The applications that we use today have evolved greatly over the years. The way we write code has improved considerably along with the way we deploy them too. Gone are the days when software deployments were planned at odd hours when active users were the least. It was done to ensure that application downtimes were kept at the minimum without affecting the user experience.
However, with the agility in the way we build software today, we needed systems that were fast, automated and intelligent. Most modern day CI/CD tools offer similar capabilities. These not only automated the deployment process but also brought down the downtime.
Deployment Strategies: Catalyst in Software Deployment
More than 75% of the organizations today employ CI/CD tools, many of them double it up with advanced deployment strategies. Most (if not all) of these strategies are aimed at eliminating downtimes for applications, reducing errors while deployment with quicker rollback options.
Some of the most common deployment strategies are:
-
Incremental: New version is rolled out slowly replacing the older version.
-
Canary: New version of the application is released to a subset of users before making it available to all.
-
Blue Green: New version is released alongside the old version, the traffic is shifted slowly to the newer version.
-
A/B Testing: New version is released to a subset of users based on specific conditions.
You can refer to strategies for application deployment to know more about these strategies. If you observe closely, all of these strategies have at least one version of the application running and accessible at a time. This way, no user will experience downtime. So the next time you see your friend using the same application, but with different features, you know how that works!
In this blog post, we’ll help you understand the Blue Green deployment strategy and how it can be achieved using DNS-based routing.
Compared to the other strategies, Blue Green deployment is one of the simpler ones. The core idea here is to maintain two identical environments - Blue and Green. These environments can live on the same physical system as two separate virtual machines with two separate IP addresses or two entirely different systems across different regions.
An existing version of the application executes on the Green environment while a newer version is pushed to the Blue environment. After you’ve tested the newer version on the Blue environment, you can simply switch the incoming traffic to the Blue environment. Once you are satisfied that the version deployed on the blue environment is working as expected, you can terminate the green environment and switch the traffic completely to the blue environment. Since this is the stable version now, this becomes the green environment. And the cycle continues.
Kubernetes however doesn’t come with Blue/Green deployment functionality out of the box. However, with building blocks like deployment and services, you can easily implement Blue/Green deployments using plain kubectl commands. In the case of environments, you will have clusters labeled as Blue or Green and achieve the functionality.
Now that you’ve understood the Blue Green deployment strategy, aren’t you curious why this was named Blue-Green in the first place? Here’s the story behind naming this Blue Green.
Traffic Routing - Backbone of Blue Green
As you might have understood, one of the critical tasks in Blue Green deployment is traffic routing. It’s because of this, you’re able to achieve zero down time for your applications. The component that helps you achieve this is load balancer.
Load balancer sits in front of your server and routes traffic to different servers that are capable of handling the traffic thus improving the performance and availability. It does so by means of load balancing algorithms that help the load balancer choose the best server to respond to a request.
DNS based routing offers certain benefits that are worth noting:
-
DNS is often the first touchpoint between your application and users, utilizing it to route traffic minimizes the total number of requests thus making the process faster.
-
DNS based routing is often offered as a managed service making it easier to scale whilst being flexible.
Having understood Blue Green deployment strategy and DNS based routing, let us look into how you can achieve it using a popular cloud native open source tool Argo Rollouts.
Argo Rollouts
Argo Rollouts is a Kubernetes controller along with a set of CRDs that provide advanced deployment capabilities such as blue-green, canary, and other progressive delivery features to Kubernetes. It can also integrate with ingress controllers and service meshes to leverage traffic shaping capabilities and shift traffic to newer versions during deployment.

Like deployment object, Argo Rollouts controller manages the creation & deletion of ReplicaSets. The ReplicaSets objects are defined in the Rollout resource using spec.template, which uses the same pod template as the deployment object. A change in spec.template signals the controller to create a new ReplicaSet. It also allows you to define the strategy to determine how the update will progress from old ReplicaSet to the new one. Once the update passes successfully, that ReplicaSet is marked as stable.
Use Case - Blue Green Deployment with DNS Routing
The use case for this blog post is going to involve a simple application written in Python and developed using the Flask web framework. The application essentially uses a weather API to fetch the latest weather forecast for a location. There are two versions of the application, one shows weather for Hyderabad and the other for New York.
The application is deployed to a Kubernetes cluster using Argo Rollouts. The cluster is hosted on Azure Kubernetes Service. We also deploy two Kubernetes services that correspond to both blue and green deployments. Public IP addresses are assigned to the services and DNS is configured for both of them. An Azure Traffic Manager profile is created with these two services as the backend.
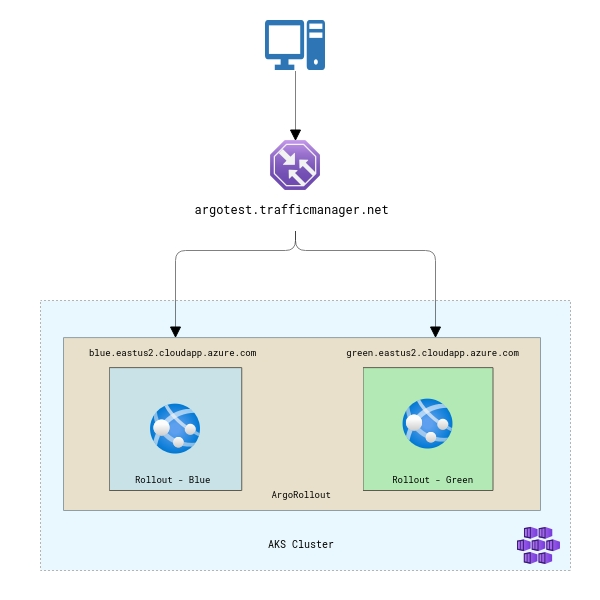
Traffic routing in this use case is done based on geography. So, people from a particular geo will see the green version of the application while people from another geo will see the blue version of the app. Azure Traffic Manager allows you to route traffic based on multiple rules like priority, weights, and geography. Refer to Azure Traffic Manager routing methods for more.
You can download all the files used in this use case from this GitHub Repo.
Implementation
To begin with, you need a Kubernetes cluster configured on Microsoft Azure. If you don’t have one, you can follow their document to deploy a cluster on AKS. You then connect to this cluster either through Azure cloud shell or by configuring your terminal to access this cluster. We prefer the latter as it allows you to work easily with the ArgoRollouts kubectl plugin.
Learn how to install the Azure CLI plugin
The next step is to clone the repository that has this example.
git clone https://github.com/infracloudio/ArgoRollout-WeatherExample-BlueGreen
Setup Argo Rollouts controller
Create a namespace to install the Argo Rollouts controller into:
kubectl create namespace argo-rollouts
Install the latest version of Argo Rollouts controller:
kubectl apply -n argo-rollouts -f https://github.com/argoproj/argo-rollouts/releases/latest/download/install.yaml
Ensure that all the components and pods for Argo Rollouts are in the running state. You can check it by running the following command:
kubectl get all -n argo-rollouts
One of the easiest and recommended ways to interact with Argo Rollouts controller is using the kubectl argo rollout plugin. You can install it by executing the following commands:
curl -LO https://github.com/argoproj/argo-rollouts/releases/latest/download/kubectl-argo-rollouts-linux-amd64
chmod +x ./kubectl-argo-rollouts-linux-amd64
sudo mv ./kubectl-argo-rollouts-linux-amd64 /usr/local/bin/kubectl-argo-rollouts
kubectl argo rollouts version
At this point we have successfully configured the Argo Rollouts controller on our Kubernetes cluster.
Blue Green Deployment with Argo Rollouts
In order to deploy our application using the Blue Green deployment strategy, we first need to deploy the sample application which contains the rollout and services.
Rollout spec:
apiVersion: argoproj.io/v1alpha1
kind: Rollout
metadata:
  name: rollout-weather-app
spec:
  replicas: 2
  revisionHistoryLimit: 2
  selector:
    matchLabels:
      app: rollout-weather-app
  template:
    metadata:
      labels:
        app: rollout-weather-app
    spec:
      containers:
      - name: rollouts-demo
        image: docker.io/atulinfracloud/weathersample:v1
        imagePullPolicy: Always
        ports:
        - containerPort: 5000
  strategy:
    blueGreen:
      # activeService specifies the service to update with the new template hash at time of promotion.
      # This field is mandatory for the blueGreen update strategy.
      activeService: weather-test-app-hyd
      # previewService specifies the service to update with the new template hash before promotion.
      # This allows the preview stack to be reachable without serving production traffic.
      # This field is optional.
      previewService: weather-test-app-ny
      # autoPromotionEnabled disables automated promotion of the new stack by pausing the rollout
      # immediately before the promotion. If omitted, the default behavior is to promote the new
      # stack as soon as the ReplicaSet are completely ready/available.
      # Rollouts can be resumed using: `kubectl argo rollouts promote ROLLOUT`
      autoPromotionEnabled: false
Services spec:
apiVersion: v1
kind: Service
metadata:
  name: weather-test-app-hyd
  annotations:
    service.beta.kubernetes.io/azure-load-balancer-internal: "false"
spec:
  selector:
    app: rollout-weather-app
  ports:
    - protocol: "TCP"
      port: 80
      targetPort: 5000
  type: LoadBalancer

---
apiVersion: v1
kind: Service
metadata:
  name: weather-test-app-ny
  annotations:
    service.beta.kubernetes.io/azure-load-balancer-internal: "false"
spec:
  selector:
    app: rollout-weather-app
  ports:
    - protocol: "TCP"
      port: 80
      targetPort: 5000
  type: LoadBalancer
In the above service.yaml file, we’re using service.beta.kubernetes.io/azure-load-balancer-internal"="false" because we want to create a load balancer in the infrastructure resource group of the cluster that will allow us to access the application from outside.
Go ahead and deploy the file to create the deployments and services. For easy deployment, we’ve combined the services and rollout mentioned above in a single yaml file: rollout.yaml.
kubectl apply -f rollout.yaml
You can verify the successful deployment by running the following command:
Accessing the application
Before accessing the application, ensure that the deployment was successful and the status is healthy/running.
$ kubectl argo rollouts get rollout rollout-weather-app

Name:        	rollout-weather-app
Namespace:   	default
Status:      	✔ Healthy
Strategy:    	BlueGreen
Images:      	docker.io/atulinfracloud/weathersample:v1 (stable, active)
Replicas:
  Desired:   	2
  Current:   	2
  Updated:   	2
  Ready:     	2
  Available: 	2

NAME                                      	  KIND    	STATUS 	AGE	INFO
⟳ rollout-weather-app                       	Rollout 	✔ Healthy  5d21h
└──# revision:1
   └──⧉ rollout-weather-app-c94c64fdb       	ReplicaSet  ✔ Healthy  6m11s  stable,active
  	├──□ rollout-weather-app-c94c64fdb-8lpkz  Pod     	✔ Running  6m11s  ready:1/1
  	└──□ rollout-weather-app-c94c64fdb-b9mpg  Pod     	✔ Running  6m11s  ready:1/1
To access the application, the first step is to identify the external IP assigned by Azure. Run the following command to get the external IP addresses.
$ kubectl get svc
NAME               	TYPE       	CLUSTER-IP 	EXTERNAL-IP 	PORT(S)    	AGE
kubernetes         	ClusterIP  	10.0.0.1   	<none>      	443/TCP    	5d22h
weather-test-app-hyd   LoadBalancer   10.0.183.118   20.22.160.180   80:31682/TCP   92s
weather-test-app-ny	LoadBalancer   10.0.206.25	20.22.161.198   80:31939/TCP   91s
Navigate to the external IP address for weather-test-app-hyd and you should see the application running. You’ll not see anything for weather-test-app-ny because we haven’t deployed a newer version to it yet.
To deploy a newer version of the application to our Kubernetes environment, run the following command & provide the newer version of the application:
kubectl argo rollouts set image rollout-weather-app rollouts-demo=docker.io/atulinfracloud/weathersample:v2
You will see new revisions created for the rollout along with new pods.
$ kubectl argo rollouts get rollout rollout-weather-app
Name:        	rollout-weather-app
Namespace:   	default
Status:      	॥ Paused
Message:     	BlueGreenPause
Strategy:    	BlueGreen
Images:      	docker.io/atulinfracloud/weathersample:v1 (stable, active)
             	docker.io/atulinfracloud/weathersample:v2 (preview)
Replicas:
  Desired:   	2
  Current:   	4
  Updated:   	2
  Ready:     	2
  Available: 	2

NAME                                       	  KIND    	STATUS 	AGE	INFO
⟳ rollout-weather-app                        	Rollout 	॥ Paused   5d21h
├──# revision:2
│  └──⧉ rollout-weather-app-55b5fbb8cc       	ReplicaSet  ✔ Healthy  14s	preview
│ 	├──□ rollout-weather-app-55b5fbb8cc-pf4x4  Pod     	✔ Running  14s	ready:1/1
│ 	└──□ rollout-weather-app-55b5fbb8cc-xft2l  Pod     	✔ Running  14s	ready:1/1
└──# revision:1
   └──⧉ rollout-weather-app-c94c64fdb        	ReplicaSet  ✔ Healthy  6m58s  stable,active
  	├──□ rollout-weather-app-c94c64fdb-8lpkz   Pod     	✔ Running  6m58s  ready:1/1
  	└──□ rollout-weather-app-c94c64fdb-b9mpg   Pod     	✔ Running  6m58s  ready:1/1
Access the green environment using the External IP address, and you should be able to see the newer version of the application deployed. Note that our environment will still have the old version of the application as we have not yet promoted the green to blue.
At this point, we have successfully deployed two versions of the application on blue and green deployment. We will now move to configuring DNS and Azure Traffic Manager for DNS based routing.
Adding DNS Label
You need to configure DNS endpoints for the Kubernetes services that you’ve created. Azure will assign a public IP address to the service, however you need to configure a DNS for it.
Navigate to Public IP addresses and locate the IP address assigned to your Kubernetes service.
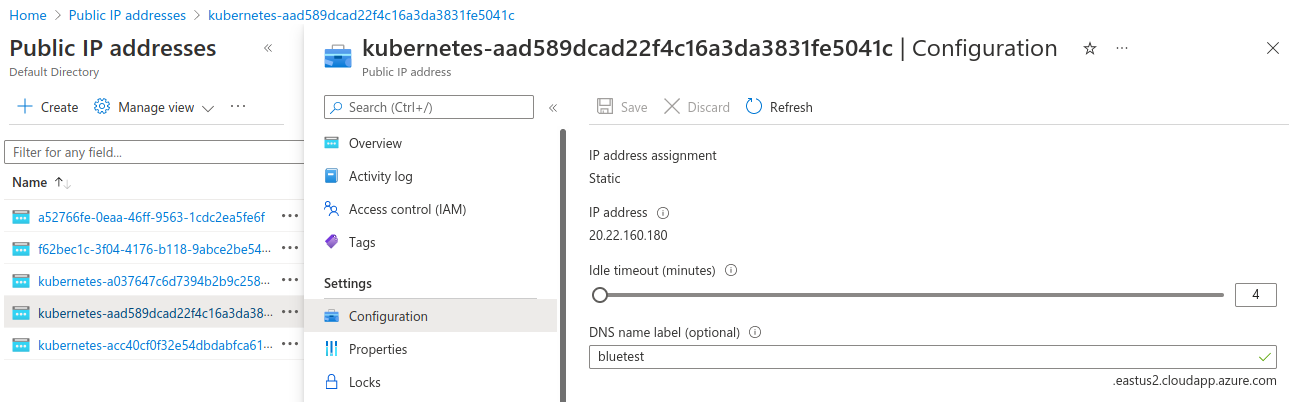
Provide a DNS name label for both the public IP addresses as that is mandatory. Without this label, you will not be able to use it as an endpoint for Azure Traffic Manager.
To validate if these are working correctly or not, copy the DNS name label along with the complete domain name and access it in a browser. You should be able to access your application.
Configuring Azure Traffic Manager
Create a new resource called Azure Traffic Manager Profile and provide the URL. In this case, the URL we gave is argotest.trafficmanager.net. This will allow us to route traffic to the above endpoints based on certain rules.
Navigate to Settings -> Configuration for Azure Traffic Manager and choose a routing method. We have used Geographic for this use case. You can choose weighted, priority etc. based on your requirement.
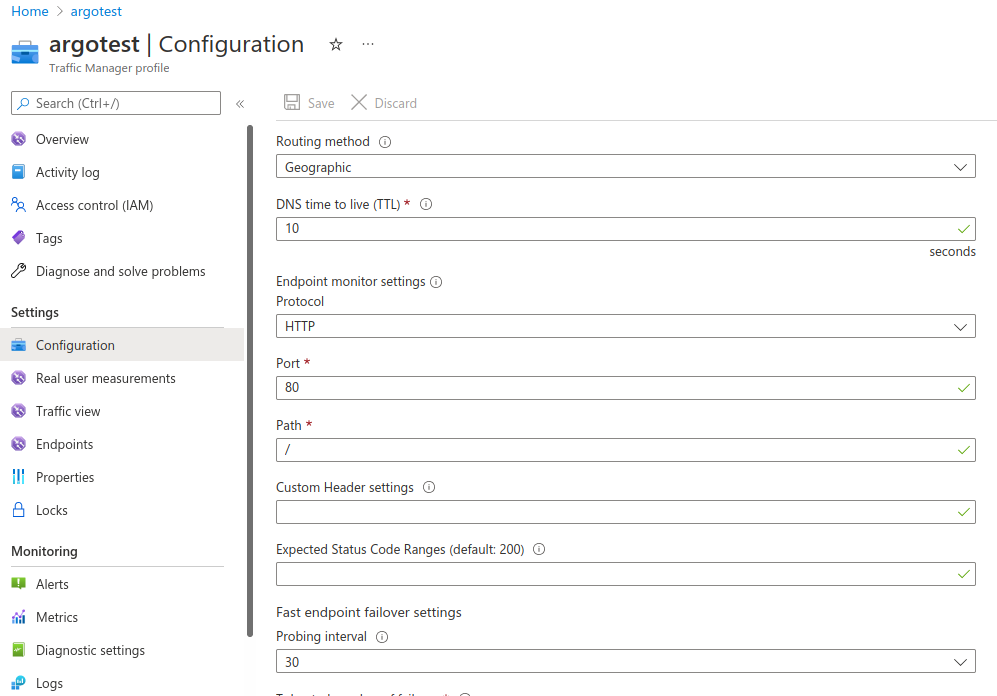
Save the configuration and move to the Endpoints section to add endpoints. These endpoints are basically where you want the traffic manager to route the traffic.
- Choose the Endpoint type as Azure Endpoint
- Provide a Name
- Choose the Target Resource Type as Public IP address
- Select the Public IP Address - will be the one that is assigned to our Kubernetes services
- Geo-Mapping, select an appropriate region/country/state
- Add endpoint
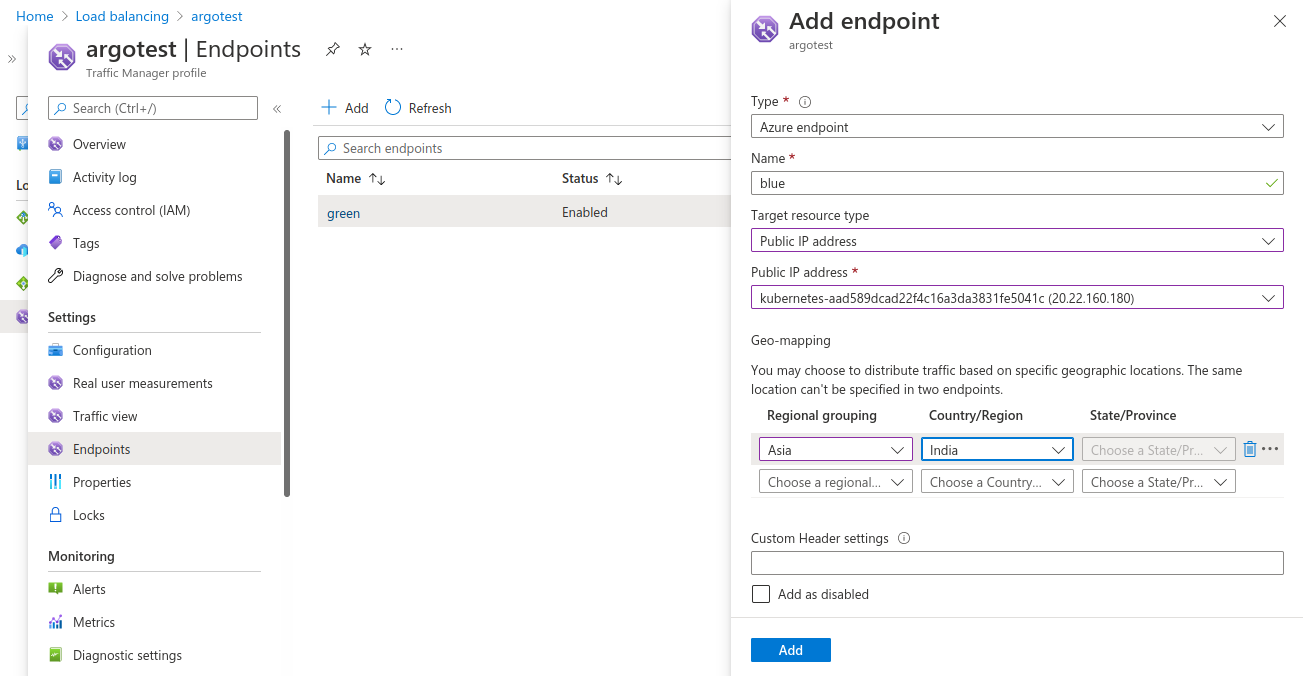
Do the same for the other endpoint. At this point we have successfully configured Azure Traffic Manager to route traffic to your blue or green deployment based on the geography selected.
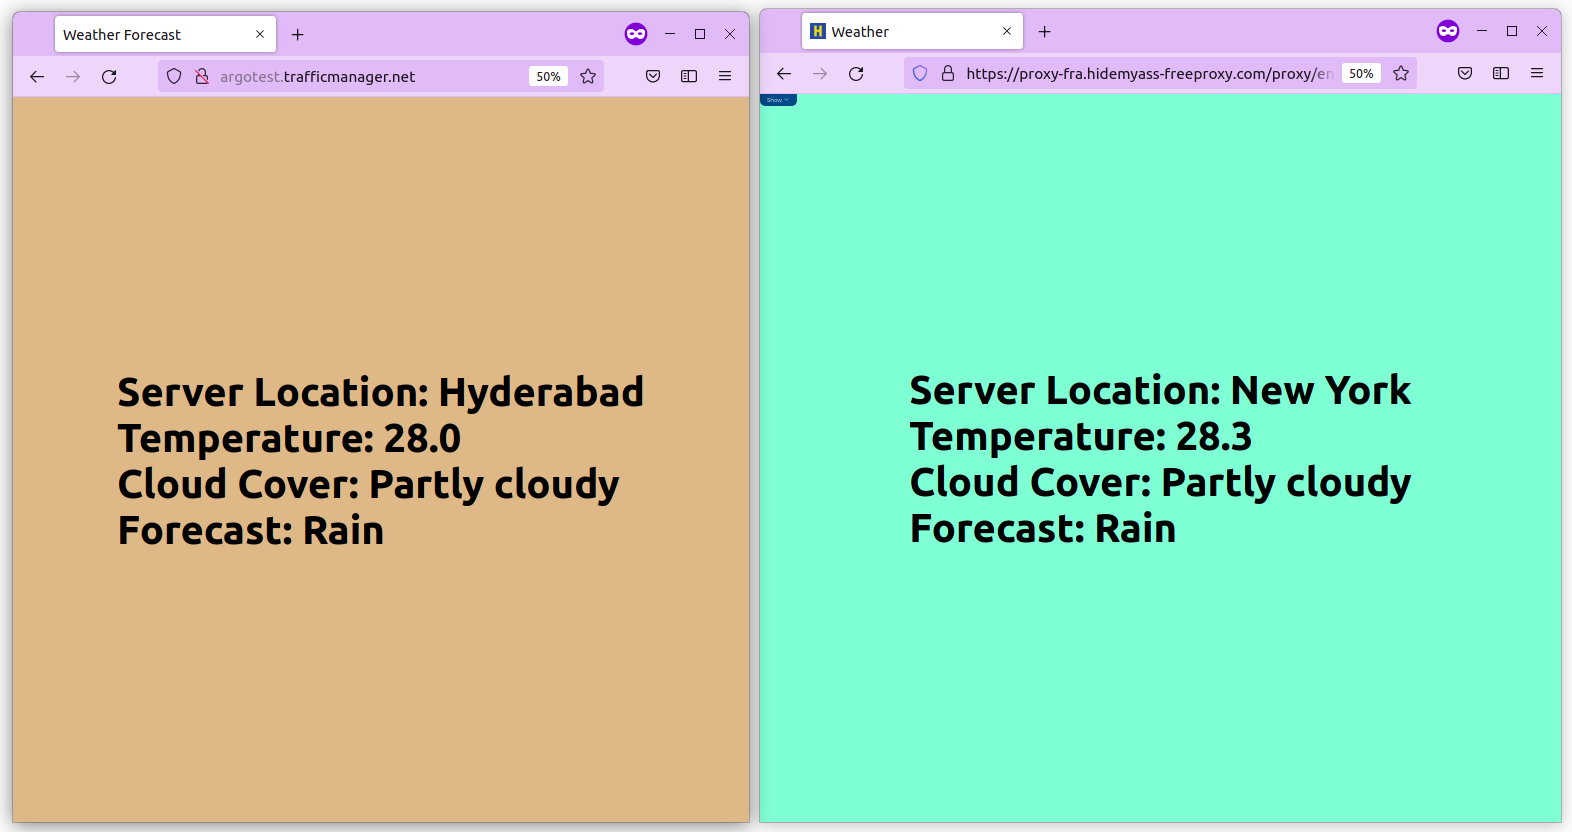
To validate, access the Azure Traffic Manager endpoint in your browser and you should see v1 of the application. In another window access the same endpoint using a VPN Proxy and choose the geo that you selected. This time you will see v2 of the application.
At this point, we have successfully configured two environments blue and green along with DNS based routing. The next step is to promote the newer version from green to blue. Run the following command to do so:
kubectl argo rollouts promote rollout-weather-app
Now we have promoted the v2 of the application to a blue environment. Now if you access the URL from your browser, you will see the v2 of the application instead of the v1 that you saw earlier.
Similarly, you can push a new version to the green environment and switch the traffic based on your requirements and achieve the blue green strategy with DNS routing.
Benefits of Blue Green with DNS Routing
Blue Green deployment comes with a suite of benefits itself. However, by enabling DNS routing for it, we are able to take things a notch further. With this approach we are able to:
- Achieve near zero downtime for application deployments because of the DNS based routing that allows you to switch between the environments
- You can test your deployments with a certain group of users before making it available to all your users & get early feedback.
-
Faster Disaster Recovery as you just need to switch the traffic.
Summary
Software deployment strategies have evolved over the years. From the big bang approach faster and smarter progressive delivery practices are making software deployments easier. Blue Green deployment is one of the popular approaches. By adding DNS based routing to it, we are able to reap greater benefits.
Feel free to reach out to Atul for any thoughts or feedback on this post. If you don’t yet have a robust software delivery pipeline in place, you can reach out to our CI/CD experts who can help you to design and implement such strategies to improve your software delivery processes.
References & Further Reading
Looking for Progressive Delivery consulting and support? Explore how we’re helping companies adopt progressive delivery - from creating a roadmap to successful implementation, & enterprise support.