Writing Serverless workloads on Kubernetes with Fission
The concept of serverless architecture has been around for quite some time now, but many of us don’t have a clear understanding of what serverless architecture is. In this blog post, we will try to explain the serverless architecture and we will dive deep into how we can achieve that on top of Kubernetes using Fission.
Serverless Architecture
When we say serverless, we actually mean that the server/runtime to run your program/workload is not running when your workload is not getting any requests, or the server/runtime only runs when your workload is receiving any kind of requests. This architecture has several benefits from the traditional architecture where our servers run even when the workload deployed on those servers is not actually receiving any requests. One of the benefits that I can think of, of this architecture, on top of my head is the cost. If your server/runtime only runs when the workload receives the request, you won’t be paying for the time when your function was not getting any requests.
Now, the above architecture has its own issues as well. For example, when your workload/program gets the first request it would take some time to start the server to serve that first request. In other words, the first request that will be served is going to take a considerably large amount of time. The time that your serverless workload would take to serve the first request is often referred as Cold Start time and there are ways to resolve this issue, we will discuss at the end of the post.
Now that we have some basic understanding of serverless architecture, let’s see how we can implement that on top of Kubernetes using Fission.
What is Fission?
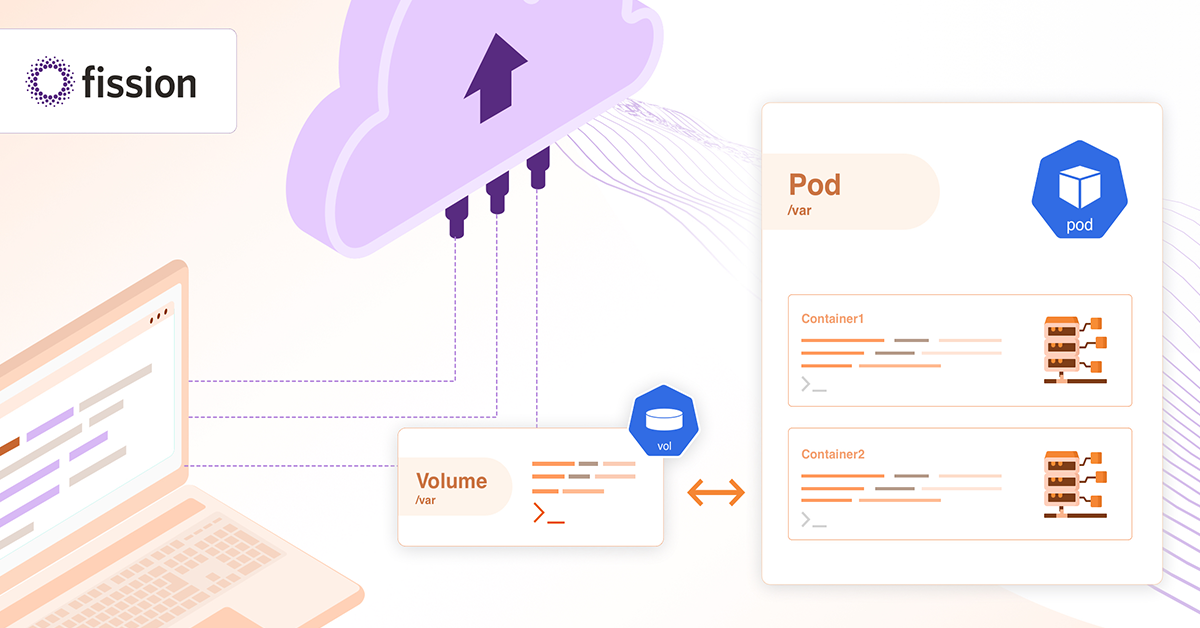
Fission is an open-source project written in Go, and it enables us to write serverless workloads on Kubernetes. Fission uses the Kubernetes native and custom resources very heavily to achieve serverless architecture. For example, the Environments, Functions are created leveraging CRDs and functions are run using Pods.
Let’s first look into some of the terminologies that we use while working with Fission, very frequently:
Environment
In simple terms, we can say that Environment has runtime or server that is going to host your Fission function. For example, if you have your workload written in Python, you will create a Fission environment mentioning the Python runtime that you are going to use.
Function
Fission functions are resources that are created to deploy your workload on Kubernetes. We can directly specify the code that a specific Fission function will host or we can specify the package after building the package out of the code.. If your function is going to use or is dependent on a ConfigMap or Secret resource you can specify that as well while creating the Fission function.
Package
Packages are generally used when your workload has some external dependencies and it should be built with those external dependencies. In that case, you create the package and specify this package name instead of source code while creating the Fission function.
Triggers
Once we have the function created, triggers are created to decide how are we going to call a particular function.
Fission uses Kubernetes custom resource very extensively and provides us with some custom resources, for example,
canaryconfigs.fission.io
environments.fission.io
functions.fission.io
httptriggers.fission.io
kuberneteswatchtriggers.fission.io
messagequeuetriggers.fission.io
packages.fission.io
timetriggers.fission.io
you might have guessed that when we create a function Fission resource, a CR for CRD functions.fission.io gets created and it will have all the details that we gave while creating function Fission resource. Since functions eventually are Kubernetes resources we can use the Kubernetes command-line tool (kubectl) to manage them. But Fission also provides it’s own CLI that can be used to manage Fission resources like Functions, Routes, and Triggers.
Note:
Below is the detail of Kubernetes setup that I have set up using minikube
$ kubectl version
Client Version: version.Info{Major:"1", Minor:"17", GitVersion:"v1.17.2", GitCommit:"59603c6e503c87169aea6106f57b9f242f64df89", GitTreeState:"clean", BuildDate:"2020-01-18T23:30:10Z", GoVersion:"go1.13.5", Compiler:"gc", Platform:"linux/amd64"}
Server Version: version.Info{Major:"1", Minor:"17", GitVersion:"v1.17.0", GitCommit:"70132b0f130acc0bed193d9ba59dd186f0e634cf", GitTreeState:"clean", BuildDate:"2019-12-07T21:12:17Z", GoVersion:"go1.13.4", Compiler:"gc", Platform:"linux/amd64"}
$ minikube version
minikube version: v1.6.2
commit: 54f28ac5d3a815d1196cd5d57d707439ee4bb392
How to Install Fission?
If you have a Kubernetes cluster setup already the best way to install Fission is using Helm. Please make sure Helm is installed and set up correctly and run the below commands to install Fission in your Kubernetes cluster. You can follow this link to know more about how to install Fission on other platforms or using other ways.
$ export FISSION_NAMESPACE="fission"
$ kubectl create namespace $FISSION_NAMESPACE
$ helm install --namespace $FISSION_NAMESPACE --name-template fission \
https://github.com/fission/fission/releases/download/1.8.0/fission-all-1.8.0.tgz
Once you have Fission, you will get all the core Fission components running in the fission namespace and two other namespaces will be created named fission-function and fission-builder.
To install Fission command line tool please run below command
$ curl -Lo fission https://github.com/fission/fission/releases/download/1.8.0/fission-cli-linux && chmod +x fission && sudo mv fission /usr/local/bin/
Please make a note that if you running this on any other machine except Linux systems you might have to follow another command to install the CLI. The CLI installation command can be found by running below command
$ helm status fission -n fission
Using Fission to deploy your code
Once we have Fission core components and CLI installed we can go ahead with writing Fission functions. Let’s assume that we have Python function that accepts a JSON request, extracts the name field from that JSON request and then sends the name back to the caller.
Creating Fission environment
To create our function, as discussed in the previous step we will first have to create an environment, since our code is in Python, we will create an environment specifying python image. Please use the below code to create your Fission environment
$ fission env create --name py-env --image fission/python-env
environment 'py-env' created
As soon as this environment is created you will see that some pods are automatically spinned up in the fission-function namespaces. These pods will be responsible to serve the requests that will come to the functions deployed on this environment.
The --image flag while creating the Fission environment resource has the runtime to run your function, the list of supported runtimes can be found in this Fission Documentation. If there are some specific things for example dependencies that your function requires, you are totally free to create your own environment image. And then that environment image can be used while creating the environment.
Creating the Fission function
Please create a file named main.py with below content
from flask import request

def main():
    req_body = request.data
    # decode req_body to string using .decode
    return "Request that we received is: "+req_body.decode("utf-8")
To create a function out of this source code please use below command
$ fission fn create --name main --code main.py --entrypoint main.main --env py-env
Package 'main-5da1f60d-4a0a-4c18-a9ca-215c953d2005' created
function 'main' created
Once we have created the function let’s test this function by passing a request body to make sure it works as expected and returns the request body that gets passed to it. Use below command to test the function
$ fission fn test --name main  --body='{"name":"John"}' --method POST
Request that we received is: {"name":"John"}
Once we are sure that the function runs as expected using the command, fission fn test we can go ahead to create a trigger that will be used to call this function. For example, if you want to call your function through an HTTP endpoint you will have to create an HTTP trigger. There are other trigger types supported by Fission platform that can be found in this Fission Document.
Creating the Trigger
In this example, we are going to create an HTTP trigger but we will also see other triggers that Fission provides. Please use below command to create an HTTP trigger
$ fission ht create --name main --url /main --method POST --function main --createingress=true
In the above command, we define the resource path where this function (--function main) would be listening at, using the flag --url. Another flag to take a look here is --createingress , this flag instructs Fission to create a Kubernetes ingress resource for this HTTP trigger. So that we can access/call the provided from outside of the cluster.
The ingress resources won’t work until we have an ingress controller installed in our cluster, since we are doing this in minikube, there is an easy way to enable/start ingress controller. To start the ingress controller please use below command
$ minikube addons enable ingress
After running this command you can check the kube-system namespace in case of minikube and you will see a pod named in the format nginx-ingress-controller.
Now that we have an HTTP trigger created, let’s go ahead and try to call the function from outside of the cluster. To do that you will have to figure out the minikube IP, please use below command to get minikube IP
$ minikube ip
192.168.99.100
In my case the IP is 192.168.99.100 but it could be different in your cluster, let’s open the Postman tool now and try to make a POST request with some request body
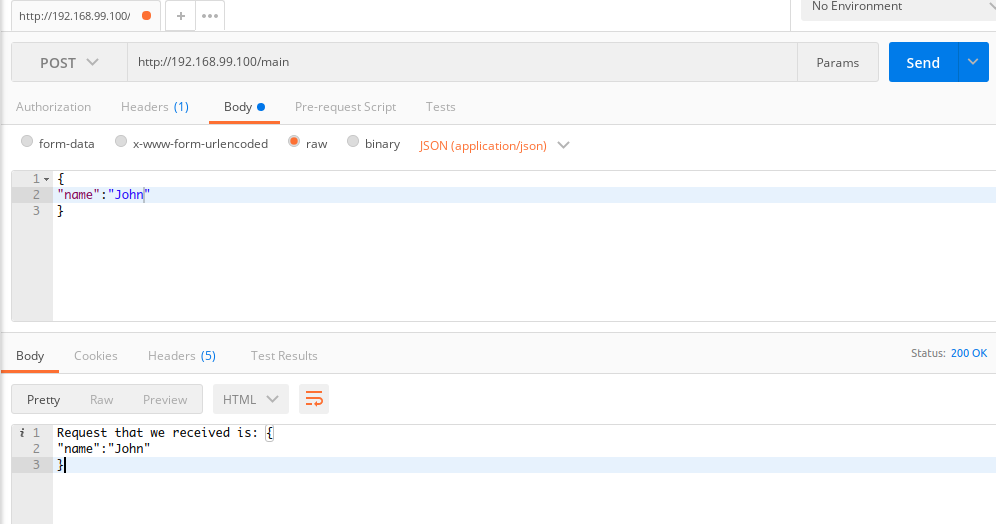
And as you can see we are successfully able to call the function from outside of cluster using HTTP triggers.
Eliminating Cold Start
Fission provides two types of executor types for your function, NewDeploy, and PoolManager. When you create the environment without specifying any executor type, PoolManager is selected. In other words, we can say that PoolManager is the default executor type for Fission environments. In the case of PoolManager executor type, when we create an environment a pool of pods is created. When we get a request for a particular function, the source code/build of that function is loaded into one of the pods from that pod’s pool.
On the other hand, if you are using NewDeploy as executor type the source code/build of the function is already loaded into the pod. So if you maintain one replica of the pod and use NewDeploy as executor type, you can eliminate the cold start. The reason for that is, having one replica will make sure that the pod is running and NewDeploy executor type will load the function code already and don’t wait for the function to be actually called. More about executor types.
Share your queries or suggestion with us via Twitter.
Looking for help with implementing serverless? learn why so many startups & enterprises consider us as one of the best serverless consulting & services providers.
Stay updated with latest in AI and Cloud Native tech
We hate 😖 spam as much as you do! You're in a safe company.
Only delivering solid AI & cloud native content.
Posts You Might Like