Kubernetes Workload Management using Karpenter

What if we didn’t have to worry about configuring Node Groups, or right-sizing compute resources beforehand in our Kubernetes infrastructure? You read it right, Karpenter does not use Node Groups to manage the workload. Instead, it uses Launch Templates for nodes and manages each instance directly without configuring any orchestration mechanism. Karpenter allows you to take full advantage of the cloud’s flexibility. Before Karpenter, Kubernetes users had to use Amazon EC2 Auto Scaling Groups and the Kubernetes Cluster Autoscaler or some custom script cron job to dynamically adjust their cluster compute capacity. In this article, we will cover in detail how to improve the efficiency and cost of running workloads in Kubernetes using Karpenter.
What is Karpenter?
Karpenter is an open source provisioner tool that can quickly deploy Kubernetes infrastructure with the right nodes at the right time. It significantly improves the efficiency and cost of running workloads on a cluster. It automatically provisions new nodes in response to un-schedulable pods.
How is Karpenter different from Cluster Autoscaler?
-
Designed to handle the cloud’s full flexibility: Karpenter can support the full range of instance types offered by Amazon Web Services. Also, you can choose the purchase options like On-Demand and Spot, Availability Zone options. The Cluster Autoscaler was not built with the ability to handle hundreds of instance types, zones, and purchase options.
-
Group-less node provisioning: Karpenter manages each instance directly, without using additional orchestration mechanisms such as node groups. Whereas Cluster Autoscaler works with node groups.
-
Scheduling enforcement: After determining launch capacity and scheduling constraints, Karpenter optimistically creates the Node object and binds the pod to it immediately. In contrast, Cluster Autoscaler does not bind pods to the nodes it creates. Instead, it relies on the kube-scheduler to make the same scheduling decision after the node has come online.
-
Right-sizing: In the case of Karpenter, we don’t have to worry about right-sizing the compute resources beforehand. It gives us the flexibility to define multiple resource types which minimizes the operational overhead and optimizes the cost. Cluster Autoscaler requires you to define compute resources beforehand.
How does Karpenter work?
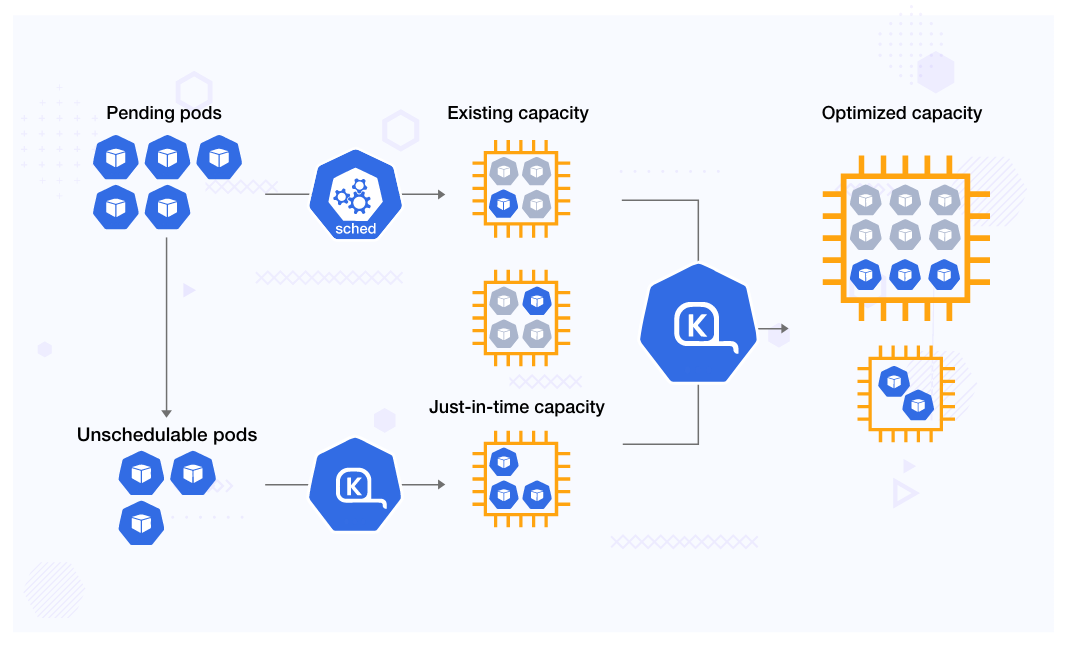
As Karpenter is tightly integrated with Kubernetes features, it observes events within a Kubernetes cluster and then sends commands to the cloud provider. As new pods are detected, scheduling constraints are evaluated, nodes are provisioned based on the required constraints, pods are scheduled on the newly created nodes, and nodes are removed when no longer needed to minimize scheduling latencies and infrastructure costs.
The key concept behind this is the custom resource named Provisioner. It is used by Karpenter to define provisioning configurations. Provisioners contain constraints that affect the nodes that can be provisioned and the attributes of those nodes (for example, timers for removing nodes).
The Provisioner can be set to do things like:
- Define taints to limit the pods that can run on Karpenter’s nodes.
- Limit the creation of nodes to certain zones, instance types, operating systems, and computer architectures (for eg. ARM).
- Instruct Karpenter that it should taint the node initially, but that the taint is temporary by defining startup taints.
- Set defaults for node expiration (timers).
Key Features & Benefits of Karpenter
-
Consolidation: When enabled, Karpenter will actively reduce cluster cost by identifying when a node can be removed as its workload can be handled on other cluster nodes and when a node can be replaced with a cheaper variant due to a change in workload.
-
Provisioners, as Kubernetes custom resources, are much more flexible than EKS-managed node groups (for example, instance types are an immutable parameter on managed node groups, but not on a Provisioner).
-
Rapid node launch times with efficient response to dynamic resource requests.
-
Cost saving: Spot instances can be used with On-Demand fallbacks.
-
Karpenter respects your pod disruption budgets when it goes to scale nodes down and when it evicts pods.
-
Flexible method to provision GPU node depending on workload and using GPU time-slicing for cost saving.
Deploying Karpenter
Firstly, we need to create an IAM role that the Karpenter controller will use to provision new instances. The controller will be using IAM Roles for Service Accounts (IRSA) which requires an OIDC endpoint. Details can be found here: karpenter-IRSA-details
Step 1: Applying karpenter custom resource definitions:
-
Provisioner:
kubectl apply -f https://raw.githubusercontent.com/aws/karpenter/main/pkg/apis/crds/karpenter.sh_provisioners.yaml -
AWS Node Template:
kubectl apply -f
https://raw.githubusercontent.com/aws/karpenter/main/pkg/apis/crds/karpenter.k8s.aws_awsnodetemplates.yaml
Step 2: Refer to the values file accordingly: karpenter-values-sample
Step 3: Installing or upgrading the karpenter:
helm upgrade --install \
        karpenter karpenter/karpenter\
        --version 0.26.1 \
        --values custom-values.yaml \
        --namespace karpenter \
        --wait
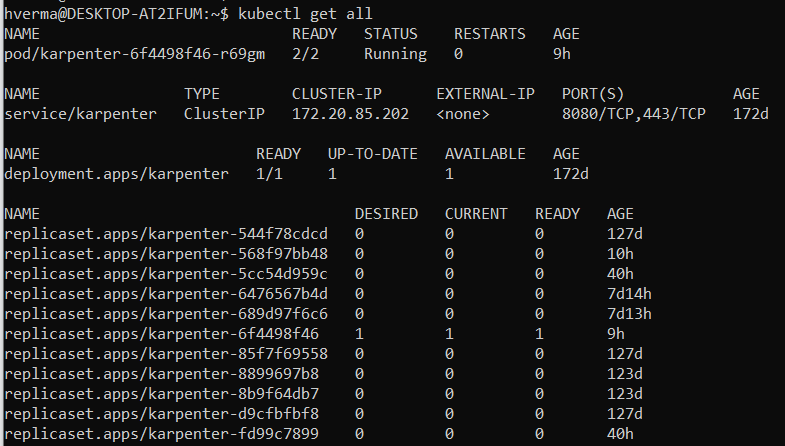
After the installation is complete, we can see the following resources are created:
Step 4: Once the karpenter pods are up and running, refer to the sample Provisioner file and update it accordingly: karpenter-provisioner-sample
-
Enabling consolidation feature: You may enable this feature to actively reduce cluster cost. Karpenter does this by identifying when a node can be removed as its workload can be handled on other cluster nodes:
spec: consolidation: enabled: true -
Utilizing Node Templates: It enables configuration of AWS-specific settings like:
- spec.subnetSelector
- spec.securityGroupSelector
- spec.amiFamily
-
spec.amiSelector
    providerRef:
         name: ${LABEL}-provisioner-ref

    ---
    apiVersion: karpenter.k8s.aws/v1alpha1
    kind: AWSNodeTemplate
    metadata:
        name: ${LABEL}-provisioner-ref
-
Making use of spot instances to reduce the cost of workloads in the lower test environments:
- key: karpenter.sh/capacity-type operator: In values: ["on-demand","spot"] -
Under the “- key: kubernetes.io/arch”, we can even utilize the arm64 architecture to have extra savings along with amd64 architecture:
  - key: kubernetes.io/arch
    operator: In
    values: ["arm64"]
For more details about the spec, see Provisioners page from Karpenter documentation.
Step 5: Make the required changes and apply the provisioner CRD:
kubectl apply -f provisioner.yaml
Cost Reduction - Using Spot and On-Demand Flexibility
The real-world problem that Karpenter can help solve is managing workload fluctuations in a cost-effective manner. Traditionally, manual scaling of worker nodes is required to handle increased traffic, which can be time-consuming and costly. Karpenter’s efficient response to dynamic resource requests enables users to handle increased traffic without downtime. To reduce the costs, spot instances can be used with on-demand fallbacks. Additionally, Karpenter provides time-slicing GPU nodes, allowing users to run high-performance computing workloads. These features help users optimize their resources and save costs while ensuring their workloads run efficiently.
Limitations of Karpenter
- Currently, it’s tied to Amazon Web Services only.
- Karpenter’s pod still needs to be deployed within a managed node group. But with new changes, it can be run on Fargate.
Some Learnings
-
Before enabling the consolidation feature, make sure to have appropriate CPU/RAM request/limit assigned to all the pods. If this is not set correctly, you will get lots of out-of-memory, timeout in readiness, and liveness probe and pods crashing/latency issues. This happens because Karpenter provisions the node based on Request/Limit. If any pod does not have any Request/Limit defined, it can consume most of the worker node resources and when Karpenter assigns a new pod to this node, it will not get all requested resources.
-
On the critical batch job, you can add annotation
karpenter.sh/do-not-evict: "true"so that the node is not de-provisioned until the job is completed. -
During Load/Performance testing, disable the consolidation and spot instance feature to get better results.
-
Do not delete Provisioner as It will delete all worker nodes provisioned by it. If you want to keep the worker node provisioned by the provisioner then delete the ec2 tag.
karpenter.sh/provisioner-name. Once the tag is removed it will not be managed by Karpenter. You will need to manually drain and delete this node. -
Reserved system resources if you have an antivirus, monitoring, and auditing agent running on a worker node so that it does not affect pods.
-
Spec.userdata can be used to install any software tools during worker node booting.
-
It’s always better to set resource limits for all the provisioners so that any unwanted pod or batch jobs can not add unexpected bills.
-
Spot instance does not work well if your pod does not have a proper graceful shutdown and Pod lifecycle.
-
It’s better to have 2 replicas of the Karpenter pod running as all provisioning task is managed by it.
Summary
Karpenter allows us to do much more than Kubernetes Cluster Autoscaler regarding provisioner configurations. For example, Karpenter directly manages the node group without ASG, new pods get bound immediately to the node. Thus, making it much faster than the Autoscaler.
We can greatly reduce the cost of infrastructure by using a flexible provisioner which dynamically allocates Spot and On-Demand instances. Using a provisioner, you can create arm64 (AWS Graviton) worker nodes that reduce cost and boost performance. By enabling the consolidation feature it automatically adjusts the cluster size by deleting underutilized nodes and consolidating pods into fewer right-size nodes.
Thanks for reading this post. We hope it was informative and engaging for you. We would love to hear your thoughts on this post, so do start a conversation on LinkedIn.
Looking to adopt cloud native and Kubernetes stack? Learn why so many startups and enterprise trust InfraCloud as one of the best Kubernetes consulting services provider for Kubernetes adoption and implementation.
Stay updated with latest in AI and Cloud Native tech
We hate 😖 spam as much as you do! You're in a safe company.
Only delivering solid AI & cloud native content.
Posts You Might Like