A/B Testing with Linkerd and Flagger using Dynamic Routing
 Pranoy Kundu
  Hitesh Wani
 Managing the flow of requests between different services is a crucial aspect of communication among services. Request routing enables us to direct incoming traffic to specific services based on various criteria, such as headers, query parameters, or other aspects of the request. Request routing is essential, but it can become challenging to manage with existing tools.
Suppose you have a microservices-based application with multiple service versions running simultaneously. You wish to gradually roll out a new version of the application to a subset of users for A/B testing. However, the existing load balancers or ingress controllers lack the granular control for such a scenario.
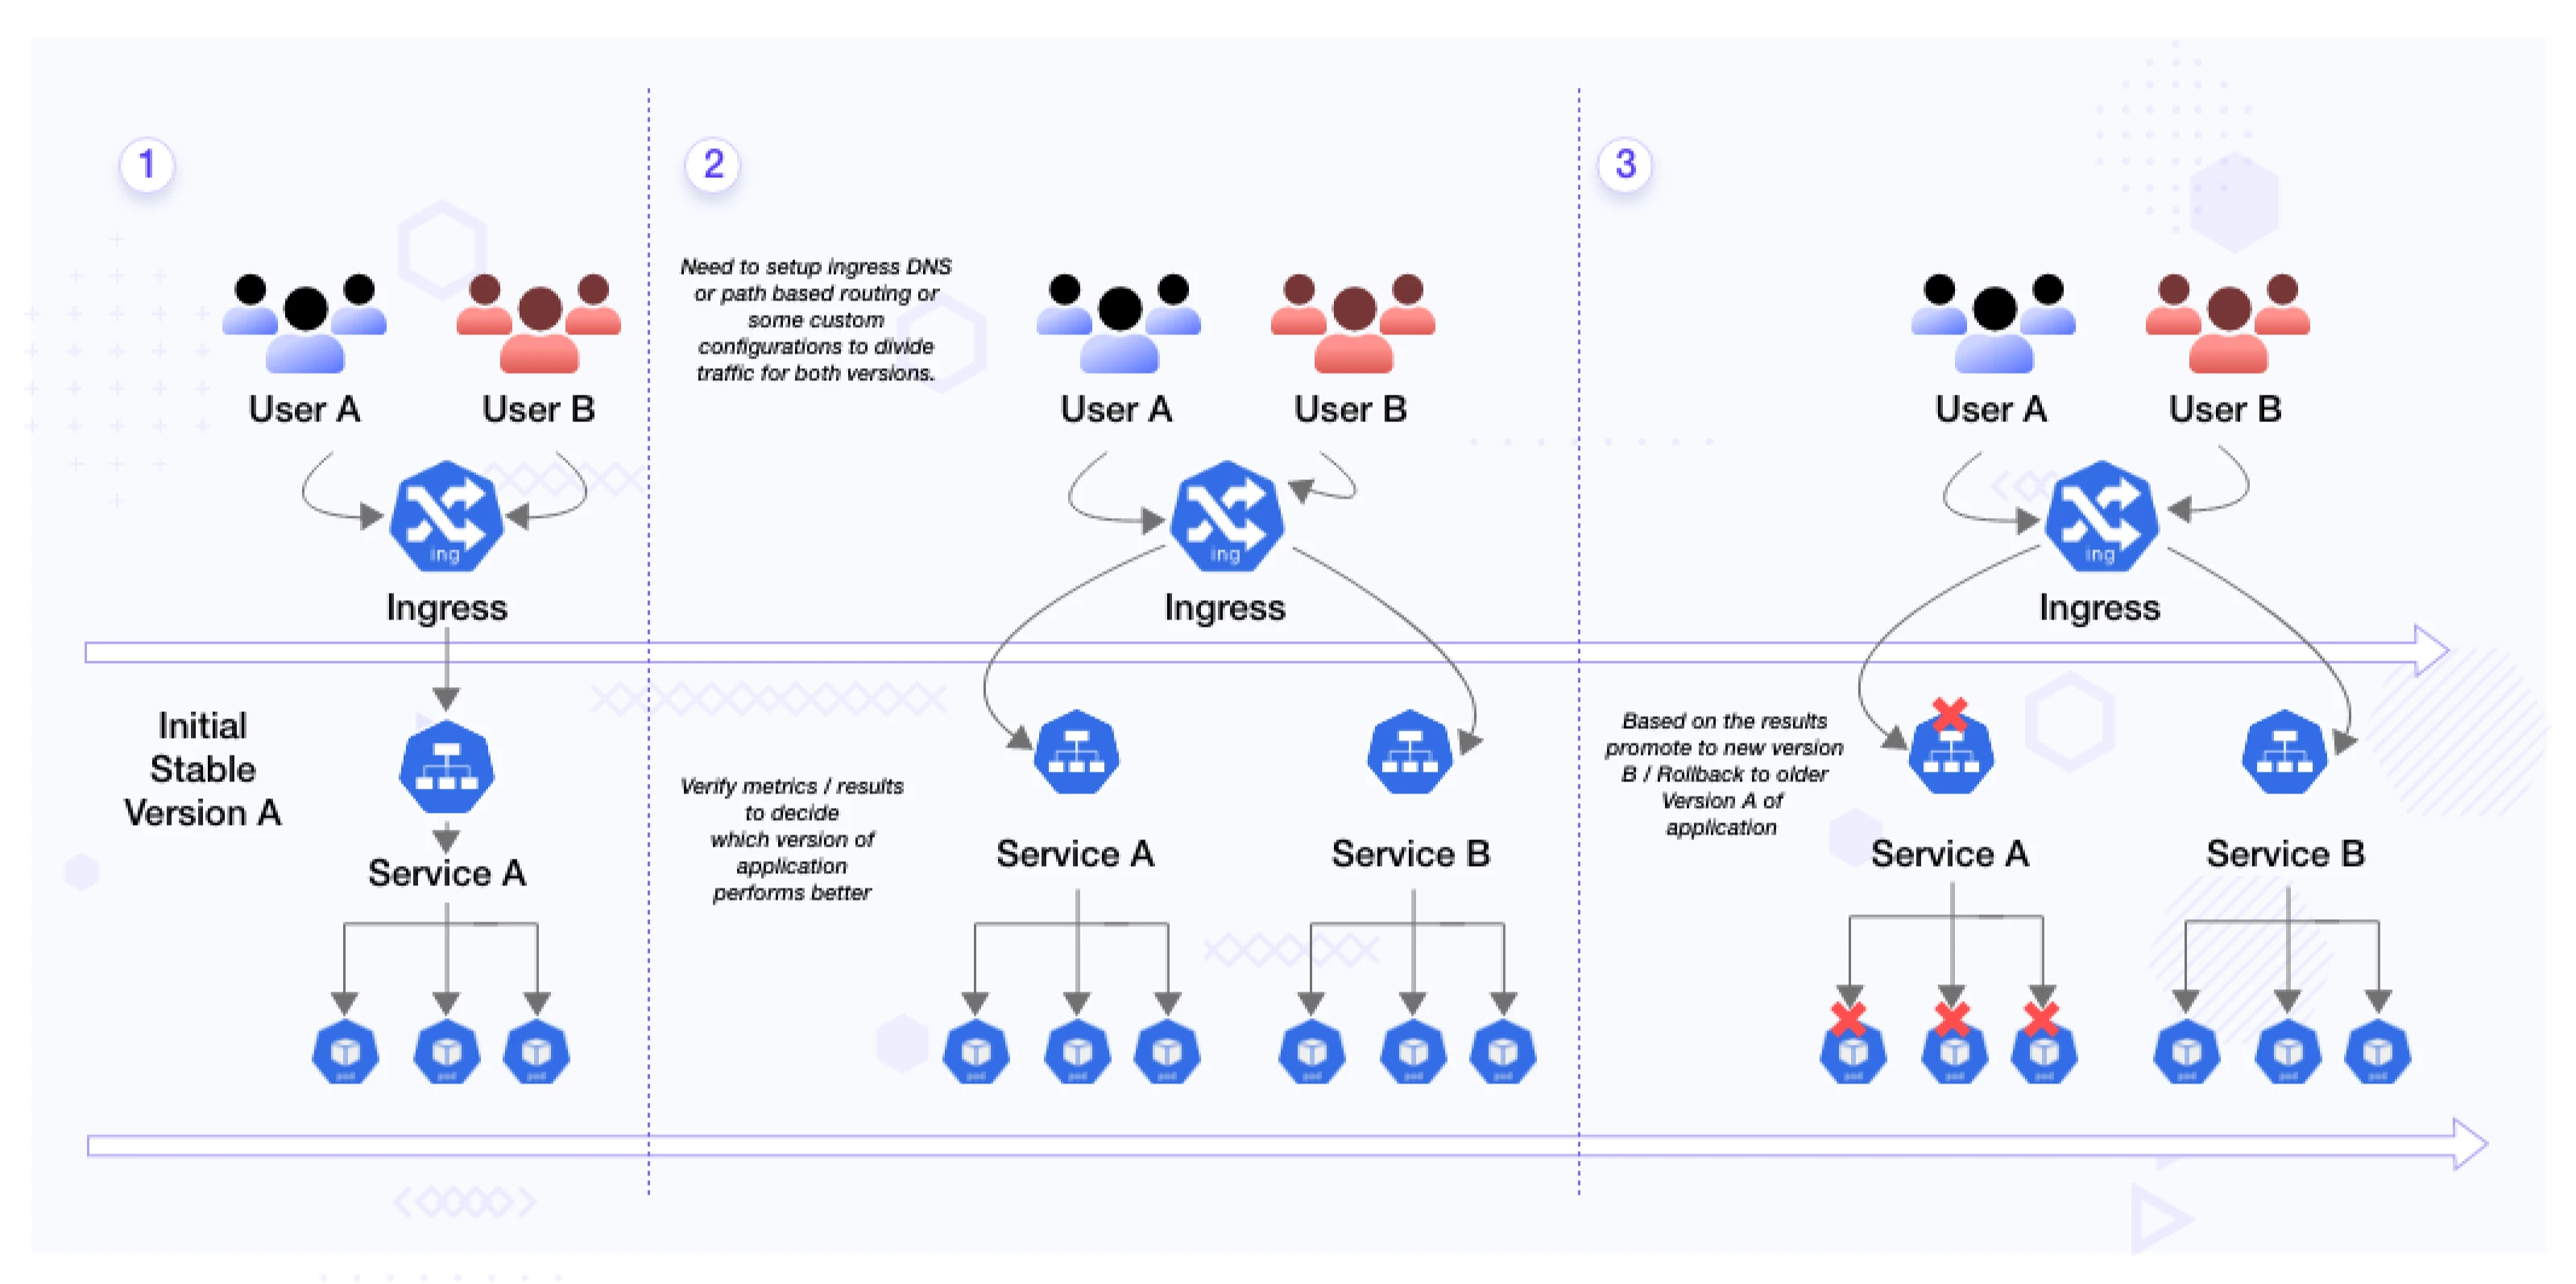
When using a traditional ingress controller in this scenario, you deploy both versions of your checkout service (A and B) behind the ingress controller. The absence of fine-grained traffic splitting capabilities in traditional ingress controllers means you have to configure manual techniques like DNS-based routing or custom configurations to divide the traffic between the two versions. Additionally, setting up separate monitoring and alerting systems becomes necessary to collect metrics and detect issues with both service versions, leading to complexity and time-consuming efforts.
This is where service mesh like Linkerd comes to the rescue. Service mesh provides a dedicated infrastructure layer that handles communication between microservices. They offer advanced features like dynamic request routing, service discovery, traffic control, and observability. By leveraging Linkerd’s dynamic request routing feature, we can easily route specific requests to different versions of services based on custom criteria, making A/B testing and gradual rollouts a breeze. If you want to know more about what are service meshes, and the benefits they bring, read this blog post on service mesh 101.
Linkerd’s dynamic request routing feature has been introduced in Linkerd 2.13. It leverages the Kubernetes Gateway API feature, which reduces the amount of new configuration machinery introduced onto the clusters while still providing a rich and expressive feature set. In this blog post, we will look at Linkerd’s dynamic request routing feature and use it for A/B testing using Flagger.
First, let’s understand the dynamic request routing.
What is dynamic request routing?
Dynamic request routing means that the route’s location is decided at the runtime by some predefined protocols or algorithms. The routing can be at different times or different locations.
What is the role of dynamic request routing?
Dynamic request routing can be used to deliver a variety of exciting features onto your platform:
- Sticky sessions
- A/B testing
- Dynamic staging environment
- User-based canary rollouts
Dynamic request routing also helps with some additional functions like:
- Increasing flexibility to route the traffic.
- Improving security by restricting unauthorized access to application resources.
- Reducing complexity due to the reduction of your application’s routing logic. It also results in ease in maintaining and troubleshooting application routes.
As we covered dynamic request routing, let’s now understand A/B testing quickly.
What is A/B testing?
A/B testing is a methodology to test two versions of a webapp or an application. It’s an experiment where two or more variations of a variable like web page, route, etc., are shown to users at random or to a predefined set of users. Developers can later collect different metrics and do a statistical analysis to determine which process suits the users better. With statistical analysis, developers and product managers can move from ‘we think’ to ‘we know’ on what works best for the user and where the team needs to focus more on improvement.
Why A/B testing?
There are many reasons organizations do A/B testing. Some of the reasons are:
- A/B testing helps in making conscious changes to the product based on the analytical feedback.
- We can continuously run A/B testing to improve the product based on the experience continually.
- With A/B testing, we can move entirely towards making our decisions based on reliable data rather than guesswork.
- A/B testing also helps in making incremental changes to your webpage based on feedback in the form of statistical analysis.
- A/B testing helps you increase user engagement by identifying and optimizing the elements that resonate best with your audience.
How to perform A/B testing?
To design a practical A/B test, consider the following key elements:
-
Define A and B versions: Based on the hypothesis created, you can deploy the baseline version (A) and the new version (B) of your application also called as canary version. These versions can include different features, UI changes, or any modifications you want to test. Remember that you have to keep everything else the same in both app versions except the changes you wish to test.
-
Configure routing: Define specific HTTP headers (e.g., x-backend) to route traffic to the canary environment. Ensure that only a fraction of the traffic is routed using these headers. We use this approach to target specific users or segments for A/B testing.
-
Monitor metrics and analyze results: Monitor metrics such as request success rate, latency, error rates, etc. Compare metrics between versions A and B and detect anomalies or deviations.
-
Compare and decide: Analyze the result for some time and make an informed decision on which version of the application performs better.
-
Rollback and iteration: If metrics indicate a negative impact, you can easily roll back to baseline version A.
Flagger and Linkerd
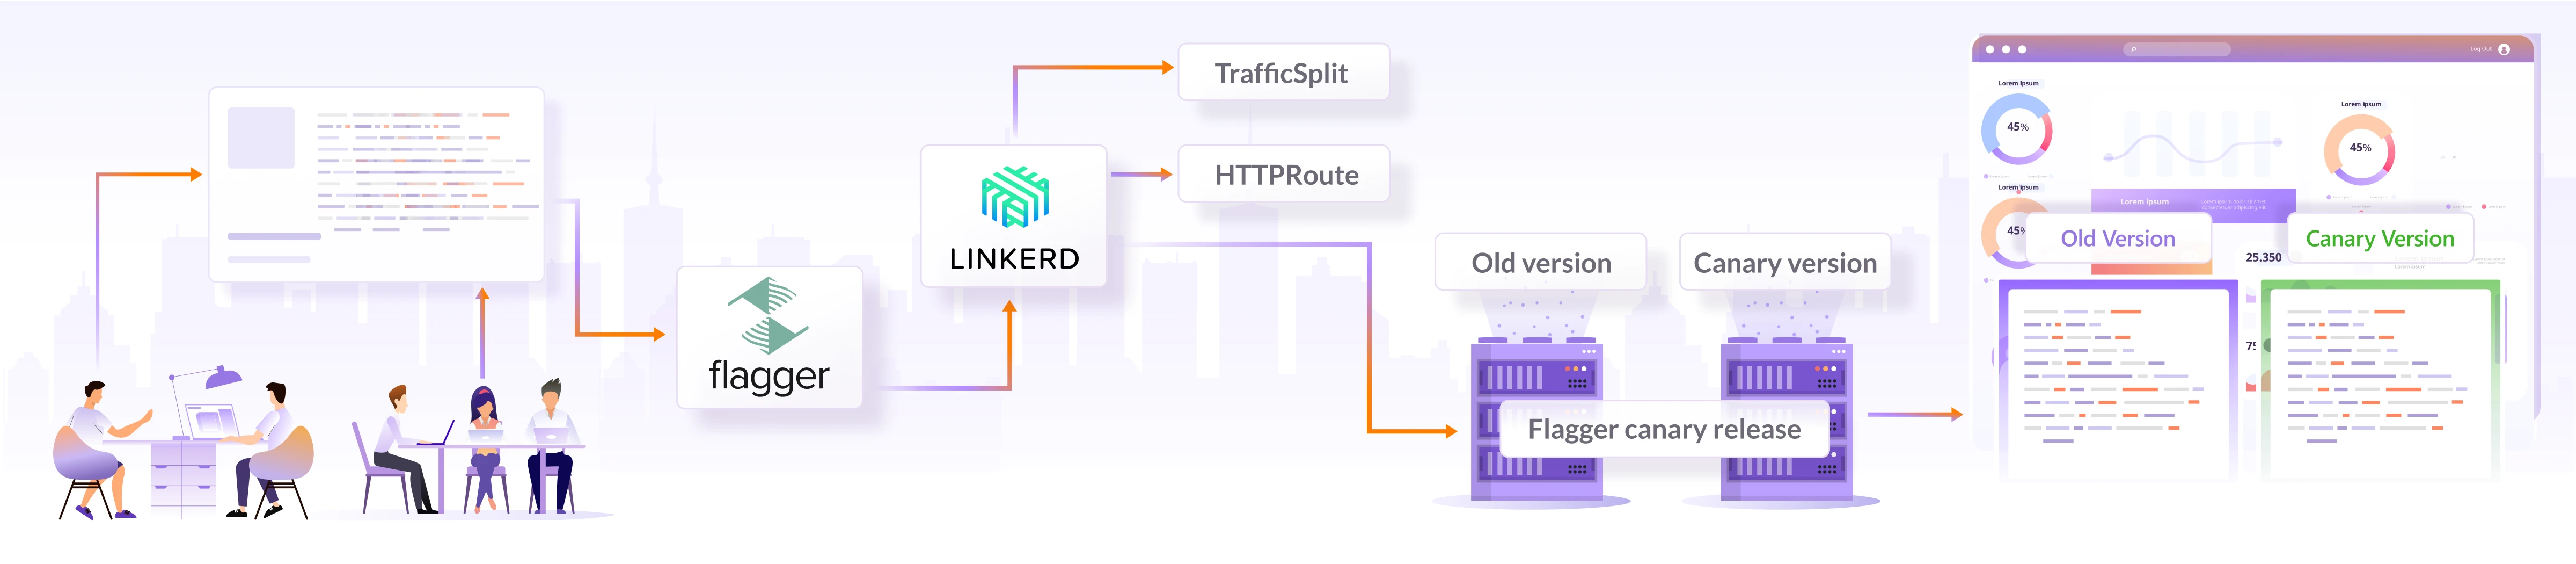
Flagger and Linkerd work together to enable controlled rollouts and monitoring within a Linkerd-powered service mesh. Flagger automates creating the required Linkerd resources and orchestrates canary deployments. It creates new Kubernetes resources for the new release, configures traffic splitting rules, and monitors metrics and health checks. Flagger incrementally shifts user traffic to the new version based on predefined criteria and monitors the performance and health of the canary deployment using Linkerd’s observability features. If the canary version meets the defined criteria, Flagger automatically promotes it to full production. Otherwise, it can roll back to the stable version. This integration streamlines the process of canary deployments, making it easier to release new versions while ensuring a smooth transition and minimizing disruptions for end users.

(A/B testing using Linkerd and Flagger)
By leveraging Flagger with Linkerd, you can conduct effective A/B testing, make data-driven decisions, and continuously improve your application.
A/B testing using Linkerd and Flagger
In this section, we’ll set up Linkerd and Flagger to perform A/B testing. We’ll be using the bookinfo application, which is a microservice-based application. In the following steps we will clone this application and set it up. The application has different services, and we’ll see how the traffic shifts.
Prerequisites
- Kubernetes kind/minikube cluster, and it must be enabled with the ingress controller. In this post, we’re using Kind.
- Linkerd must be installed and configured with the cluster.
- Linkerd-SMI and Linkerd-viz extensions must be installed.
- Flagger must be installed.
Header based testing
The header-based testing approach utilizes headers to direct traffic to different versions of the application. This strategy employs HTTP headers for routing requests, providing an advanced method for controlling the distribution of traffic. By leveraging tools like Flagger and Linkerd, this approach enables precise header-driven routing.
This feature is valuable in A/B testing scenarios where you want to target a particular segment of users using HTTP headers or cookies. It is especially beneficial for front-end applications that rely on session affinity to ensure a consistent user experience. This can be used when we have a set of predefined users that we want to route to the latest version.
Set up the demo
This demo consists of the components book-svc deployment, book-svc service, and load-generator.
The book-svc deployment represents a microservice that exposes book-info APIs.
A load generator is used to simulate real-world traffic and test the canary deployment. The load generator generates live traffic for the application, allowing Flagger to monitor and analyze the behavior of the deployed versions effectively.
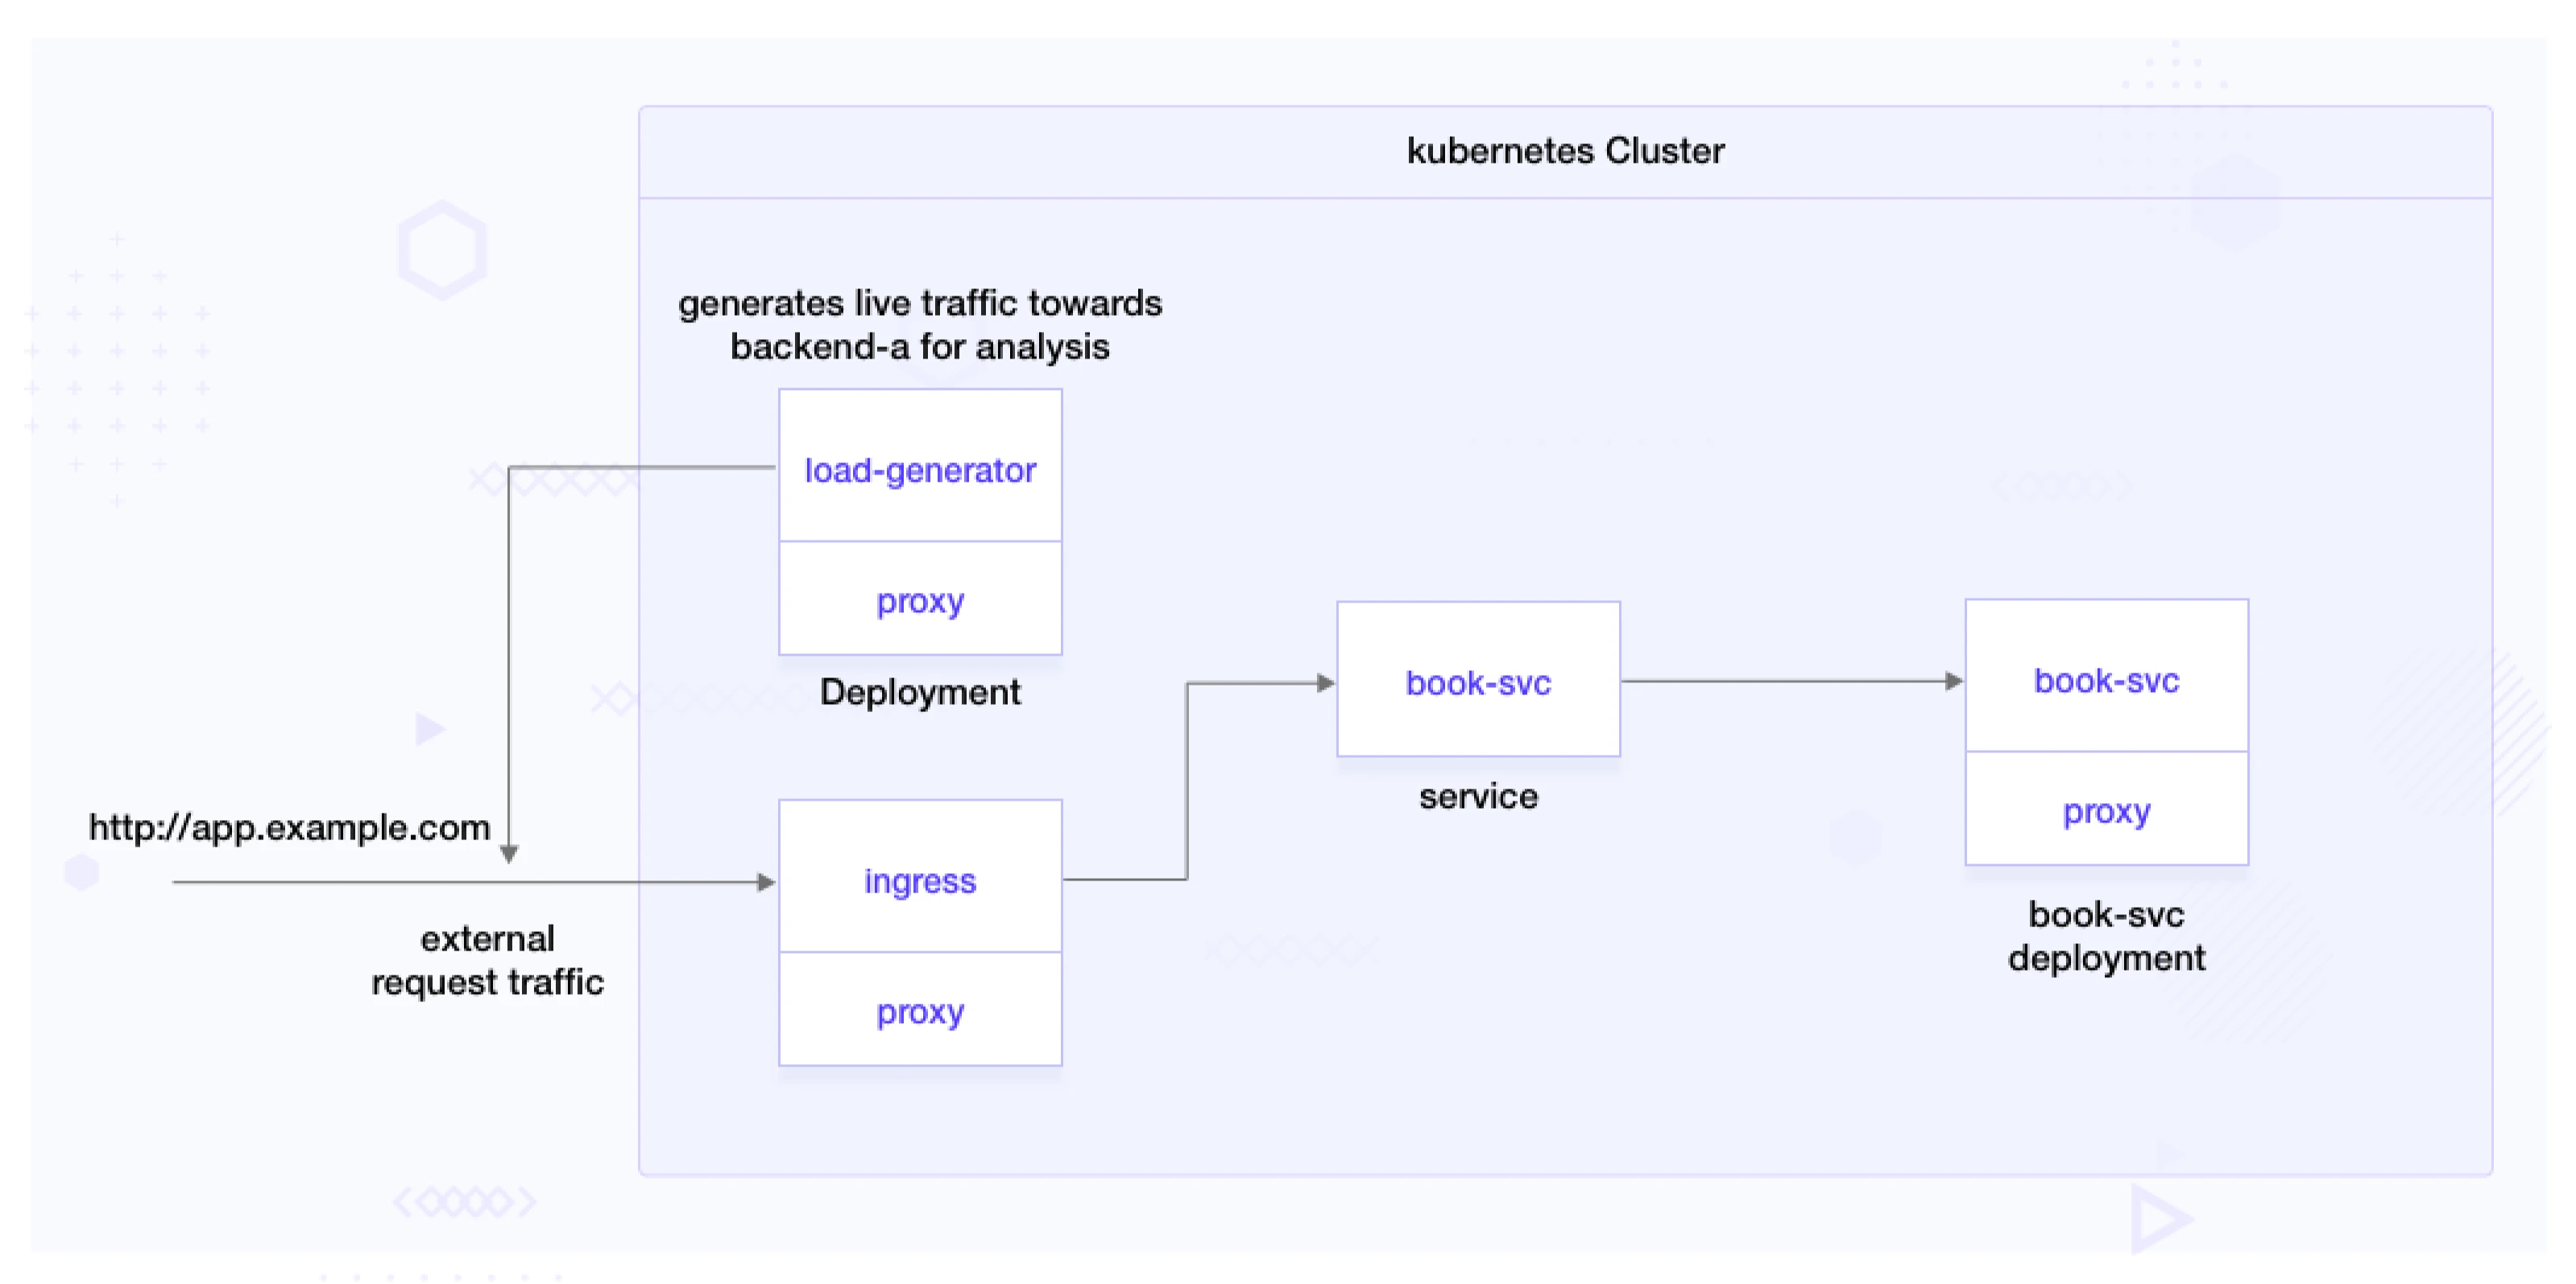
Clone application:
git clone https://github.com/infracloudio/ab-testing-linkerd-flagger.git
To add these components to your cluster and configure with Linkerd, run the following:
kubectl create ns test --dry-run=client -o yaml \
  | linkerd inject - \
  | kubectl apply -f -
Deploy all components required for the demonstration.
$ make deploy-flagger-release ROUTING=header-based
$ kubectl apply -f deploy/book-svc.yaml
deployment.apps/book-svc created
service/book-svc created
Warning: annotation "kubernetes.io/ingress.class" is deprecated, please use 'spec.ingressClassName' instead
ingress.networking.k8s.io/book-svc created
Configure A/B testing with Flagger
apiVersion: flagger.app/v1beta1
kind: Canary
metadata:
  name: book-svc
  namespace: test
spec:
  # ingress reference
  provider: nginx
  ingressRef:
    apiVersion: networking.k8s.io/v1
    kind: Ingress
    name: book-svc
  targetRef:
    apiVersion: apps/v1
    kind: Deployment
    name: book-svc
  service:
    # container port
    port: 8080
  analysis:
    interval: 2m
    threshold: 10
    iterations: 20
    match:
      - headers:
          x-backend:
            exact: "new"
    metrics:
    - name: request-success-rate
      thresholdRange:
        min: 99
      interval: 1m
    - name: request-duration
      thresholdRange:
        max: 500
      interval: 30s
We will discuss what we configured in the above YAML configuration:
- The analysis section specifies the settings for canary analysis:
- interval: Sets the interval for analysis to 2 minutes.
- threshold: Specifies the threshold for the canary analysis.
- iterations: 20: Defines the number of iterations for the canary analysis.
- match: Defines the criteria for matching requests to the canary version.
- headers: Specifies the HTTP headers to be matched.
- x-backend: Matches requests with the exact value “new” in the “x-backend” header.
- cookie: Matches requests with the exact value “canary” in the cookie.
- headers: Specifies the HTTP headers to be matched.
- metrics: Includes metric checks for evaluating canary success:
- name: The metric being checked, like request success rate and request duration.
- thresholdRange: The acceptable range for the metric’s values.
- interval: The frequency of metric checks during analysis.
In summary, the YAML configures the canary release to route traffic to the new version with the header and the older version without the header.
Apply it with the following command:
kubectl apply -f flagger/header-based.yaml
A fresh deployment named “deployment.apps/book-svc-primary” will be generated, containing the identical number of replicas as the “book-svc” deployment. After the new pods are operational, the original deployment is scaled down to zero. This establishes a deployment that Flagger manages as an underlying component.
$ kubectl get deployments.apps -n test
NAME               READY   UP-TO-DATE   AVAILABLE   AGE
book-svc           0/0     0            0           1m
book-svc-primary   1/1     1            1           10m
It creates a new canary object to check the status of the release. The status of the canary is initialized as of now before the rollout of the new release.
$ kubectl get canaries -n test
NAME       STATUS        WEIGHT   LASTTRANSITIONTIME
book-svc   Initialized   0        2023-06-25T17:51:03Z
It will also create the following services. book-svc-canary represents the canary version, and book-svc-primary denotes the primary version for the deployment created when we created the Flagger canary. These services enable Linkerd, guided by Flagger, to route traffic based on specified headers. Depending on the header conditions, incoming requests are routed to the appropriate version, ensuring a controlled transition between primary and canary versions during the release process.
$ kubectl get svc -n test
NAME               TYPE        CLUSTER-IP      EXTERNAL-IP   PORT(S)    AGE
book-svc           ClusterIP   10.96.99.39     <none>        8080/TCP   36m
book-svc-canary    ClusterIP   10.96.225.92    <none>        8080/TCP   18m
book-svc-primary   ClusterIP   10.96.219.233   <none>        8080/TCP   18m
Configure and deploy the load generator
Edit env variables in deploy/load-generator.yaml.
-
Modify ENDPOINT as “http://app.example.com” to generate external live traffic.
-
As we configured the header key as ‘x-backend’ and header value as ‘new’ in the above Flagger canary configuration, add it in the load generator environment variables so that the load generator can generate live traffic with the header ‘x-backend: new’ for the new release.
         env:
         - name: ENDPOINT
         value: "http://app.example.com/"
         - name: CALL_DURATION
         value: "20"
         - name: SLEEP_DURATION
         value: "10"
         - name: NEW_VERSION_HEADER_KEY
         value: "x-backend"
         - name: NEW_VERSION_HEADER_VAL
         value: "new"
Rollout new release
Suppose that you have made some changes in the code or you have a new API version that needs to be rolled out. For this application, let’s say we have a new release build with version v1 with image book-svc:v1. We are changing the image to book-svc:v1 and the VERSION env variable to v1 with the patch file flagger/flagger-release-patch.json
Patch deployment book-svc for the new version of the application by running the following command:
make patch-flagger-release
We can see the status of the rollout by running:
watch kubectl get canaries.flagger.app -n test
We can check the response of the older version API with the following URL:
http://app.example.com/
This would return the following response:
{
"author": "F. Scott Fitzgerald",
"backend": "book-svc",
"genre": "Fiction",
"header": "",
"id": "123456",
"rating": 4.5,
"status": "success",
"title": "The Great Gatsby",
"version": "primary",
"year": 1925
}
Response from the old version
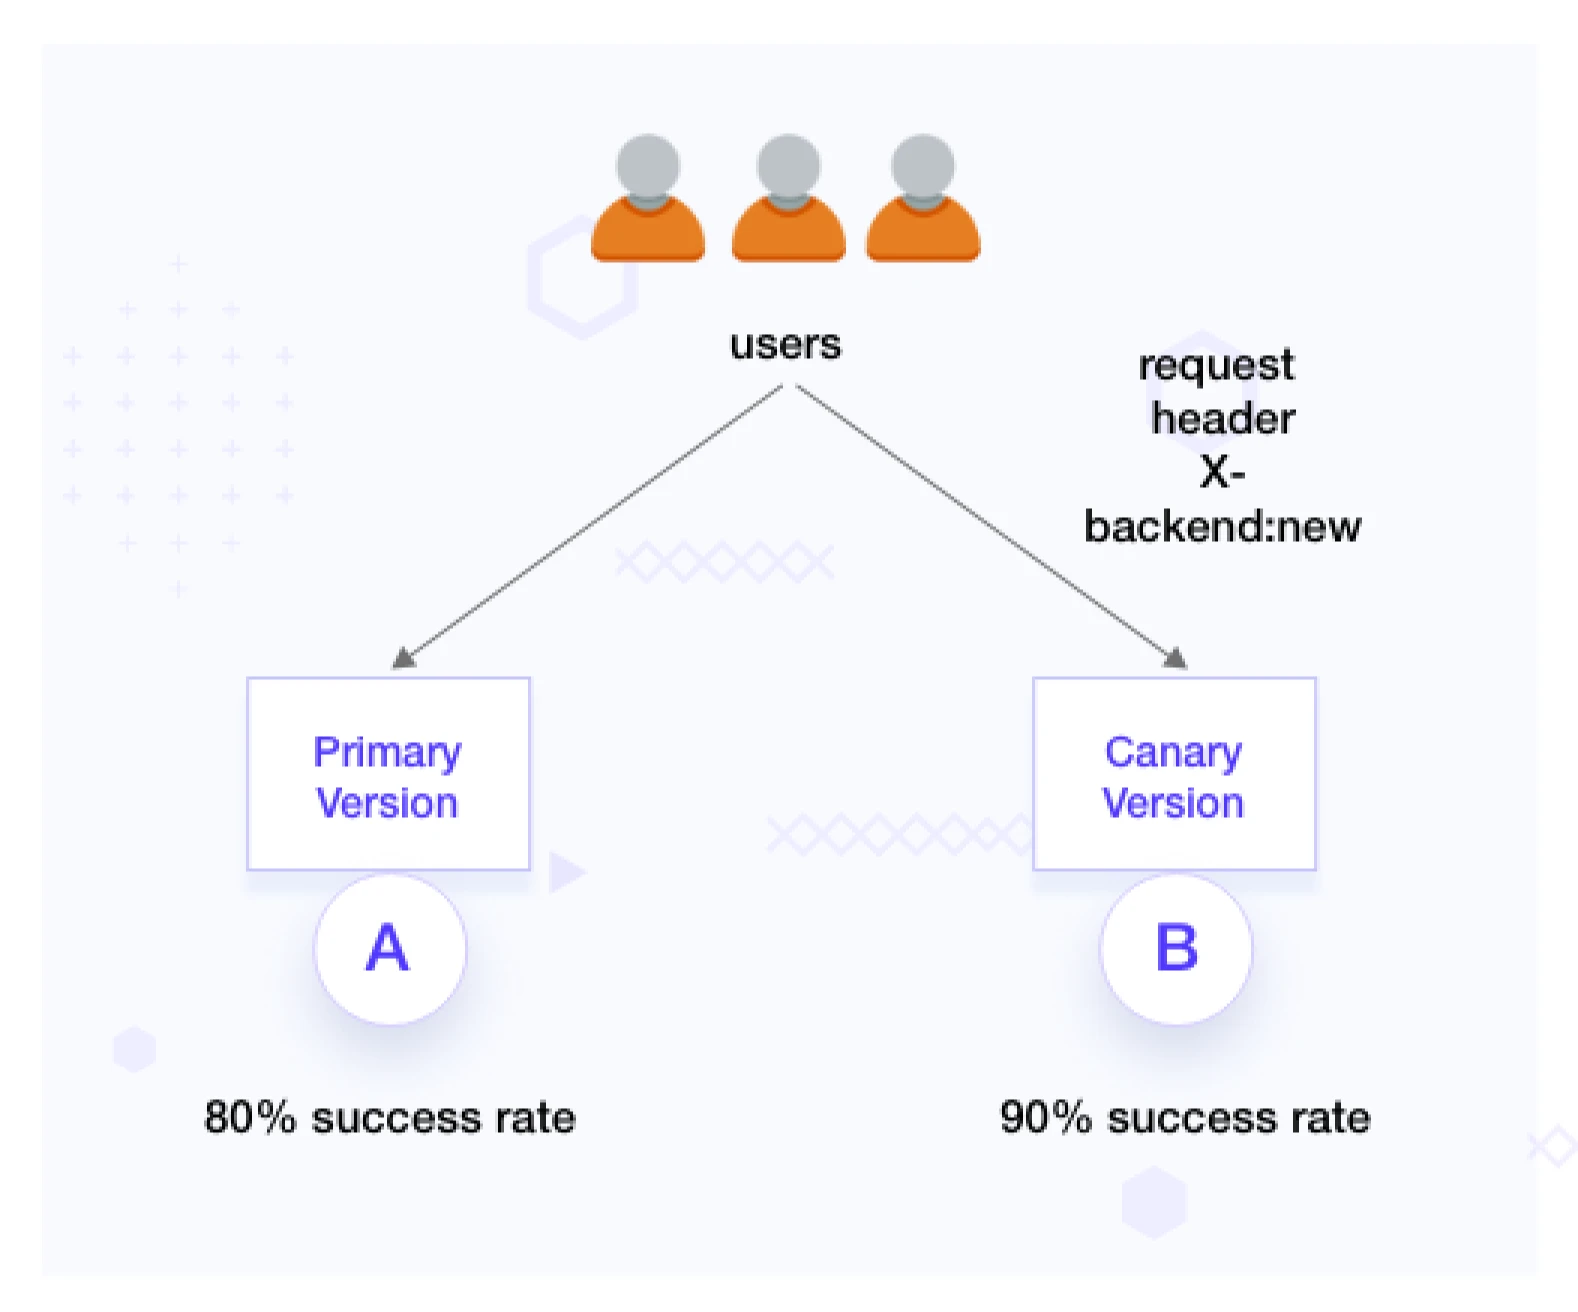
We can route to the new version of the application by passing x-backend: new header in the request as follows:
curl -sX GET -H 'x-backend: new' http://app.example.com/
This would give us the following response:
{
"Publisher": "Scribner",
"author": "F. Scott Fitzgerald",
"backend": "book-svc-v1",
"genre": "Fiction",
"header": "",
"id": "123456",
"rating": {
"average": 4.8,
"totalVotes": 100
},
"status": "success",
"summary": "The Great Gatsby is a novel by F. Scott Fitzgerald...",
"title": "The Great Gatsby",
"version": "V1",
"year": 1925
}
Monitor and analysis
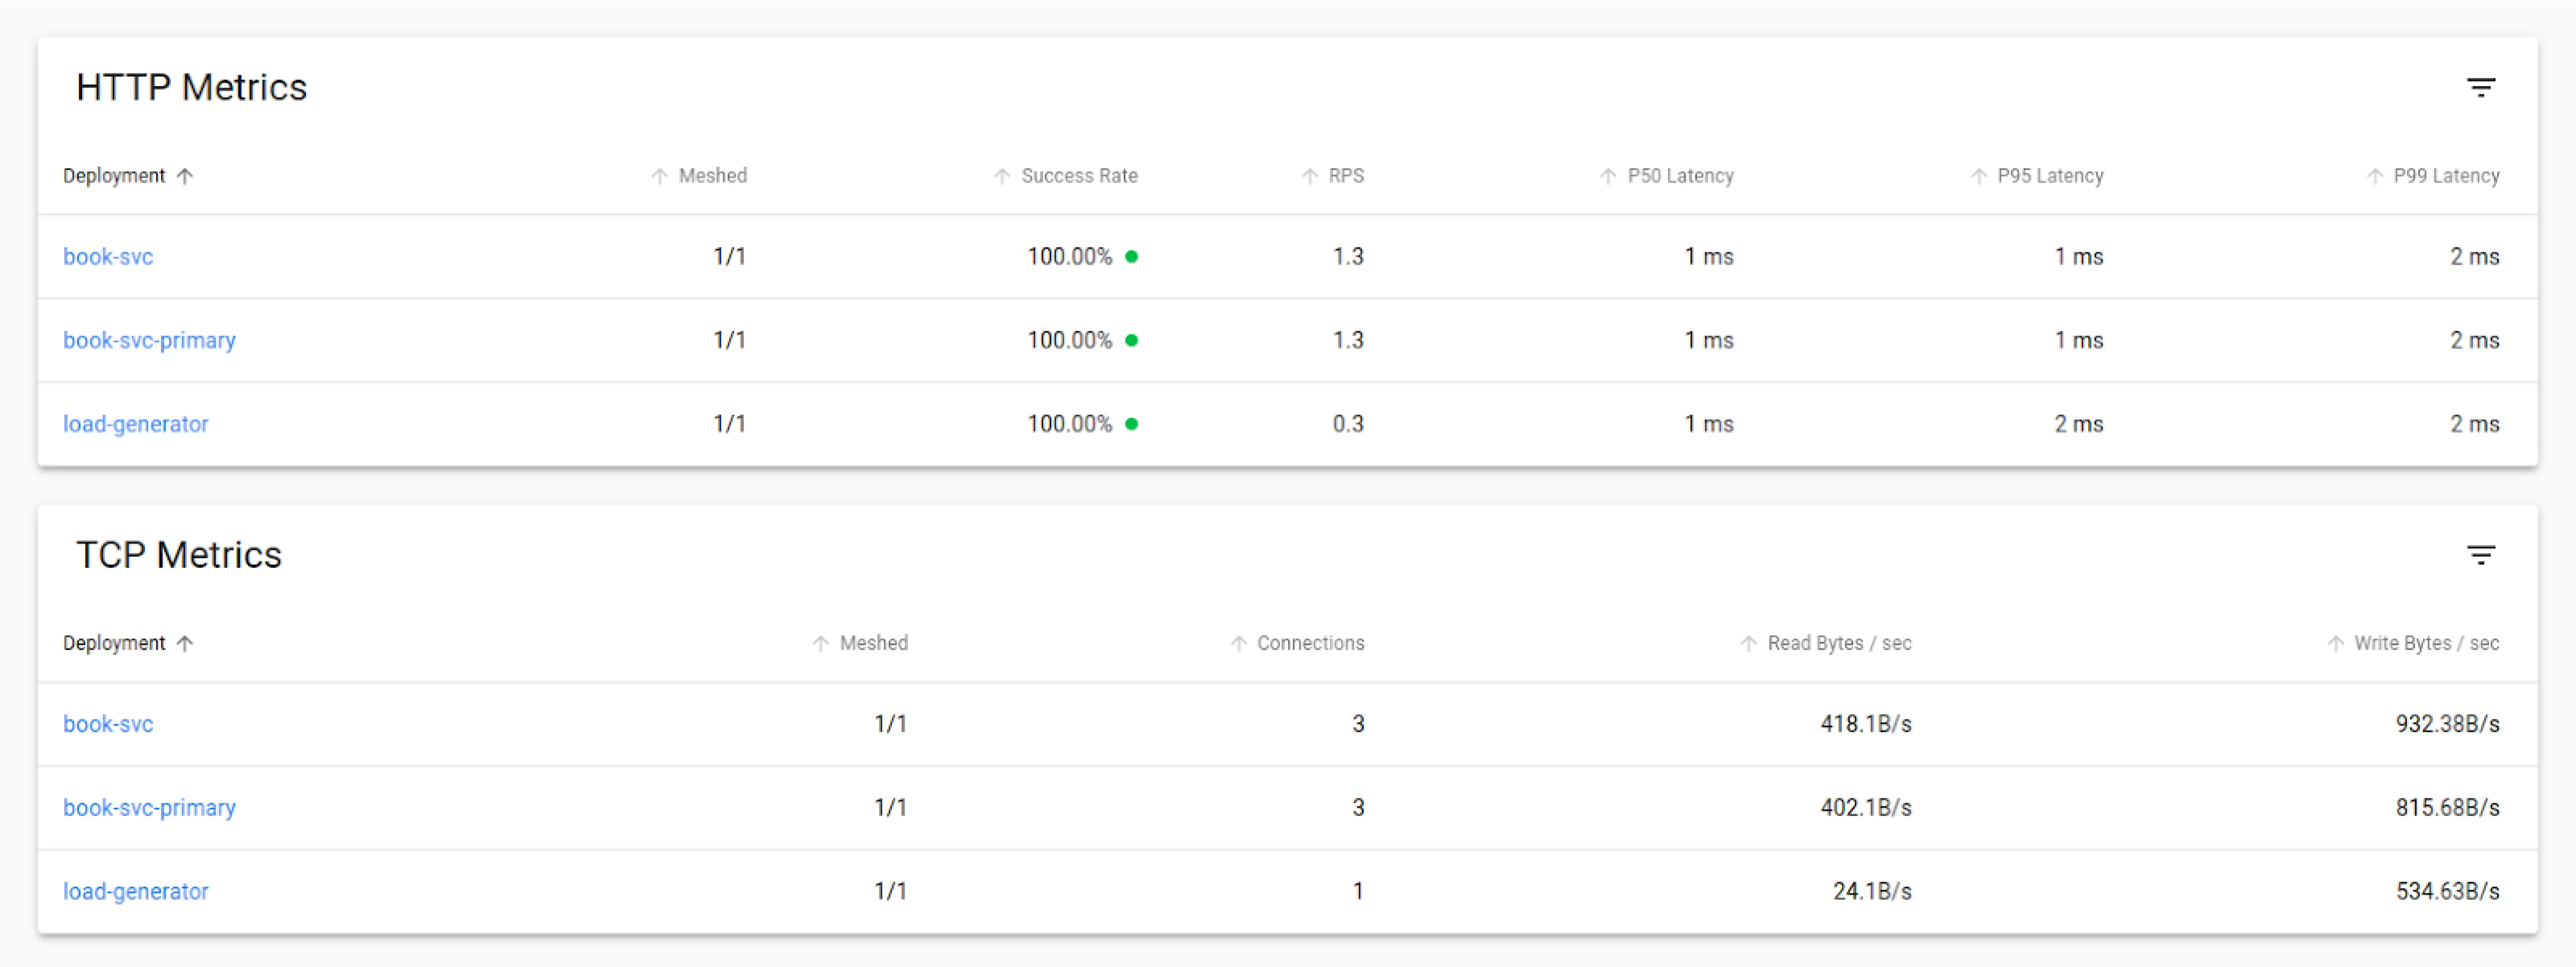
In order to monitor the A/B testing results, we can use the Linkerd viz feature. You must have already installed the Linkerd viz extension when setting up in the above steps.
Evaluating the A/B test results based on predefined metrics and success criteria
In order to say the test has been successful, we need to make sure that a certain number of requests pass the test. Since we are using Flagger to generate load for testing, we have set the success criteria to be 99%. If the success criteria are not met, then Flagger will stop the promotion of the service to the newer version. We can set the success criteria in the YAML files as shown above in the setup steps of flagger.yaml.
We also set a threshold of 10 which means that a maximum of 10 failures are allowed before rollback to the previous version happens. Once everything is set up and deployed, as mentioned in the above steps, we can go ahead with our analysis.
In order to view the stats through the CLI we can run the following command:
linkerd viz -n test stat deploy --from deploy/load-generator
This will give us the stats of the load that is being sent to both the services and its success rate.
$ linkerd viz -n test stat deploy --from deploy/load-generator
NAME               MESHED   SUCCESS   RPS   LATENCY_P50   LATENCY_P95   LATENCY_P99   TCP_CONN
book-svc              1/1     100.00%     0.0rps         1ms          1ms             1ms          1
book-svc-primary      1/1     100.00%     1.0rps         1ms          5ms             5ms          1
We use a load balancer to generate the load, which runs 20 iterations over a defined period of time and generates metrics based on it. In the above response, we can see its success rate and latency.
In order to visualize Linkerd UI, we can open Linkerd viz UI by running this command:
linkerd viz dashboard &
We can see the HTTP and TCP metrics to get the success rate and decide which version performs better.
Conclusion
In this blog post, we learned how to achieve A/B testing using Flagger. We went through understanding how to implement A/B testing. Later on, we discussed how to monitor the tests and also did an analysis using the Linkerd viz extension.
Overall, the analysis of A/B testing using Linkerd’s dynamic request routing feature provides valuable insights into the test’s success, load distribution, and gradual traffic shift during canary deployments. You can follow this article to do A/B testing, however, in a real-world scenario, things could be complicated. For that, you can bring in Progressive Delivery experts onboard to help you out.
Thanks for reading this blog post. We hope it was informative and engaging for you. We would love to hear your thoughts on this post, so start a conversation on LinkedIn - Hitesh Wani and Pranoy Kundu.
References
Stay updated with latest in AI and Cloud Native tech
We hate 😖 spam as much as you do! You're in a safe company.
Only delivering solid AI & cloud native content.
Posts You Might Like