Achieving Cloud Native Security and Compliance with Teleport

Security is the most critical aspect for any IT solutions and with the ever-increasing adoption of cloud native technologies, the need for Zero Trust Architecture is irrefutable as:
- The traditional networking approach is not effective enough to provide full security to cloud native applications.
- With cloud offerings being heavily getting used going forward, security policies around the application need to be scalable as well.
- With more emphasis on loosely coupled microservice based applications, chances of vulnerabilities getting introduced also increases.
- People are using multiple clouds to take advantage of the offerings.
- On-premise to the cloud and other way around connectivity is a reality.
- Devices that span beyond traditional data centers & cloud are increasingly being used to provide connectivity to remote sites.
To sum up, it means there is no “real network boundary” anymore, and hence we need to have a way in which we don’t trust anyone. Traditionally it was assumed that communication between entities inside the same data center is secure; where as with zero trust we don’t even assume that. So, it has become a mandate to have a zero-trust security framework around your cloud native applications.
Teleport? What is it? Why is it needed?
Gravitational Teleport is one such fine product which fits in the space of “Zero Trust Networks” for cloud native applications. It acts as a gateway machine for identity and access management of clusters of Linux servers via SSH or the Kubernetes API. It can replace the use of traditional OpenSSH going forward for organizations who are looking for:
- Better security and compliance practices.
- End to end visibility of activities happening in their infrastructure.
- Achieving compliance for their software products like SOC 2.
- Reduction in the operational burden of access management across both on-premise and cloud native infrastructure.
Benefits of using Teleport for cloud native applications
Teleport is a cloud native SSH solution. Below is a list of the key features that Teleport offers:
- It can act as a single SSH/Kubernetes gateway machine for your organizations.
- It can provide an audit log and recording of all kubectl commands executed in your Kubernetes cluster.
- It can also run in “agentless” mode also where session details can be MITM-ed and taped on the proxy server; instead of keeping them on the nodes.
- It does not rely on static keys and provides authentication based on SSH certificate.
- It uses auto-expiring keys signed by a cluster certificate authority (CA).
- It enforces 2nd factor authentication.
- You can connect to your clusters (protected by firewall) without internet access via SSH bastion host.
- You can share sessions with your colleagues for troubleshooting any issues collectively.
- It’s a single tool that can manage RBAC for both SSH and Kubernetes.
- You can replay audit logs from recorded sessions to detect any safety issues.
Let’s find out how this tool works in the following sections along with the inner workings of Teleport.
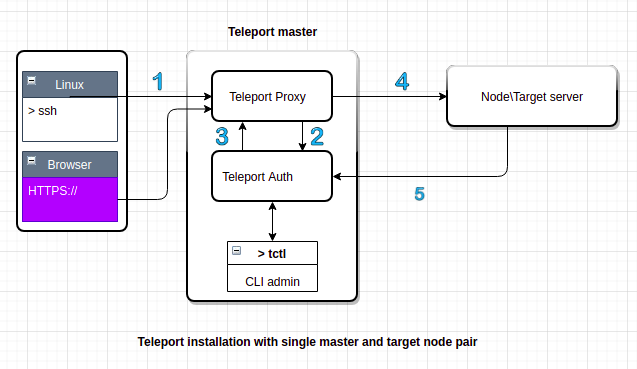
Architecture
Let’s walk through a scenario of a user connecting to a node and how Teleport works in that case.

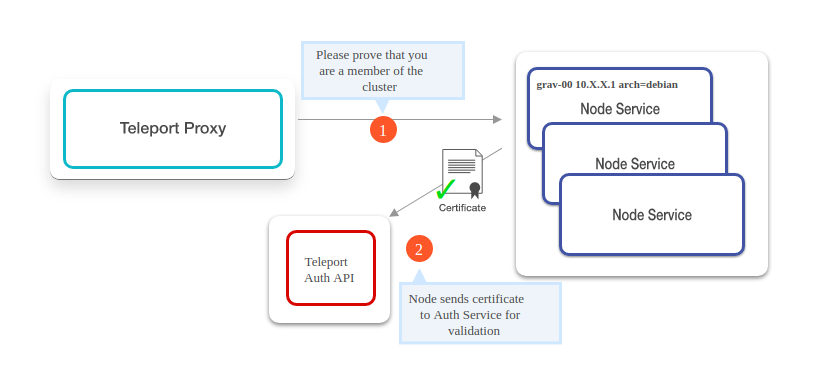
1: Establishing client connection
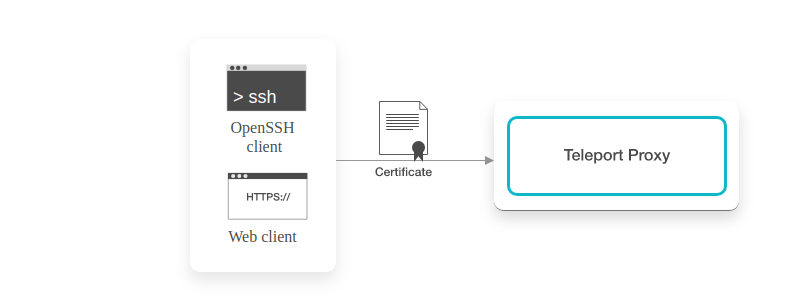
To initiate the client connection; when the client tries to SSH to the required target, it first establishes a connection to the Teleport proxy and offers the client’s certificate. Teleport proxy makes sure to record SSH sessions and keep an eye on live and active sessions of users. With records of all users logged in to the target server, Teleport proxy also helps SSH users to see if anyone else is also connected to the same target that the client is intending. Once client ssh to server, it can run command tsh status which provides session id as well user id of the users who are logged in.
2: Authenticate client provided certificate
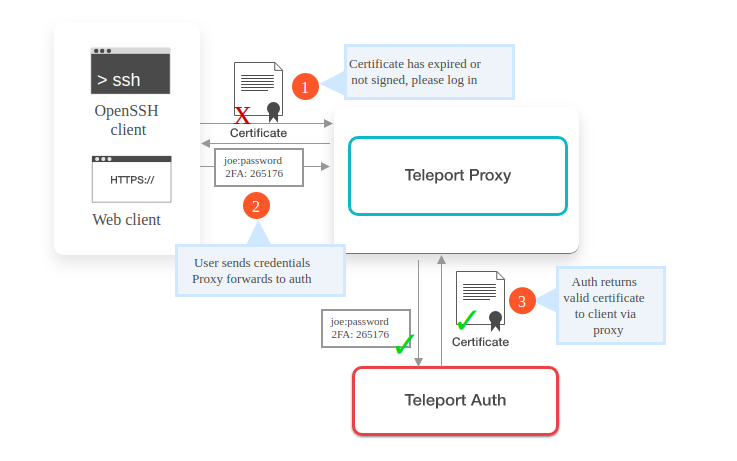
If the user or client is logging in for the 1st time or if the previously provided client certificate is expired, the proxy server will deny the further connection. In this case, it requests the user or client to again login using a new password and two-factor authentication code if it is enabled already. Since this connection request is HTTPS, Teleport must have the right HTTPS certificate installed on the proxy server.
For 2FA currently, Teleport supports Google Authenticator, Authy, and any time-based one-time password generators.
3: Lookup node
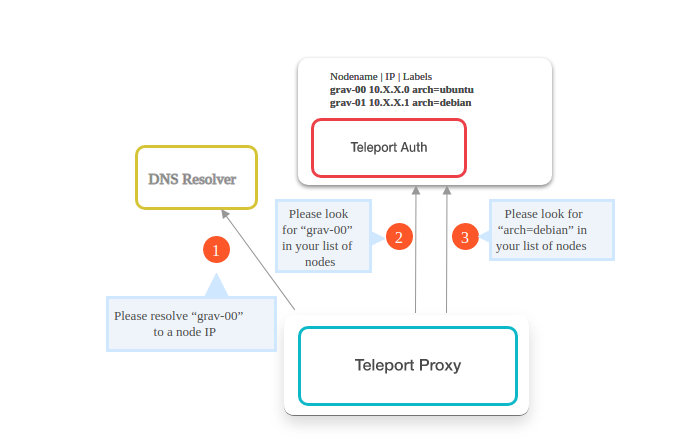
At this stage, the proxy server tries to find out the requested target server in the cluster. It uses three lookup mechanisms to find out the requested target/node server’s IP address.
- Lookup mechanism 1: Using DNS resolver to resolve the target name requested by client.
- Lookup mechanism 2: The next step is to check with the Teleport Auth Server, if the requested target/node server is present in its list of target/nodes.
- Lookup mechanism 3: Finally the Teleport Auth Server is used to find the target server/node with the label name suggested by the client.
If the requested target/node server is located, the proxy server further forwards the connection request from the client to that target/node server. Then that target server starts creating an event log file using the dir backend. The entire session recording log is stored in data_dir under log directory (usually in /var/lib/teleport/log/sessions/default) .This session log contains events like session.start and session.end. It also records the complete stream of bytes which goes as the standard input to an SSH session as well as the standard output from an SSH session. These target session’s event logs are stored in a raw format which is either .bytes or .chunks.gz. From these raw logs, a video recording of the SSH session is generated.
For example, we can see the session files from one target node by running following command:
$ ls /var/lib/teleport/log/sessions/default

-rw-r----- 1 root root 506192 Feb 4 00:46 1c301ec7-aec5-22e4-c1c3-40167a86o821.session.bytes

-rw-r----- 1 root root  44943 Feb 4 00:46 1c301ec7-aec5-22e4-c1c3-40167a86o821.session.log
If needed, we can run commands like tsh --proxy=proxy play 1c301ec7-aec5-22e4-c1c3-40167a86o821 to replay a session.
This is how the target server records the session and keep sharing it to Auth Server for storage purpose.
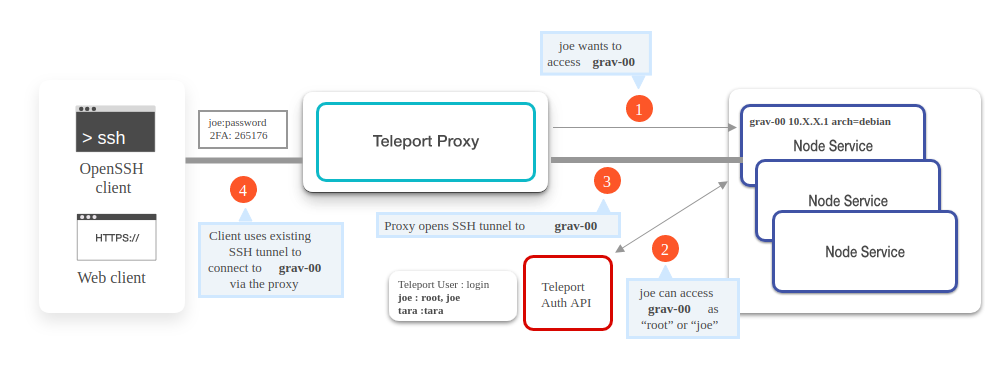
4: Authenticate node certificate
For future connection requests, when the target/node server receives a client connection request, it again goes back and checks with the Teleport Auth Server if the target/node’s certificate is valid or not. If the certificate is valid, then the target/node server starts the SSH session.
5: Grant user node access
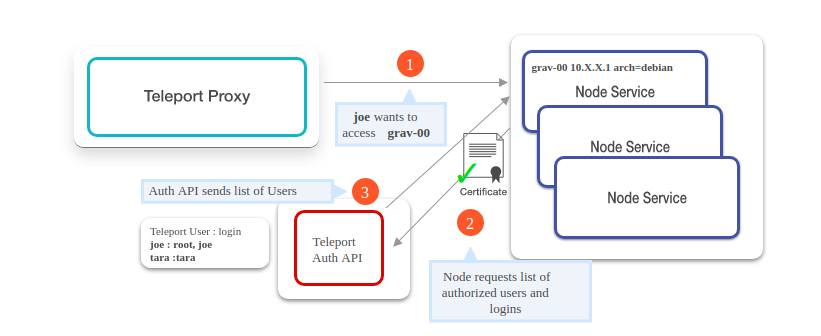
As the last step, target/node server requests to the Teleport Auth Server to provide a list of OS users and cross-verify that the client is really authorized to use the requested OS login and thus the client is authorized to SSH to requested target/node server.
To sum up, if a user Joe wants to connect the server/node called grav-00; then below is the sequence of actions that takes place inside Teleport to allow Joe access to it.
Installation/demo
Just for demo purpose, we will have one Teleport master, which will run Teleport and secure only one node/target server. In production, you might have more than one Teleport master for high availability and potentially hundreds of nodes secured by Teleport. For now, we will do these steps manually but you can easily automate them.
Prerequisites
For installation of Teleport, we would need:
- A Linux machine with ports 3023, 3024, 3025 and 3080 open.
- A domain name, DNS and TLS certificates for production system.
Installation steps
Note that the following installation is completed and tested with help of localhost and self-signed certificate, by referring to the Teleport Quick Start guide.
Step 1: Install Teleport on a Linux host
There are multiple ways to install Teleport. I will be following the one for Amazon Linux.
sudo yum-config-manager --add-repo https://rpm.releases.teleport.dev/teleport.repo
sudo yum install teleport
Step 2: Configure Teleport
It’s recommended by Teleport to use a YAML configuration file for setting it up. Create a YAML file called teleport.yaml, and add the below configurations to it.
Note: Make sure to validate your teleport.yaml file, with the help of local tools like yamllint (which can be launched easily from the local console) to avoid any syntax errors.
# teleport.yaml
---
app_service:
  debug_app: true
  enabled: true
auth_service:
  cluster_name: teleport-quickstart
  enabled: true
  listen_addr: "<internal_ip_of_server>:3025"
  tokens:
  - "proxy,node,app:f7adb7ccdf04037bcd2b52ec6010fd6f0caec94ba190b765"
proxy_service:
  enabled: true
  listen_addr: "0.0.0.0:3023"
  tunnel_listen_addr: "0.0.0.0:3024"
  web_listen_addr: "0.0.0.0:3080"
ssh_service:
  enabled: true
  labels:
    env: staging
teleport:
  data_dir: /var/lib/teleport  # This is the default directory, where Teleport stores its log and all the configuration files
Below are some of the configuration details present in this above yaml file:
-
teleport.data_dir: /var/lib/teleport:
This is the default data directory, where Teleport stores its log and all the configuration files -
auth_servicesection:
Auth service listens on SSH port 3025 to provide its API to communicate with other nodes in a cluster. -
auth_service.tokens:
To make each node/server participate in the Teleport cluster, we need to establish a secure tunnel between the master and the other participating nodes. For this connection, there should be a shared secret among them. This secret is nothing but what we call a token. We can generate a static token or a dynamic one. For the demo purpose, we are going to use a static onef7adb7ccdf04037bcd2b52ec6010fd6f0caec94ba190b765. (Teleport recommends using tools likepwgen -s 32to generate sufficiently random static tokens of 32+ byte length). -
proxy_servicesection:
Proxy service listens on port 3023 (i.elisten_addr) and acts as a forwarder to direct incoming connection request to desired target node on port 3022 (which is Teleport equivalent of port 22 for SSH).
Also this proxy service uses SSH port 3024 to do a reverse SSH tunneling behind a firewall, into a proxy server.
Web UI of teleport listen on this port and all HTTPS connection are from tsh users are authenticated on this port. -
app_servicesection:
For testing and debugging, Teleport provides an in-bulit app, which can be enabled by settingdebug_appastrue.
Now, you can move this file to Teleport’s default configuration location by running sudo mv teleport.yaml /etc.
Step 3: Configure domain name and obtain TLS certificates
Teleport normally requires a secured publicly accessible end point, and so a domain name and TLS certificates are needed too. But since we are doing just a test here; we can locally set up them using the self-signed TLS certificate without a domain name.
Self-signed TLS certificate creation
openssl req -x509 -out localhost.crt -keyout localhost.key \
  	-newkey rsa:2048 -nodes -sha256 \
  	-subj '/CN=localhost' -extensions EXT -config <( \printf "[dn]\nCN=localhost\n[req]\ndistinguished_name = dn\n[EXT]\nsubjectAltName=DNS:localhost\nkeyUsage=digitalSignature\nextendedKeyUsage=serverAuth")
This will create a certificate localhost.crt and a key localhost.key in your current directory.
Update teleport.yaml with certificate details
We can now amend the previously created teleport.yaml configuration with above locally created TLS certificate. Add the below code at the end of previous YAML configurations with a new section https_keypairs.
https_keypairs:
- key_file: /usr/local/bin/localhost.key
  cert_file: /usr/local/bin/localhost.crt
Now, you can start Teleport directly using sudo teleport start or else in case, if you are already in /usr/local/bin directory, you can also use nohup sudo ./teleport start &.
You can also setup a systemd service by following these instructions.
Step 4: Create a Teleport user and set up 2-factor authentication
Next step is tocreate teleport-admin which will help us to SSH into any node which is part of the Teleport cluster. For that, we need to assign OS user to teleport-admin account. This can be achieved using the below command which will assign OS users root, ubuntu and ec2-user to the teleport-admin user.
sudo tctl users add teleport-admin root,ubuntu,ec2-user
Once you run this command, Teleport will give you output similar to below.
User teleport-admin has been created but requires a password. Share this URL with the user to complete user setup, link is valid for 1h0m0s:

https://<internal_ip_address>:3080/web/invite/7e3bd3d504c10b2637db6b06f29529

NOTE: Make sure <internal_ip_address>:3080 points at a Teleport proxy that users can access.
You can now go to your any favourite browser, and put the URL:
https://<public_ip_address_of_server_where_teleport_installed>:3080/web/invite/7e3bd3d504c10b2637db6b06f29529
Which will open a page like below:
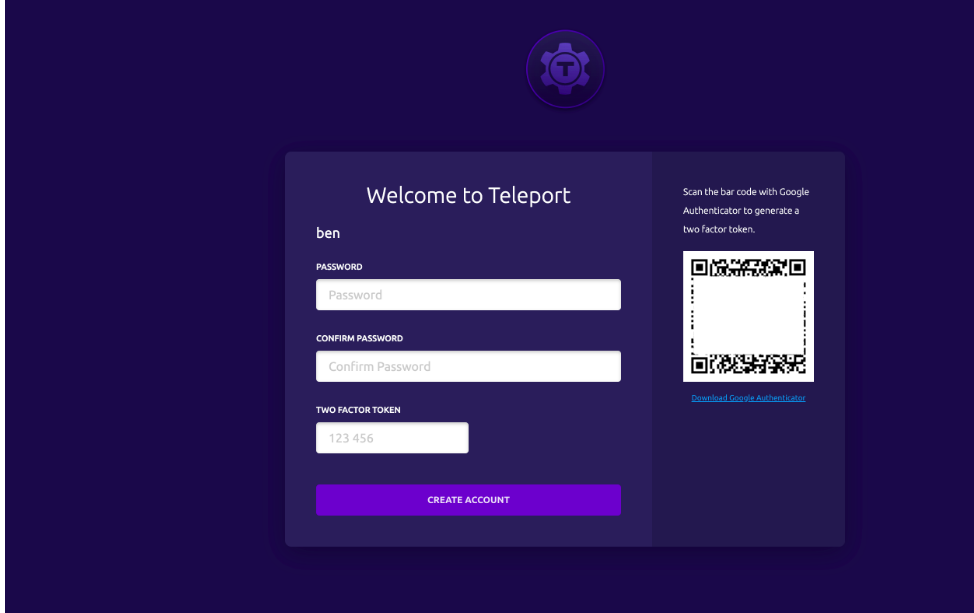
Set any desired password with a minimum length of six characters and use any authenticator (like Google Authenticator, Authy etc) to scan and obtain 6 digit code and put that into TWO FACTOR TOKEN dialogue box.
Once completed above, below home-page will appear.
Congratulations!! You have successfully installed a single node cluster of Teleport.
Step 5: Log in using tsh to your Teleport cluster
tsh login --proxy=localhost:3080 --user=teleport-admin --insecure
You will see the below kind of prompt for password and OTP that you will receive over your authenticator.
WARNING: You are using insecure connection to SSH proxy https://localhost:3080
Enter password for Teleport user teleport-admin:
Enter your OTP token:
511510
On successful login, you will see the below message displayed.
WARNING: You are using insecure connection to SSH proxy https://localhost:3080
Profile URL:   https://localhost:3080
Logged in as:       teleport-admin
Cluster:            teleport-quickstart
Roles:              admin*
Logins:             ec2-user, root, ubuntu
Kubernetes:         disabled
Valid until:        2021-01-07 05:20:50 +0000 UTC [valid for 12h0m0s]
Extensions:         permit-agent-forwarding, permit-port-forwarding, permit-pty
RBAC is only available in Teleport Enterprise
https://gravitational.com/teleport/docs/enterprise
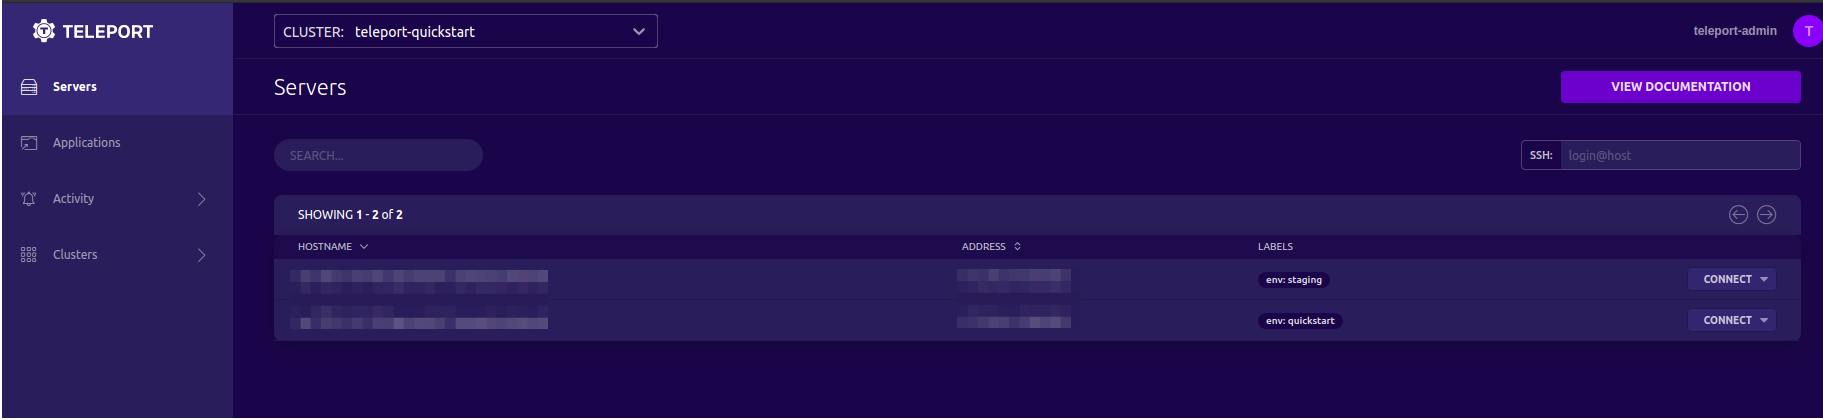
Step 6: Check Teleport cluster
You can check the status of your cluster using command:
[ec2-user@ip-172-31-34-133 bin]$ tsh ls
Node Name                                    Address            Labels
-------------------------------------------- ------------------ -----------
ip-172-31-34-133.ap-south-1.compute.internal 172.31.34.133:3022 env=staging
Step 7: Add new node or target server in Teleport cluster
You can now secure more servers with Teleport by adding them to the Teleport cluster we just created. For that, we need to install Teleport on all those servers/nodes by doing Step 1 and Step 2 that we did earlier on those new target servers, followed by a simple below command to be executed on those target servers (to add those servers in a cluster).
sudo teleport start --roles=node --token=f7adb7ccdf04037bcd2b52ec6010fd6f0caec94ba190b765 --labels=env=quickstart --insecure
After this command, you will see the output as:
[NODE] Service 5.1.0:v5.1.0-0-g46679fb34 is starting on 0.0.0.0:3022.
Which confirms that the node has been added in the Teleport cluster. We can be sure of that by running tsh ls command on Teleport master server (where we installed Teleport cluster first).
[ec2-user@ip-172-31-34-133 bin]$ tsh ls
Node Name                                    Address            Labels
-------------------------------------------- ------------------ --------------
ip-172-31-34-133.ap-south-1.compute.internal 172.31.34.133:3022 env=staging
ip-172-31-41-130.ap-south-1.compute.internal 172.31.41.130:3022 env=quickstart
We can now login into any node by doing, tsh ssh user-name@Node Name. The target Node Name in this command, is the one you will find in ‘Node Name’ column of tsh ls command’s output.
And now, once the user is connected to the required target server/node, then on the Teleport web UI, you would be able to see video recordings of all the user activities during a particular session on the Teleport web UI once the user is connected to the required target server/node. A quick video demonstration of the same is shown below.
Quick Demo
The demo video will show you:
- How to check Teleport cluster status by running the
tsh statuscommand and list the nodes participating in the cluster with the help of thetsh lscommand. - How the web interface of Teleport looks like, with different sections.
- How to access the Session Recordings.
- How you can Join session for troubleshooting collectively with other users.
- How you can access the Audit logs in JSON format.
Conclusion
Implementing security and achieving compliance particularly in the cloud native infrastructure has been challenging for most of the organisations. In many cases, doing-it-yourself with a variety of capabilities and tools turns out to be a complex solution.
Teleport is a mature product with a focus on developer productivity and its alignment to help with compliance makes them a leader. Some features like ChatOps integration, focus on edge/IoT connectivity, a variety of SSO integrations, are attractive. Just to keep in mind that a lot of things can be done using their open source offering but I find that implementing RBAC would become a bare minimum requirement in an enterprise environment, where you would need the enterprise version.
Hope this post was helpful to you. Do try Teleport for cloud native security and compliance, and share your experience in the comments section below. Happy Coding :)
Looking for help with cloud native security consulting & implementation? do check out our capabilities how we’re helping startups & enterprises as an cloud native consulting & services provider.
References
Stay updated with latest in AI and Cloud Native tech
We hate 😖 spam as much as you do! You're in a safe company.
Only delivering solid AI & cloud native content.
Posts You Might Like