How to Develop a Custom Provider in Terraform

Terraform Introduction and Overview
Terraform is an Infrastructure as Code technology and it is used to create immutable infrastructure. It allows infrastructure to be expressed as code in a simple, human readable language called HCL (HashiCorp Configuration Language). It supports managing resources across all the major cloud providers. Terraform is used to create, manage, and update infrastructure resources such as physical machines, VMs, network switches, containers, Kubernetes and more. Almost any infrastructure type can be represented as a resource in Terraform.
- Deliver infrastructure as code with Terraform using declarative
.tfconfiguration files. - Plan and predict changes: Terraform provides an elegant user experience for operators to safely and predictably make changes to infrastructure. It reads configuration files and provides an execution plan of changes, which can be reviewed for safety and then applied and provisioned.
- Extensible
providersallow Terraform to manage a broad range of resources, including IaaS, PaaS, SaaS, and hardware services. - Create reproducible infrastructure: Terraform makes it easy to re-use configurations for similar infrastructure, helping to avoid mistakes and save time.
This post is intended for Terraform users who are having a basic understanding of Terraform and its usage and are likely willing to develop custom Terraform provider. Let’s get started!
What are Terraform Providers?
Creating and maintaining resources using Terraform rely on plugins called providers. Each provider plug-in is responsible to interact with cloud providers, SaaS providers, and other APIs. Most providers configure a specific infrastructure platform (either cloud or self-hosted). Providers can also offer local utilities for tasks like generating random numbers for unique resource names.
Each provider adds a set of resource types and/or data sources that Terraform can manage. Every resource type is implemented by a provider; without providers, Terraform can’t manage any kind of infrastructure. Terraform providers enables extensibility not only for cloud infrastructure, but it allows managing objects which can be created through exposed API calls as well.
Terraform Custom Provider
Below are some of the possible scenarios for authoring a custom Terraform provider, such as:
- An internal private cloud whose functionality is either proprietary or would not benefit the open source community.
- A “work in progress” provider being tested locally before contributing to the registry.
- Extensions of an existing provider.
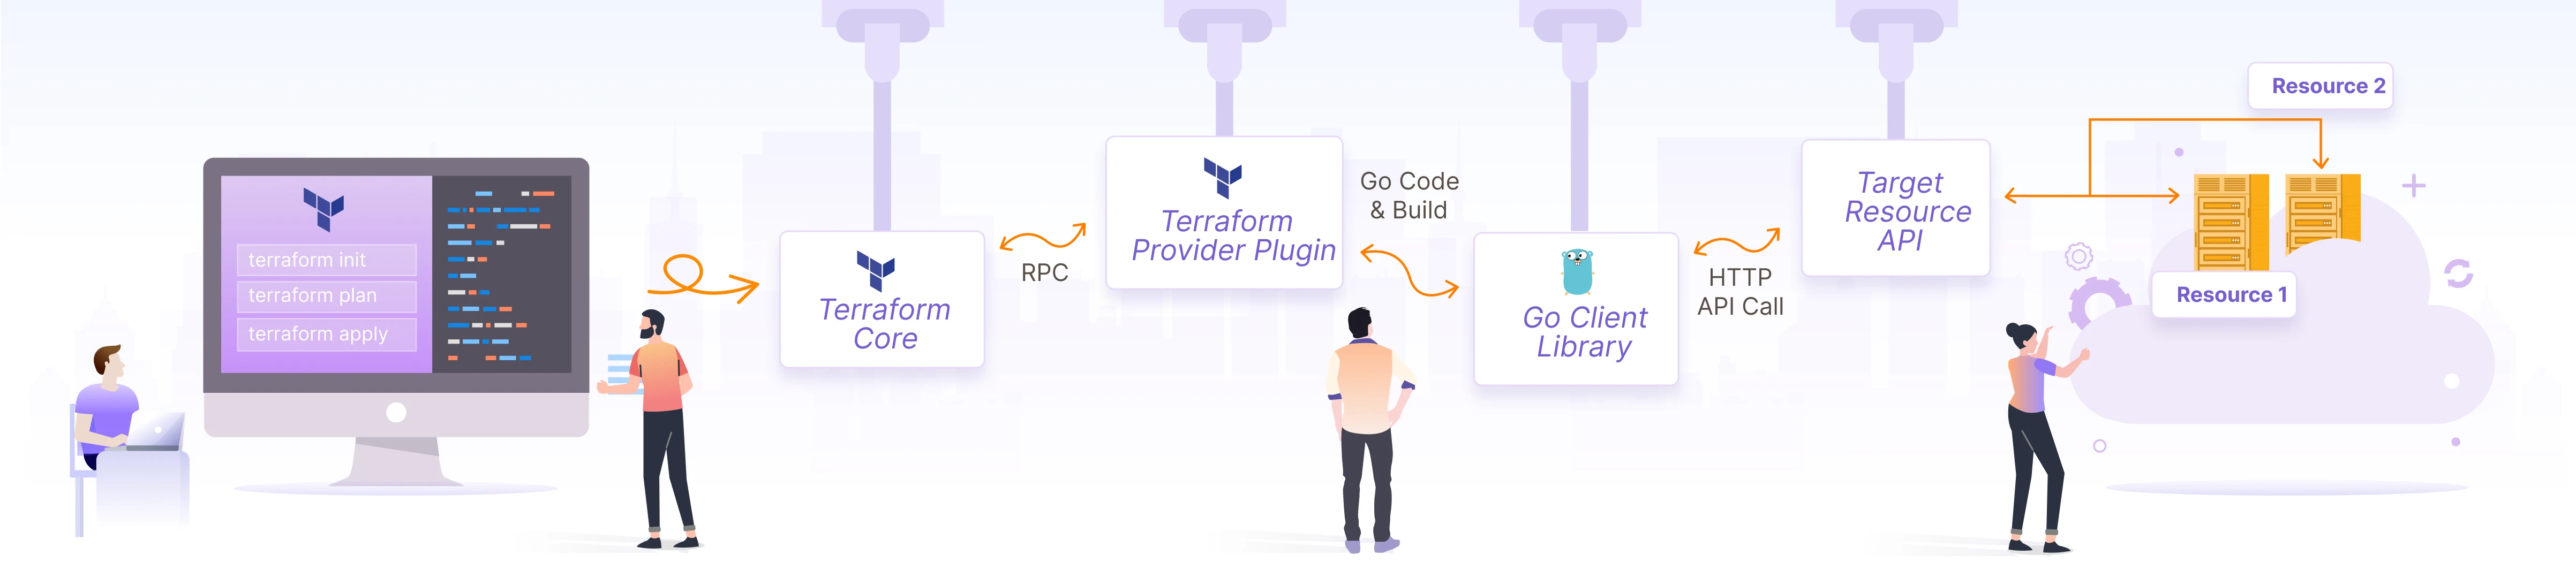
How Terraform and Provider plugin works?
As per the Terraform documentation:
Terraform core
Terraform Core is a statically-compiled binary written in the Go programming language. The compiled binary is the command line tool (CLI)
terraform, and this is the entrypoint for anyone using Terraform.The primary responsibilities of Terraform Core are:
- Infrastructure as code: reading and interpolating configuration files and modules
- Resource state management
- Construction of the Resource Graph
- Plan execution
- Communication with plugins over RPC
Terraform plugins
Terraform Plugins are written in Go and are executable binaries invoked by Terraform Core over RPC.
 Source: Terraform documentation
Each plugin exposes an implementation for a specific service, for example: AWS, or provisioner, such as bash. All Providers and Provisioners used in Terraform configurations are called as plugins. Terraform Core provides a high-level framework that abstracts away the details of plugin discovery and RPC communication so developers do not need to manage them.
The primary responsibilities of Provider Plugins are:
- Initialization of any included libraries used to make API calls.
- Authentication with the Infrastructure Provider.
- Define Resources that map to specific Services
The primary responsibilities of Provisioner Plugins are:
- Executing commands or scripts on the designated Resource after creation, or on destruction.
Please note our post focuses on how to develop Provider Plugins
Terraform CLI file and provider plugin installation
Terraform 0.13+ uses .terraformrc CLI config file to handle the provider installation behavior. So, we need to create the config file under the path $HOME/.terraformrc and add below content:
plugin_cache_dir   = "$HOME/.terraform.d/plugin-cache"
disable_checkpoint = true
There are two methods available to do the provider installation (from Terraform 0.13+).
Explicit Installation Method A provider_installation block in the CLI configuration allows overriding Terraform’s default installation behaviors, so you can force Terraform to use a local mirror for some or all of the providers you intend to use. In the explicit installation method, we will need to have a provider_installation block.
Implicit Local Mirror Method If the CLI configuration file does not have a provider_installation block, then Terraform produces an implied configuration.
We will be using Implicit local mirror method to install our custom provider.
Default behavior of terraform init, is usually to attempt to download the provider from the Terraform registry from the internet. Since we are mimicking the custom provider scenario, we can override this behaviour by implicit method. Using the implicit method, Terraform will implicitly attempt to find the providers locally in the plugins directory ~/.terraform.d/plugins for Linux systems and %APPDATA%\terraform.d\plugins in Windows systems.
What is required to develop custom Provider?
- Just a basic Go development knowledge is enough to get started.
- Exposed API details from the service provider for managing resources.
How to Install and configure Terraform
Refer here for installing Terraform
Windows:
- Download and extract the Terraform executable
- Add Terraform executable path to ENV PATH variable
In Linux flavours, extract and copy the Terraform executable in /usr/bin path to execute it from any directory.
Install Go and setup development environment
Follow the Go installation steps mentioned in official Go website and getting started with Go.
Custom Provider source code details
Go to $HOME/go/src path and create code.
cd $HOME/go/src
mkdir tf_custom_provider
Required source files for custom provider are:
main.goprovider.goresource_server.go
The code layout looks like this:
.
├── main.go
├── provider.go
├── resource_server.go
Functionality of the Provider
We will be creating a provider with the below functionality. Since this is going to be an example, we will be mocking the Terraform Resource create and delete functionalities. We will also be utilizing the random UUID generator API and it will be added as part of the Create functionality, to show the ability to invoke the API call. The API can be modified later with actual resource creation API for cloud provider, on prem service provider or any As a Service provider API.
main.go
Go entry point function is main.go.
// main.go
package main

import (
        "github.com/hashicorp/terraform-plugin-sdk/plugin"
        "github.com/hashicorp/terraform-plugin-sdk/terraform"
)

func main() {
        plugin.Serve(&plugin.ServeOpts{
                ProviderFunc: func() terraform.ResourceProvider {
                        return Provider()
                },
        })
}
provider.go
provider.go will have the resource server function calls.
// provider.go
package main

import (
        "github.com/hashicorp/terraform-plugin-sdk/helper/schema"
)

func Provider() *schema.Provider {
        return &schema.Provider{
                ResourcesMap: map[string]*schema.Resource{
                     "example_server": resourceServer(),
                },
        }
}
resource_server.go
All the resource creation has to be coded in resource_server.go. This file will have the resource function declaration and definition like create, delete etc, it also gets the input params required to create resources.
As part of this example provider, Resource server has the following functionalities:
- Create
- Delete
// resource_server.go
package main

import (
        "net/http"
        "log"
        "github.com/hashicorp/terraform-plugin-sdk/helper/schema"
)

func resourceServer() *schema.Resource {
        return &schema.Resource{
                Create: resourceServerCreate,
                Read:   resourceServerRead,
                Update: resourceServerUpdate,
                Delete: resourceServerDelete,

                Schema: map[string]*schema.Schema{
                        "uuid_count": &schema.Schema{
                                Type:     schema.TypeString,
                                Required: true,
                        },
                },
        }
}

func resourceServerCreate(d *schema.ResourceData, m interface{}) error {
        uuid_count := d.Get("uuid_count").(string)

        d.SetId(uuid_count)

        // https://www.uuidtools.com/api/generate/v1/count/uuid_count
        resp, err := http.Get("https://www.uuidtools.com/api/generate/v1/count/" + uuid_count)
        if err != nil {
                log.Fatal(err)
        }
        defer resp.Body.Close()

        return resourceServerRead(d, m)
}

func resourceServerRead(d *schema.ResourceData, m interface{}) error {
        return nil
}

func resourceServerUpdate(d *schema.ResourceData, m interface{}) error {
        return resourceServerRead(d, m)
}

func resourceServerDelete(d *schema.ResourceData, m interface{}) error {
        d.SetId("")
        return nil
}
Our example code implements mock resource creation for the provider called ‘exampleprovider’. In an actual implementation, it has to be changed for the provider name of the respective cloud or on-premises server. Most providers have API calls to be consumed for resource operation like create/update/delete etc.. So, we need to define the logic of resource operations like create and delete using the custom provider API calls, to apply the Terraform template.
After adding the logic for resource operations in resource_server.go, our custom provider is ready to get tested.
Build the Custom Provider code
go mod init
go fmt
go mod tidy
go build -o terraform-provider-example
Steps to copy provider executable to plugins directory
In order to copy and use the custom provider we have created, we need to create the below directory structure inside the plugins directory:
- Linux based system -
~/.terraform.d/plugins/${host_name}/${namespace}/${type}/${version}/${target} - Windows based system
%APPDATA%\terraform.d\plugins\${host_name}/${namespace}/${type}/${version}/${target}
Where:
- host_name-> somehostname.com
- namespace-> Custom provider name space
- type-> Custom provider type
- version-> semantic versioning of the provider (ex: 1.0.0)
- target-> target operating system
Our custom provider should placed in the directory as below:
~/.terraform.d/plugins/terraform-example.com/exampleprovider/example/1.0.0/linux_amd64/terraform-provider-example
So, as a first step, we need to the create the directory as part of our provider installation:
mkdir -p ~/.terraform.d/plugins/terraform-example.com/exampleprovider/example/1.0.0/linux_amd64
Then, copy the terraform-provider-example binary into that location:
cp terraform-provider-example ~/.terraform.d/plugins/terraform-example.com/exampleprovider/example/1.0.0/linux_amd64
Create Terraform .tf files
Let’s test the provider by creating main.tf, by providing the resource inputs. We have added the number of server count (uuid_count) as an input parameter for the demo purpose.
main.tf
Create main.tf file with code to create custom provider resource:
resource "example_server" "my-server-name" {
	uuid_count = "1"
}
version.tf
Create a file called versions.tf and add the path to custom provider name and version:
terraform {
  required_providers {
    example = {
      version = "~> 1.0.0"
      source  = "terraform-example.com/exampleprovider/example"
    }
  }
}
Test the Provider and output values
Execute the following Terraform commands to verify the custom provider functionalities we have added.
Terraform initialization
When we run terraform init command, the Terraform core fetches the provider plugin from the local path, since we have configured the provider in the versions.tf file. During the Terraform initialization, the custom provider has been cached into ~/.terraform.d/plugin-cache directory, to re-use the provider during next run.
$ terraform init

Initializing the backend...

Initializing provider plugins...
- Finding terraform-example.com/exampleprovider/example versions matching "~> 1.0.0"...
- Using terraform-example.com/exampleprovider/example v1.0.0 from the shared cache directory

Terraform has created a lock file .terraform.lock.hcl to record the provider
selections it made above. Include this file in your version control repository
so that Terraform can guarantee to make the same selections by default when
you run "terraform init" in the future.

Terraform has been successfully initialized!

You may now begin working with Terraform. Try running "terraform plan" to see
any changes that are required for your infrastructure. All Terraform commands
should now work.

If you ever set or change modules or backend configuration for Terraform,
rerun this command to reinitialize your working directory. If you forget, other
commands will detect it and remind you to do so if necessary.
Terraform plan
The terraform plan command, uses the server definition defined in the main.tf file.
$ terraform plan

Terraform used the selected providers to generate the following execution plan. Resource actions are indicated with the following symbols:
  + create

Terraform will perform the following actions:

  # example_server.my-server-name will be created
  + resource "example_server" "my-server-name" {
      + id         = (known after apply)
      + uuid_count = "1"
    }

Plan: 1 to add, 0 to change, 0 to destroy.
Terraform apply
The terraform apply command invokes the resourceServerCreate function, we have defined in resource_server.go file.
$ terraform apply -auto-approve=true

Terraform used the selected providers to generate the following execution plan. Resource actions are indicated with the following symbols:
  + create

Terraform will perform the following actions:

  # example_server.my-server-name will be created
  + resource "example_server" "my-server-name" {
      + id         = (known after apply)
      + uuid_count = "1"
    }

Plan: 1 to add, 0 to change, 0 to destroy.
example_server.my-server-name: Creating...
example_server.my-server-name: Creation complete after 0s [id=1]

Apply complete! Resources: 1 added, 0 changed, 0 destroyed.
Cleaning up
Terraform destroy
The terraform destroy command invokes the resourceServerDelete function, we have defined in resource_server.go file.
$ terraform destroy -auto-approve=true
example_server.my-server-name: Refreshing state... [id=1]

Terraform used the selected providers to generate the following execution plan. Resource actions are indicated with the following symbols:
  - destroy

Terraform will perform the following actions:

  # example_server.my-server-name will be destroyed
  - resource "example_server" "my-server-name" {
      - id         = "1" -> null
      - uuid_count = "1" -> null
    }

Plan: 0 to add, 0 to change, 1 to destroy.
example_server.my-server-name: Destroying... [id=1]
example_server.my-server-name: Destruction complete after 0s

Destroy complete! Resources: 1 destroyed.
Conclusion
In this technical blog post, we covered the topics below:
- How Terraform provider works.
- What is Terraform custom provider.
- Steps to create and build an example Terraform provider.
- Steps to use the custom provider.
- What happens while invoking the Terraform CLI commands.
Readers of this article can use the sample code given above and modify the API call with their own API for managing their resources. Also here is GitHub repo link to the source code. Hope you enjoyed the article, if you have any queries or feedback, let’s connect and start a conversation on LinkedIn.
Looking for help with building your DevOps strategy or want to outsource DevOps to the experts? learn why so many startups & enterprises consider us as one of the best DevOps consulting & services companies.
Bibliography and Reference
Stay updated with latest in AI and Cloud Native tech
We hate 😖 spam as much as you do! You're in a safe company.
Only delivering solid AI & cloud native content.
Posts You Might Like