Monitoring Velero Backup and Restore with BotKube

One of the key challenges for Kubernetes Day 2 operations is Observability i.e having a holistic view of your system’s health. This is where BotKube helps to improve your monitoring experience of your Kubernetes clusters by sending notifications to supported messaging platforms. BotKube helps you solve several interesting use cases, for example, monitoring Velero backup failure or certificate issue/expiry status by cert-manager, etc. Previously, we discussed how to integrate cert-manager monitoring using BotKube. In this blog, we will configure BotKube to monitor your Velero backups and restores.
What is BotKube?
BotKube is a messaging tool for monitoring and debugging Kubernetes clusters. BotKube can be integrated with multiple messaging platforms like - Slack, Mattermost, or Microsoft Teams to help you monitor your Kubernetes cluster(s), debug critical deployments, and gives recommendations for standard practices by running checks on the Kubernetes resources. - BotKube website
What is Velero?
Velero is an open source tool to safely backup and restore, perform disaster recovery, and migrate Kubernetes cluster resources. - Velero website
It supports snapshotting of your cluster’s Persistent Volumes using your cloud provider’s storage and restoring the Persistent Volumes from the snapshots.
While considering backup solutions for disaster recovery, we want to ensure backups for etcd - to restore our Master node and Cluster configs; and Persistent Volume for application data. With the help of Velero, you can create volume snapshots, on-demand backups, scheduled backups, or restore backups.
How to monitor Velero backups using BotKube?
With the release of BotKube v0.11.0+, monitoring of any Kubernetes resources, including custom resources, is supported. This allows us to configure alerts and notify of create, delete, error events of Velero resources. BotKube can notify us about the events and updates in status.Phase field in velero.io/v1/backups and velero.io/v1/restores resource.
Prerequisites
This post assumes that you already have a Kubernetes cluster with Velero and BotKube running on it. If you don’t have these things running, follow this section to get a minimal setup running on top of minikube. We will be configuring BotKube with Slack for this tutorial. You can use any other interface like Mattermost, MS Teams, Discord, etc. supported by BotKube as well.
How to create a Kubernetes cluster with Minikube?
- Install minikube on your machine by following the instructions given here.
-
To start the minikube cluster, run the following command.
 $ minikube start
 😄  minikube v1.20.0 on Ubuntu 20.04
 ✨  Using the docker driver based on existing profile
 👍  Starting control plane node minikube in cluster minikube
 🚜  Pulling base image ...
 🔄  Restarting existing docker container for "minikube" ...
 🐳  Preparing Kubernetes v1.20.2 on Docker 20.10.6 ...
 🔎  Verifying Kubernetes components...
     ▪ Using image gcr.io/k8s-minikube/storage-provisioner:v5
 🌟  Enabled addons: storage-provisioner, default-storageclass
 🏄  Done! kubectl is now configured to use "minikube" cluster and "default" namespace by default
Install and setup BotKube
- Install Helm on your machine by following the instructions given here.
-
To add the
infracloudioHelm chart repository, run the following command.$ helm repo add infracloudio https://infracloudio.github.io/charts "infracloudio" has been added to your repositories $ helm repo update ...Successfully got an update from the "infracloudio" chart repository Update Complete. ⎈Happy Helming!⎈ - Install the BotKube Slack app in your workspace by following the instructions given in this section of the documentation. You will be provided a Slack bot access token, be sure to save it.
-
To create the Helm values file for BotKube, run the following command.
cat <<EOF > botkube-values.yaml communications: slack: enabled: true channel: "test" token: "<TOKEN_FROM_3>" config: settings: clustername: "minikube" kubectl: enabled: true EOF -
To create a namespace and install BotKube, run the following command.
$ helm install botkube infracloudio/botkube \ --namespace botkube --create-namespace \ -f botkube-values.yaml -
Verify that the pods are running.
 $ kubectl get pods -n botkube
 NAME                       READY   STATUS    RESTARTS   AGE
 botkube-84f95dd594-qrz28   1/1     Running   5          24h
If any of the above instructions don’t work, please refer to the Botkube’s official documentation page for an updated version of these instructions.
How do you install Velero?
Velero consists of:
- A command-line client that runs locally
- A server that runs on your cluster
To install the CLI client locally, download and extract the latest release’s tarball for your client platform. Move the extracted velero binary to somewhere in your $PATH
Install Velero in your cluster:
-
To add
vmware-tanzuHelm repository, run the following command.$ helm repo add vmware-tanzu https://vmware-tanzu.github.io/helm-charts $ helm repo update - Configure provider credentials. Follow the Velero plugin setup instructions for your cloud provider. For example, if you are using AWS (as this guide does), follow the AWS plugin setup instructions to create an IAM user and S3 bucket and obtain a credentials file.
-
Install Velero. Add below in velero-values.yaml for configuring values.
 cat <<EOF > velero-values.yaml
 credentials:
   secretContents:
     cloud: credentials-velero
 configuration:
   provider: aws
   backupStorageLocation:
     bucket: <bucket-name>
     config:
       region: <region>
 EOF
helm install velero vmware-tanzu/velero --namespace velero -f velero-values.yaml -
Verify that the pods are running.
 $ kubectl get pods -n velero
 NAME                      READY   STATUS    RESTARTS   AGE
 velero-65656995d6-59c6r   1/1     Running   2          44h
If any of the above instructions don’t work, please take a look at the Velero’s official documentation page for an updated version of these instructions.
Let’s configure BotKube for monitoring
We will now configure BotKube to monitor the backups and restores custom resources of Velero.
Add the following snippet under config in the botkube-values.yaml file.
#config:
## Resources you want to watch
  resources:
    - name: velero.io/v1/backups
      namespaces:
        include:
          - all
      events:
        - all
      updateSetting:
        includeDiff: true
        fields:
          - status.phase
    - name: velero.io/v1/restores
      namespaces:
        include:
          - all
      events:
        - all
      updateSetting:
        includeDiff: true
        fields:
          - status.phase
This configures BotKube to start monitoring velero.io/v1/backups and velero.io/v1/restores resource. It monitors all the operations like create, update, delete, error from all the namespaces.
We are also monitoring the status.Phase field of the Velero custom resources. This will create a notification when an operation is triggered.
To update BotKube deployment, run the following Helm command.
helm upgrade botkube infracloudio/botkube -n botkube -f botkube-values.yaml
You can read more about this configuration in the resource_config.yaml syntax documentation section.
Let’s test our BotKube setup
We will deploy the example nginx application, present in the velero folder which was extracted from velero-x.y.z.tar.gz during installation.
$ cd velero-v1.6.0-linux-amd64
$ kubectl apply -f examples/nginx-app/base.yaml
namespace/nginx-example created
deployment.apps/nginx-deployment created
service/my-nginx created

$ kubectl get pods -n nginx-example
NAME                               READY   STATUS    RESTARTS   AGE
nginx-deployment-57d5dcb68-xn8xc   1/1     Running   0          97s
nginx-deployment-57d5dcb68-zl26q   1/1     Running   0          97s
Velero can backup or restore all objects in your cluster, or you can filter objects by type, namespace, and/or label. We are creating a backup nginx-backup to include all resources from the nginx-example namespace.
velero backup create nginx-backup --include-namespaces nginx-example

Wreak Havoc! Let’s delete the example nginx application using below command :
$ cd velero-v1.6.0-linux-amd64
$ kubectl delete -f examples/nginx-app/base.yaml
namespace "nginx-example" deleted
deployment.apps "nginx-deployment" deleted
service "my-nginx" deleted

$ kubectl get pods -n nginx-example
No resources found in nginx-example namespace.
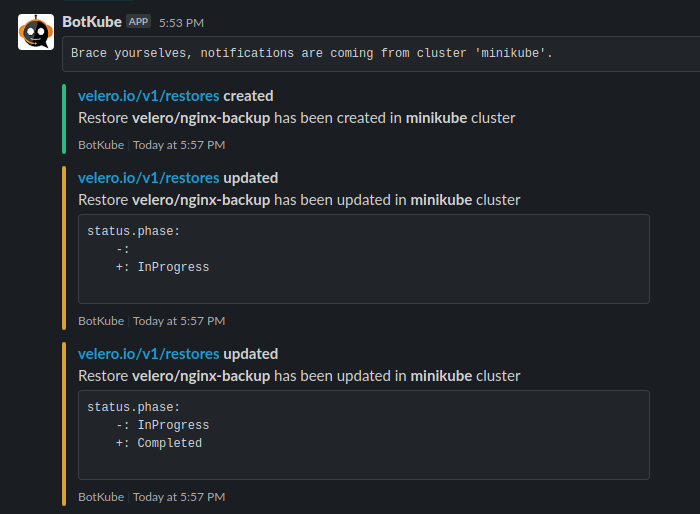
We will now restore the nginx-backup backup. We need to provide a backup name in the --from-backup parameter to identify which backup we want to restore.
$ velero restore create nginx-backup --from-backup nginx-backup
Restore request "nginx-backup" submitted successfully.
Run `velero restore describe nginx-backup` or `velero restore logs nginx-backup` for more details.
Conclusion
In this post, we discussed what BotKube and Velero are. We also looked at how you can configure BotKube to monitor Velero backups for your Kubernetes clusters. Similarly, we can use BotKube to monitor any custom resources by updating the resource configurations.
Hope you found the montoring Velero backup using BotKube blog post informative and engaging. If you have any questions, feel free to reach out to me on LinkedIn. For regular cloud native updates from InfraCloud, follow us on LinkedIn and Twitter.
Looking for help with observability stack implementation and consulting? do check out how we’re helping startups & enterprises as an observability consulting services provider.
Stay updated with latest in AI and Cloud Native tech
We hate 😖 spam as much as you do! You're in a safe company.
Only delivering solid AI & cloud native content.
Posts You Might Like