How to Migrate React App from AWS ECS to CloudFront & S3
 Yachika Ralhan
  Yatish Sharma
 This post is co-written by infranauts - Yachika Ralhan and Yatish Sharma.
Background story
We used to have a server-side React application hosted on Amazon Elastic Container Service (ECS). Day-by-day, with the increase in traffic, we had to increase the ECS task replicas and the resources allocated to those. Doing this increased the cost directly. Additionally, this approach had slow delivery and a long loading time. As the demand grew, we needed to scale without costing a fortune while improving the application user experience in loading and speed.
Solution
We switched to static rendering, considering the above problems as it has the advantage of serving requests stupidly fast. It generates a single HTML file for every page that the user can access ahead of time. That’s why it is a faster, cheaper, and more straightforward solution. We serve files all around the globe using CDN, which gives the site a speedy response time.
Here, S3 with CloudFront fulfills all our requirements. We chose Amazon S3 & CloudFront to store, secure, and deliver the static content at scale with cost optimization. S3 is simple to use and provides durable, highly available, and scalable data storage at a low cost. In contrast, CloudFront is a CDN service that speeds up content delivery by leveraging its worldwide network of data centers known as edge locations to reduce delivery time by caching the content close to your end-users.
Benefits of serving static application hosted on S3 & CloudFront
- Ease of Use and Maintenance
- Deploying static files requires far fewer moving parts than an app with a server. We just need to upload all the files to S3. There is less to set up and maintain.
- There is no dependency on configuring servers.
- Due to S3, we were now free from the overhead of building and maintaining Docker images, and no need to worry about the image size.
- Less Cost
- There is a significant reduction in cost since S3 is for static resource handling.
- Faster delivery and High-Performance
- Static resources always load fast. With CDN configured, it delivers content to customers with low latency, which significantly improves performance.
- Scalable
- As an Amazon CloudFront involved, it automatically provides seamless scalability and elasticity.
- More Secure
- Lambda@Edge to add security headers to every request-response (will discuss more later in the post).
- AWS Web Application Firewall.
Challenges we faced
- Migrating the old server-side rendered React application to static content application involved many code changes and dependencies migrations.
- We were using React v16.x and React Router of v3.x, and somehow, this combination wasn’t working for S3 hosted static web applications. As a workaround, we migrated the React Router to React Router DOM.
- Adding all security response headers was not achievable at the origin we used to have at the server, so Lambda@Edge solved our problem.
Demo
Let’s walk through a demo on how you deploy a sample React app on S3 and CloudFront.
Create sample project
First, we need a React app that we can build and deploy to AWS S3. For the sake of simplicity, we are going to use the example app provided by Facebook. This step will hardly take 2-3 minutes.
npx create-react-app my-app
cd my-app
npm start
Now, we should be able to access it on <http://localhost:3000/>. And you will see something similar to this.

Deploy to S3
Build
We will build our application for the deployment using the npm command. Once you execute the build command, you will get your production build in a minute. The following step will generate the static files in the build directory.
npm run build
Bucket Creation
Amazon S3 buckets have the most common use case to serve the static assets, including files like images, videos, music, or even scripts like .js or .css.
- Create an account or sign in to the AWS Console.
- Navigate to the S3 service and click Create Bucket. Provide a suitable name for your bucket and select an appropriate region and keep the other settings as it is.
- Scroll to the bottom of the page and click Create Bucket.
By default, all the content of the S3 bucket is private, so none of the users can access your content yet. We will create bucket policies later in this blog post so no one can access the bucket content except the CloudFront. Using this approach makes the hosting flow more secure.
Push to S3
We will use the awscli to push the production-ready build of our application to S3. You can use the following environment variables for AWS authentication and authorization or the aws configure command to provide the required details.
export AWS_ACCESS_KEY_ID=<YOUR-AWS-ACCESS-KEY>
export AWS_SECRET_ACCESS_KEY=<YOUR-AWS-SECRET-ACCESS-KEY>
export AWS_DEFAULT_REGION=<DEFAULT-REGION>
Run the following command to verify your AWS credentials.
aws sts get-caller-identity
Run the following command to push the earlier built package of our application.
aws s3 sync build/ s3://<BUCKET-NAME>
CloudFront Integration
Follow the steps to create and configure the CloudFront distribution with the AWS S3 bucket.
- Select the CloudFront service in the AWS console, click Create Distribution.
-
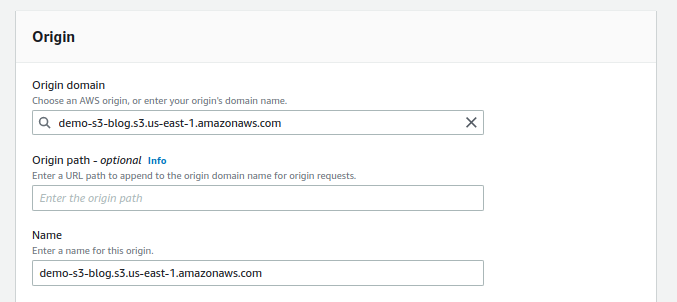
Go to the Origin section and select the S3 domain name in the Origin Domain dropdown. And it’ll automatically populate the Name. You will see something like this.
-
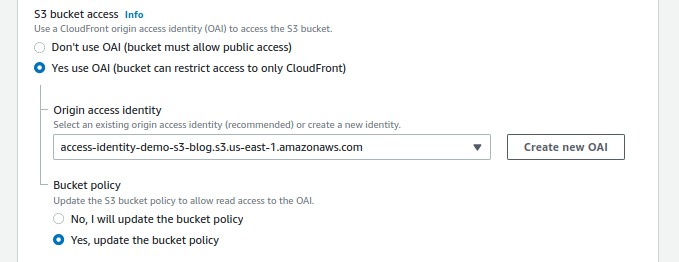
Select the Yes use OAI in the S3 bucket access, click on Create new OAI, then choose Yes, and update the bucket policy from the Bucket policy sub-section. This step will update the bucket policy with a policy, which means this distribution can access the bucket objects.
-
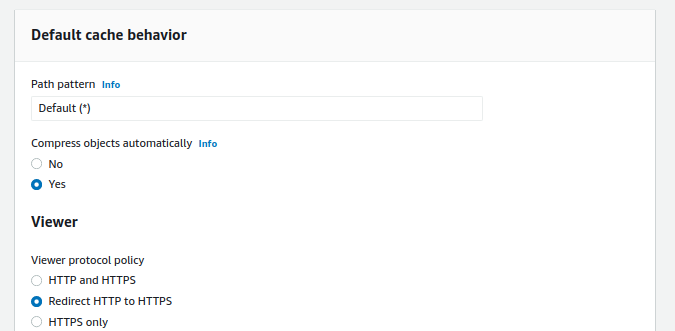
Choose Redirect HTTP to HTTPS in the Viewer sub-section of Default cache behavior.
-
Go to the Settings section at the bottom of the page and provide the index.html in the Default root object.

- Scroll down to the bottom of the page, and click on Create distribution to create the CloudFront distribution with the provided configuration. It will take around 5 minutes to deploy a CloudFront distribution.
-
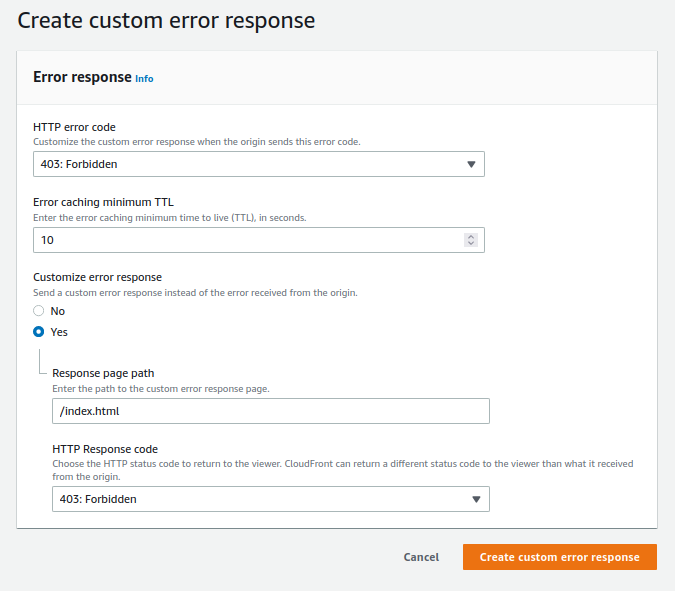
[optional] You can configure CloudFront to return a custom error response to the viewer in case the page that you’re serving through CloudFront is unavailable for some reason. Click the ID of your newly created distribution, then click on the Error Pages tab. Select Create custom error response—select 403: Forbidden in the HTTP error code dropdown menu. Choose Yes in Customize error response and provide the /index.html in the Response page path. When done, click Create custom error response.
-
Go to the General tab and copy the distribution domain name and paste it into the browser. And you will see something similar to this.
Hurray!! You did it. BUT, it seems we have done nothing related to app security.
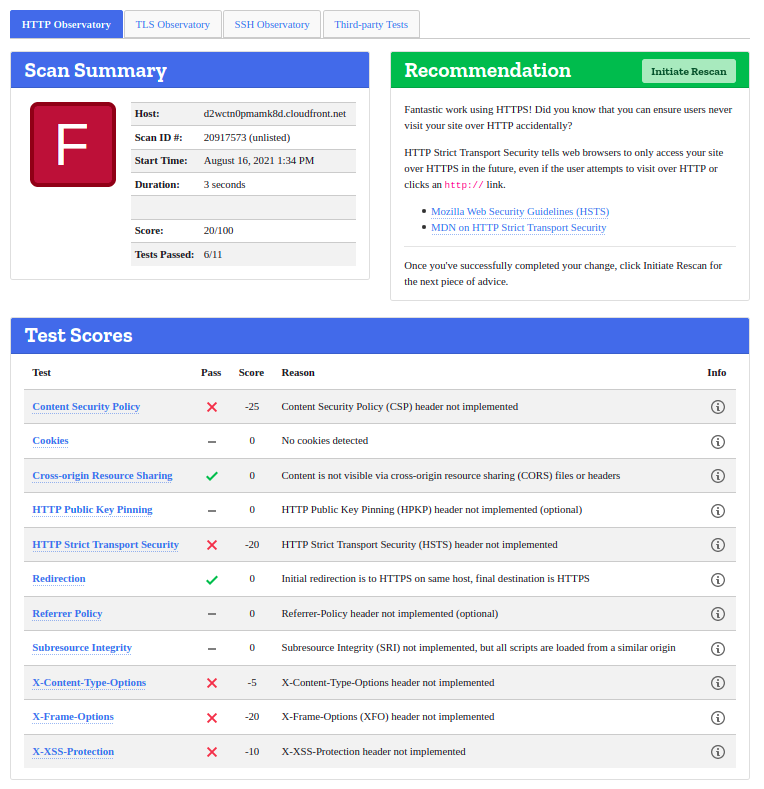
In the next section, we will learn how to add HTTP security headers specifically targeted to improve the security and privacy of both viewers and content providers. Adding HTTP security headers can prevent you from attacks like cross-site scripting attacks. We have used Mozilla Observatory to test the app for header security. The following screenshot shows the rating of the app without the security headers.
Security Headers: Lambda@Edge
What are security headers?
Security headers are a group of headers in the HTTP response from a server that tells your browser how to behave when handling your site’s content. For example, X-XSS-Protection is a header that Internet Explorer and Chrome stop the pages from loading when they detect cross-site scripting (XSS) attacks. Follow the web security guidelines by Mozilla to learn more about it.
The following diagram illustrates the CloudFront distribution without Lambda@Edge.
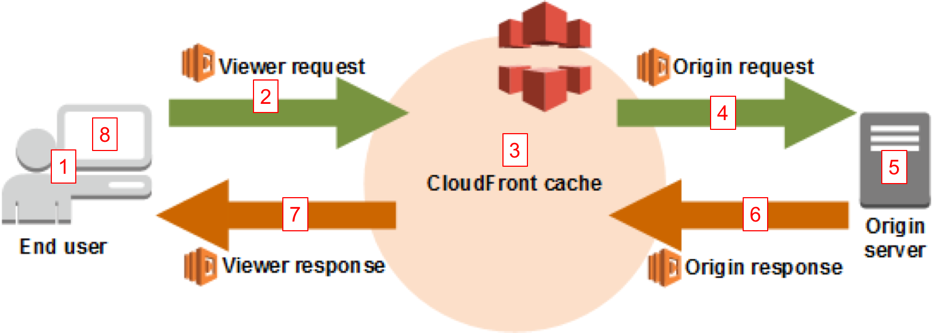 Image source: AWS blog
Let’s look at the following diagram to understand the Lambda@Edge integration with CloudFront.
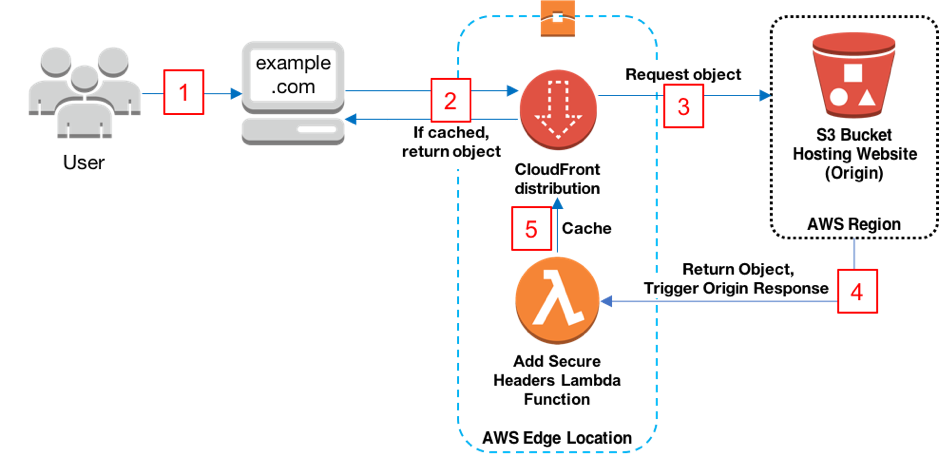 Image source: AWS blog
Workflow -
- Viewer requests website www.example.com.
- CloudFront returns the object from the cache to the viewer if the object is cached already. Otherwise, it moves on to step 3.
- CloudFront requests the object from the origin that is an S3 bucket.
- S3 returns the object, which in turn causes CloudFront to trigger the origin response event.
- Our Add Security Headers Lambda function triggers and the resulting output is cached and served by CloudFront.
Follow the post Adding HTTP Security Headers Using Lambda@Edge and Amazon CloudFront to try out the above flow.
What next!!
You can integrate the AWS Web Application Firewall with CloudFront for better security and any CI tool to automate the overall flow for frontend deployment to S3 and CloudFront. We have done the same using Circle-CI. Also, you can tweak other settings of CloudFront to make it production-ready, like Alternate Domain names, custom SSL Certificates, etc.
That’s a wrap-up, folks. We hope you found this post informative and engaging. If you have questions related to this, feel free to reach out to Yatish Sharma and Yachika Ralhan on LinkedIn and start a conversation :)
Looking for help with building your DevOps strategy or want to outsource DevOps to the experts? learn why so many startups & enterprises consider us as one of the best DevOps consulting & services companies.
Stay updated with latest in AI and Cloud Native tech
We hate 😖 spam as much as you do! You're in a safe company.
Only delivering solid AI & cloud native content.
Posts You Might Like