Enhancing Kubernetes Application Security with NeuVector

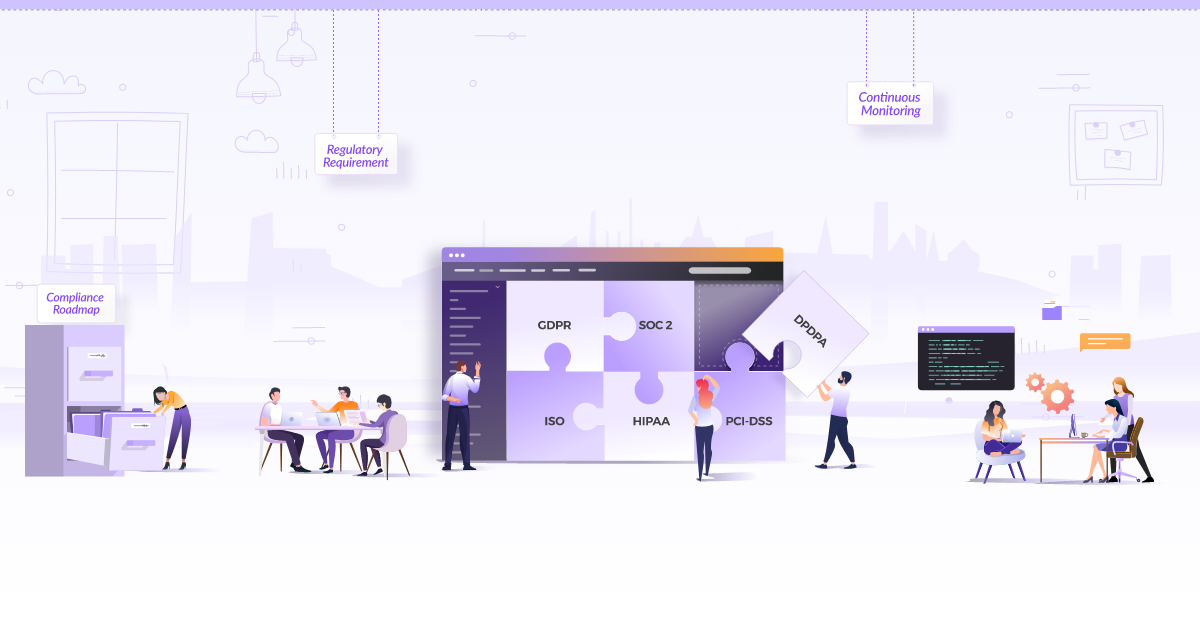
Scanning container images and enforcing vulnerability and compliance management are crucial to container security. To operate in a lot of industries and geographies, it is essential for an organization to achieve regulatory compliance like GDPR, NIST, HIPAA, and PCI. In a containerized environment, scanning container images in the pipeline (at the earliest possible stage or even during image building) is important to identify and reject any vulnerabilities. Even when the images are stored in a registry, you have to scan them continuously because new vulnerabilities might occur after approval. Live production environments also require ongoing vulnerability and compliance scanning to identify misconfigurations or new vulnerabilities being introduced due to fast-changing environments.
While manual image scanning can provide valuable insights into potential security issues, it can be time-consuming and may need to be more scalable for large-scale deployments. As a result, automated image scanning tools and solutions have become more popular to complement manual efforts and improve the efficiency and effectiveness of security assessments for container images.
DevSecOps is an approach that emphasizes integrating security measures from the early stages of product development. This approach reduces the cost of addressing security issues during production and facilitates timely product delivery. Security should be an integral part of the software development life cycle (SDLC) to establish a “Secure SDLC” process that ensures the delivery of a secure application.
Automated tools like Trivy, Aqua Security, Twistlock, Snyk, and NeuVector can continuously scan and monitor container images for vulnerabilities, providing developers with faster feedback and enhancing containerized applications’ overall security posture.
In this blog post, we will focus on using NeuVector to identify image vulnerabilities as part of CI/CD pipeline scans and scan the runtime environment. While scanning for vulnerabilities is an easy security layer to implement, good security practices dictate that you should always assume your environment contains unknown or unpatched vulnerabilities or has already been exploited. Mature environments will always employ effective security layers against zero-day attacks, unpatched CVEs, internal actors, and other real-time vectors threatening runtime environments.
What is NeuVector?
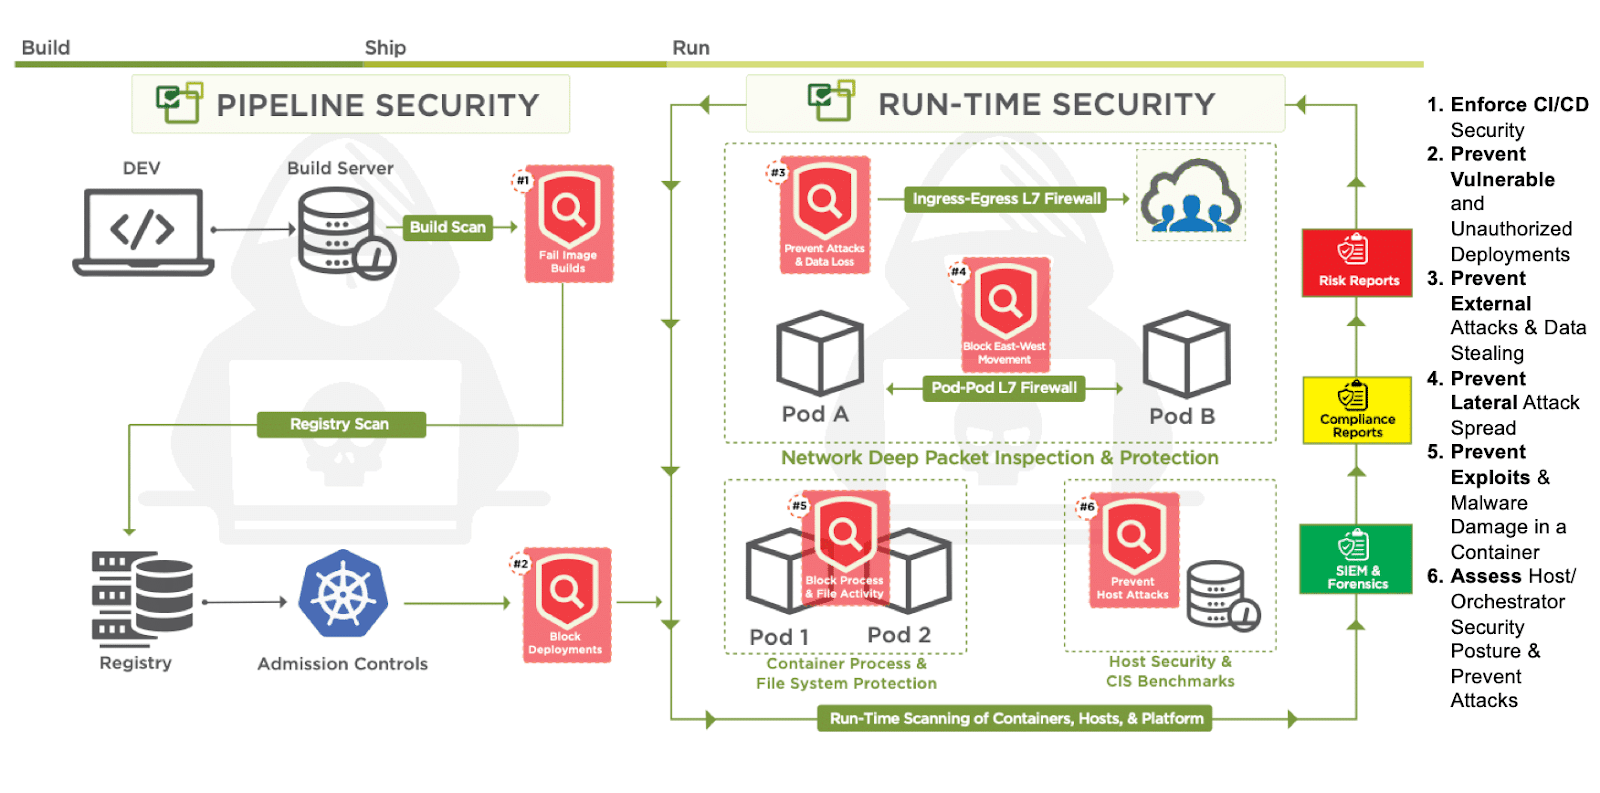
NeuVector is a full lifecycle container security that adds multiple security layers for development pipelines and the Kubernetes runtime environment. There are 3 key areas for these respective security layers: Scanning, Admission Control, and Zero-Trust Runtime.
NeuVector offers a comprehensive suite of security features designed to protect Kubernetes environments at different stages.
-
Compliance Scanning: You can employ NeuVector’s compliance scanning in your pipelines and during runtime. It compares the security settings of any Kubernetes setup with the CIS Kubernetes Benchmark, highlighting any deviations.
-
Vulnerability Scanning: NeuVector’s vulnerability scanning works seamlessly in your pipelines and during runtime. It detects software vulnerabilities in container images, cluster nodes, or the cluster orchestrator. NeuVector’s admission controller utilizes the results of vulnerability scans to identify and, if necessary, block images with security risks.
-
Integration with DevOps Tools: NeuVector’s scanning capabilities seamlessly integrate with popular DevOps tools like Jenkins, GitHub Actions, and Azure DevOps, making it easier to incorporate security into your DevOps workflow.
-
Runtime Security: NeuVector’s runtime security employs behavior-based zero-trust security policies. These policies provide an additional layer of security that remains effective even when vulnerabilities are unidentified or lack patches. Notably, NeuVector holds nine United States Patents for its innovative network-centric network inspection and its ability to enforce network policies in Kubernetes without relying on side-cars, agents, or IPTables manipulation.
-
Zero-Trust Security: NeuVector’s runtime security ensures that only authorized processes and network connections are permitted within the containerized environment, further enhancing the security of your Kubernetes deployments.
By generating security policies directly from the processes and network connections unique to the workload, NeuVector can alert or enforce those policies and even export those policies as Security as Code configuration files, allowing the same zero-trust security policies to be reused anywhere the application is deployed.
Now that we know about NeuVector, let’s dive into the demonstration and uncover its advantages at different SDLC phases. We will be starting with Build-Scan.
Build time scanning
Build time scanning is a proactive security practice that involves analyzing your application’s dependencies and code during the build process. Identifying vulnerabilities and potential security risks early can prevent these issues from propagating to production environments.
By integrating NeuVector’s build time scanning into the GitHub Actions workflow, we can automatically scan container images as part of the build process. Let’s walk through the steps to set up build time scanning using the NeuVector standalone scanner and GitHub Actions:
Step 1: Repository Setup
You can begin by creating a GitHub repository for your project. This will serve as the foundation for implementing the build-time scanning workflow. We created the neuvector-github-action repo. You can create your own or fork it to follow up with this tutorial.
Step 2: Workflow Definition
Next, we will define a GitHub Actions workflow by creating a YAML file (e.g., neuvector-build-action.yaml) in the repository. You can configure the workflow to trigger events. Here, we have created one for the push events.
name: build
on:
  push:
    branches:
      - main
The sections are described below:
- on: We define the events triggering the workflow.
- push: This is the specific event we are specifying. In this case, the “push” event occurs whenever code is pushed to the repository.
- branches: This further filters when the workflow should be triggered based on branch activity.
- main: This indicates the specific branch triggering the workflow. This example triggers the workflow only when the code is pushed to the “main” branch.
Step 3: Incorporating NeuVector
Now, we will integrate NeuVector’s build-time scanning action into our workflow. This action allows you to scan container images and generate reports on vulnerabilities.
jobs:
  build:
    name: Build
    runs-on: ubuntu-latest
    outputs:
      output1: ${{ steps.step2.outputs.high_vulnerability_count }}
      output2: ${{ steps.step2.outputs.vulnerability_count }}
      output3: ${{ steps.step2.outputs.medium_vulnerability_count }}
    steps:
      - name: Checkout code
        id: step1
        uses: actions/checkout@v2
      - name: Build image
        run: |
          docker build -t org/image-name:${{ github.sha }} .
      - name: Scan Image
        id: step2
        uses: neuvector/scan-action@main
        with:
          image-repository: org/image-name
          image-tag: ${{ github.sha }}
          min-high-cves-to-fail: "3"
          # min-medium-cves-to-fail: "10"
          # cve-names-to-fail: "CVE-2023-2603,CVE-2022-3602"
The sections are described below:
-
Jobs: Jobs represent a set of tasks that we want to perform. It consists of one or more “steps.” Each step is an action or command executed within the job. Steps are defined in the steps section of a job. We are running two jobs: Build and Job2.
-
Build:
- This job is named “Build” and runs on an “ubuntu-latest” virtual machine.
- It defines three outputs: output1, output2, and output3. These outputs will store values from the “Scan Image” step.
- Steps include:
- Checking out the repository code.
- Building a Docker image.
- Scanning the Docker image using the neuvector/scan-action action. The result values (high vulnerability count, vulnerability count, and medium vulnerability count) are captured as outputs and will be used in the second job.
Here we are using the neuvector/scan repo. This repo contains all the necessary files for the NeuVector scanner to work. Out of which action.yaml and scan-run.sh are the configuration files. Let’s take a look at these files one by one.
action.yml: This blueprint file defines and configures all the options available for the scanner. In addition to defining repository, username, password, image, and image-tags, it also defines a few conditionals we can use to manage the scanner.
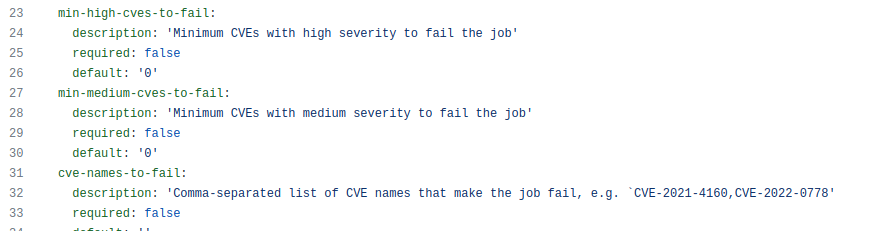
min-high-cves-to-fail, min-medium-cves-to-fail: The job will fail if high/medium CVEs exceed the number. This will force SDLC to return to the previous step, fix those CVEs, and re-run the build.


cve-names-to-fail: If we are concerned about specific CVEs, write their names here. The job will fail If the CVEs are found.

Therefore, we know this image requires further attention, and we should only let this get deployed into our environment with additional attention.
This file also defines outputs generated after the scan is complete.
outputs:
  vulnerability_count:
    description: 'Number of found vulnerabilities'
  high_vulnerability_count:
    description: 'Number of found vulnerabilities with high severity'
  medium_vulnerability_count:
    description: 'Number of found vulnerabilities with medium severity'
run-scan.sh: This shell script runs the scanner Docker image and shows the outputs in the scan_results.json file.
Step 4: Print the Vulnerability count
This step is optional. We used it here to show that we could use the information of found CVEs and make some decisions based on that. In our case, it is just echoing the counts.
       job2:
         runs-on: ubuntu-latest
         needs: build
         steps:
           - run: echo "${{needs.build.outputs.output1}}, ${{needs.build.outputs.output2}}, ${{needs.build.outputs.output3}}"
The section is described below:
- Job2
- This job runs on an “ubuntu-latest” virtual machine.
- It has a dependency on the “build” job (specified by needs: build), meaning it will only run if the “build” job is successful.
- The step in this job echoes the values of the three outputs (output1, output2, and output3) from the “build” job, showing the vulnerability counts in the scanned image.
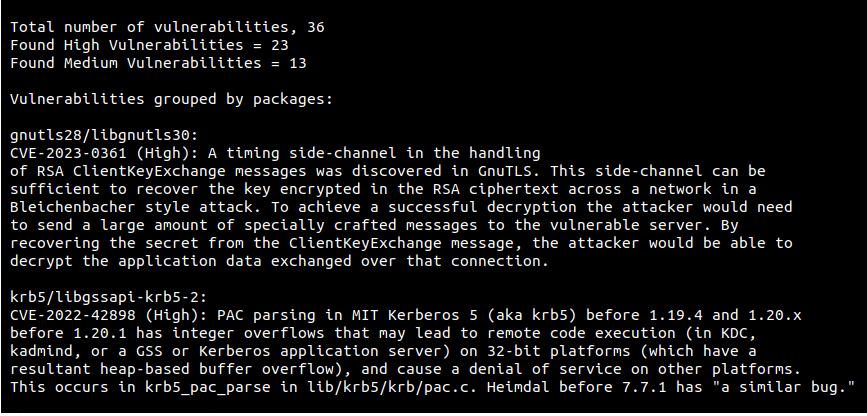
Once the scan is successful, you should see a similar result: 36 total vulnerabilities, of which 23 are high and 13 are medium.
At this point, we’ve configured NeuVector with GH actions and scanned an image to check for vulnerabilities. Next, we will see how NeuVector can help in scanning the registries.
Registry scanning
Even when performing image scanning during build time, there is a time delay from building an image to deploying it. New vulnerabilities may get detected in between these phases. It is essential to scan the registries periodically. Let’s explore how to monitor and manage the vulnerabilities by scanning the registries.
You will need the following:
- A Kubernetes cluster. We used a Rancher cluster for this demonstration.
- Use one of the ways mentioned in the NeuVector deployment doc to deploy the NeuVector. Access the NeuVector dashboard through the WebUI service IP and log in with the default admin/admin credentials. We must change the credentials after login.
Once done, log in with the new credentials and go to the Assets → Registries section to configure a registry. NeuVector supports several registries. We can get the list from the NeuVector admission control docs. We will choose ‘Docker Registry’ for our use case, give it a name, and enter the registry URL, username, password, and a filter to scan a registry.
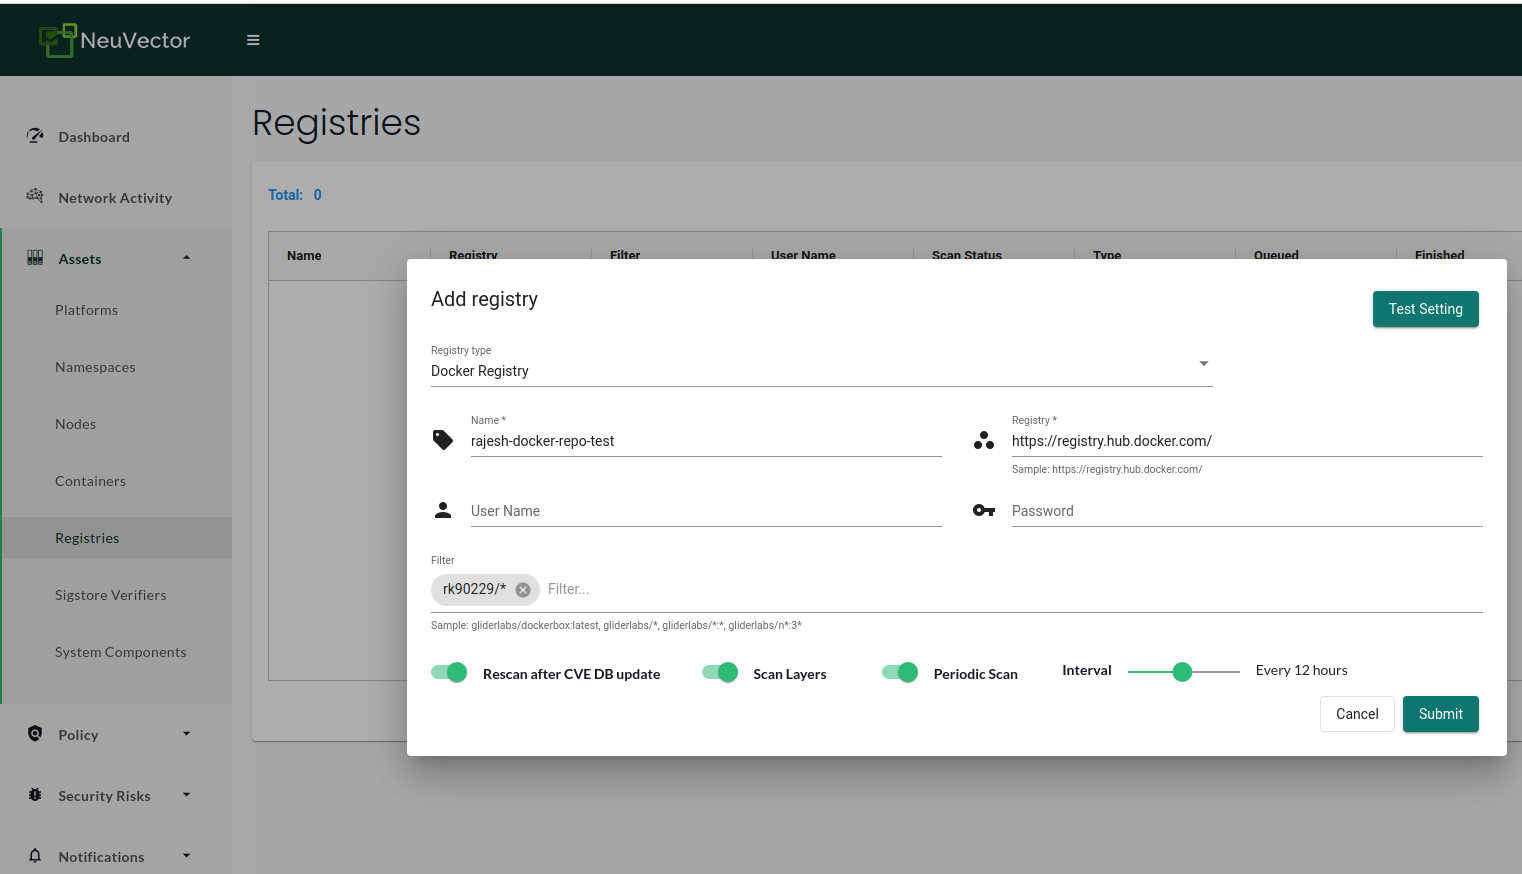
You can test the settings using the “Test Setting” button. If the test returns any errors, you have to fix them. There are some options visible at the bottom of the configuration popup. Let’s quickly understand them:
- Rescan after CVE DB database: NeuVector scanner CVE DB is updated every few days, and the setting should be enabled as this would rescan the registries for new CVEs.
- Scan Layers: With the scan layers feature, NeuVector can scan all image layers to check for hidden vulnerabilities.
- Periodic Scan: We can enable this to scan the registries periodically. It is optional and mainly not required if “Rescan after the CVE DB update” is enabled.
Once the test returns successful, click on submit to add the registry. After this, we can click the “Start Scan” button to start the scan immediately.
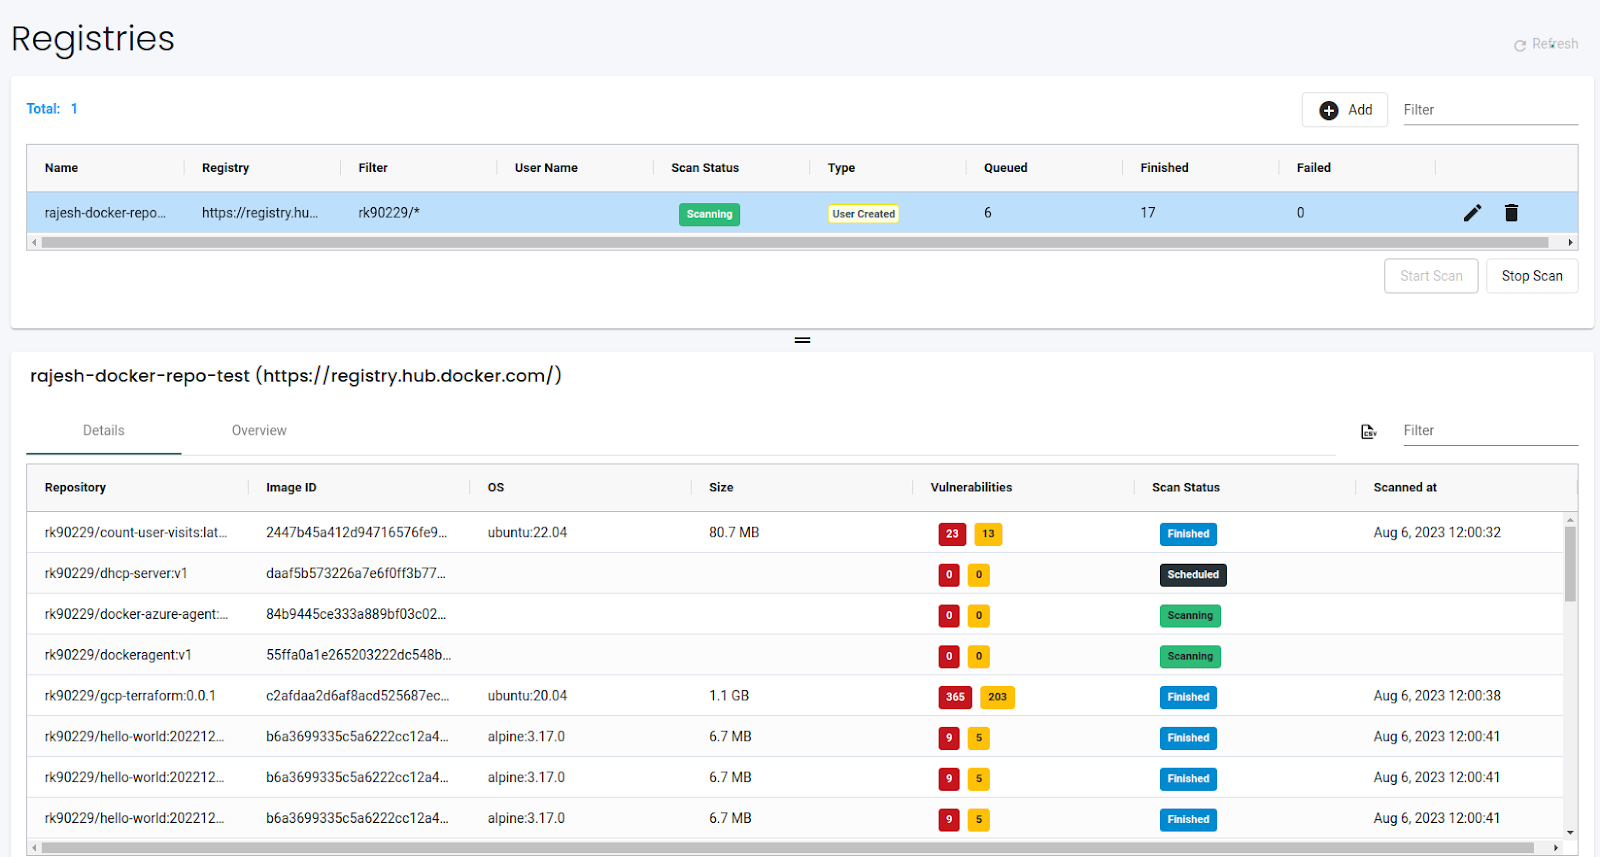
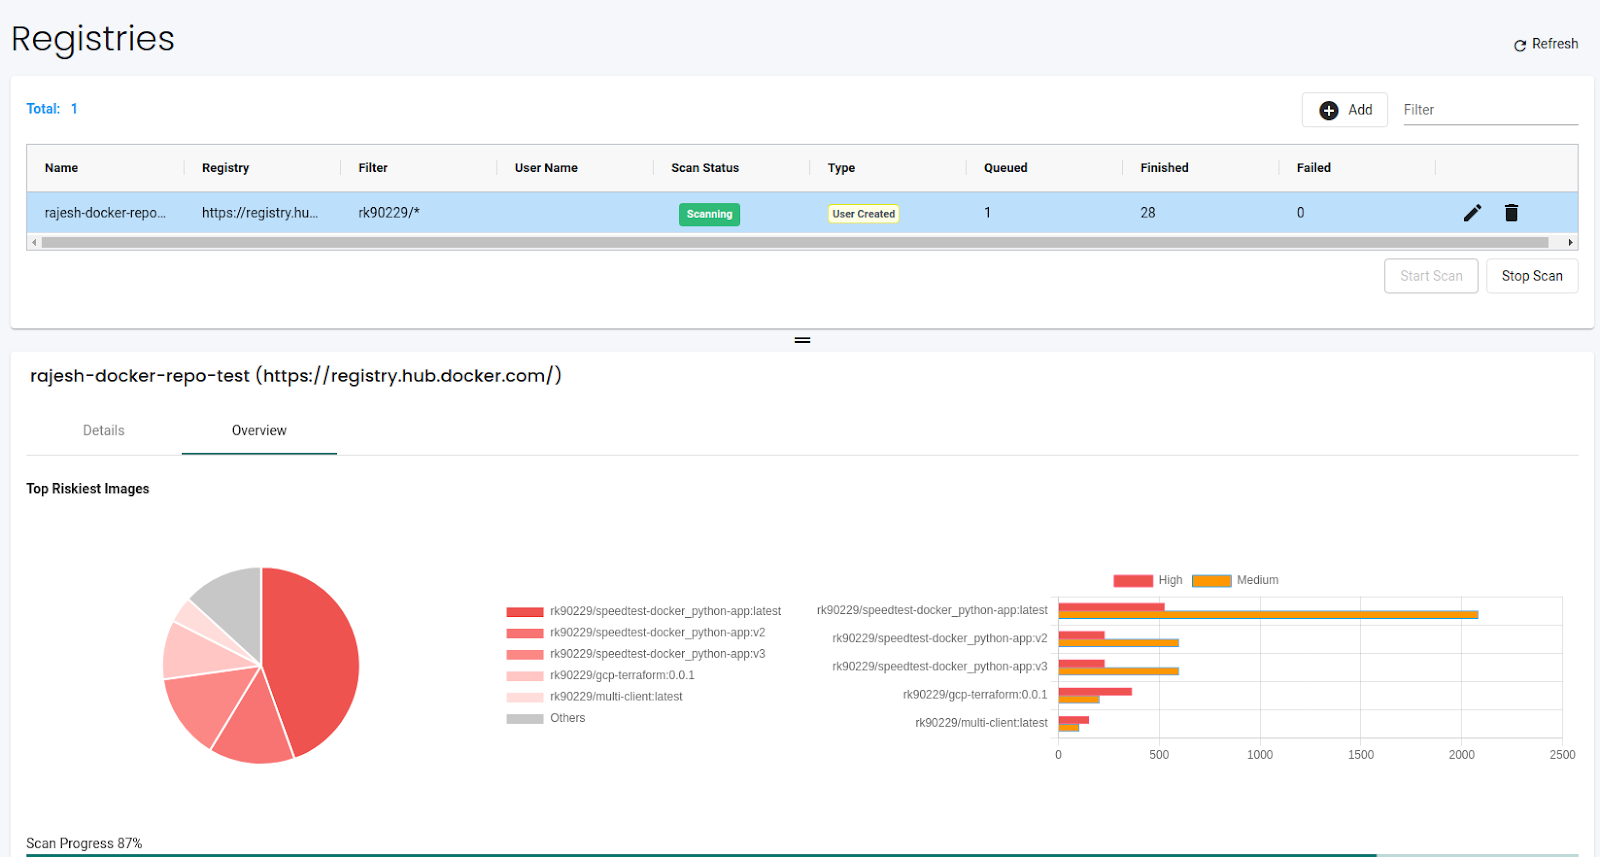
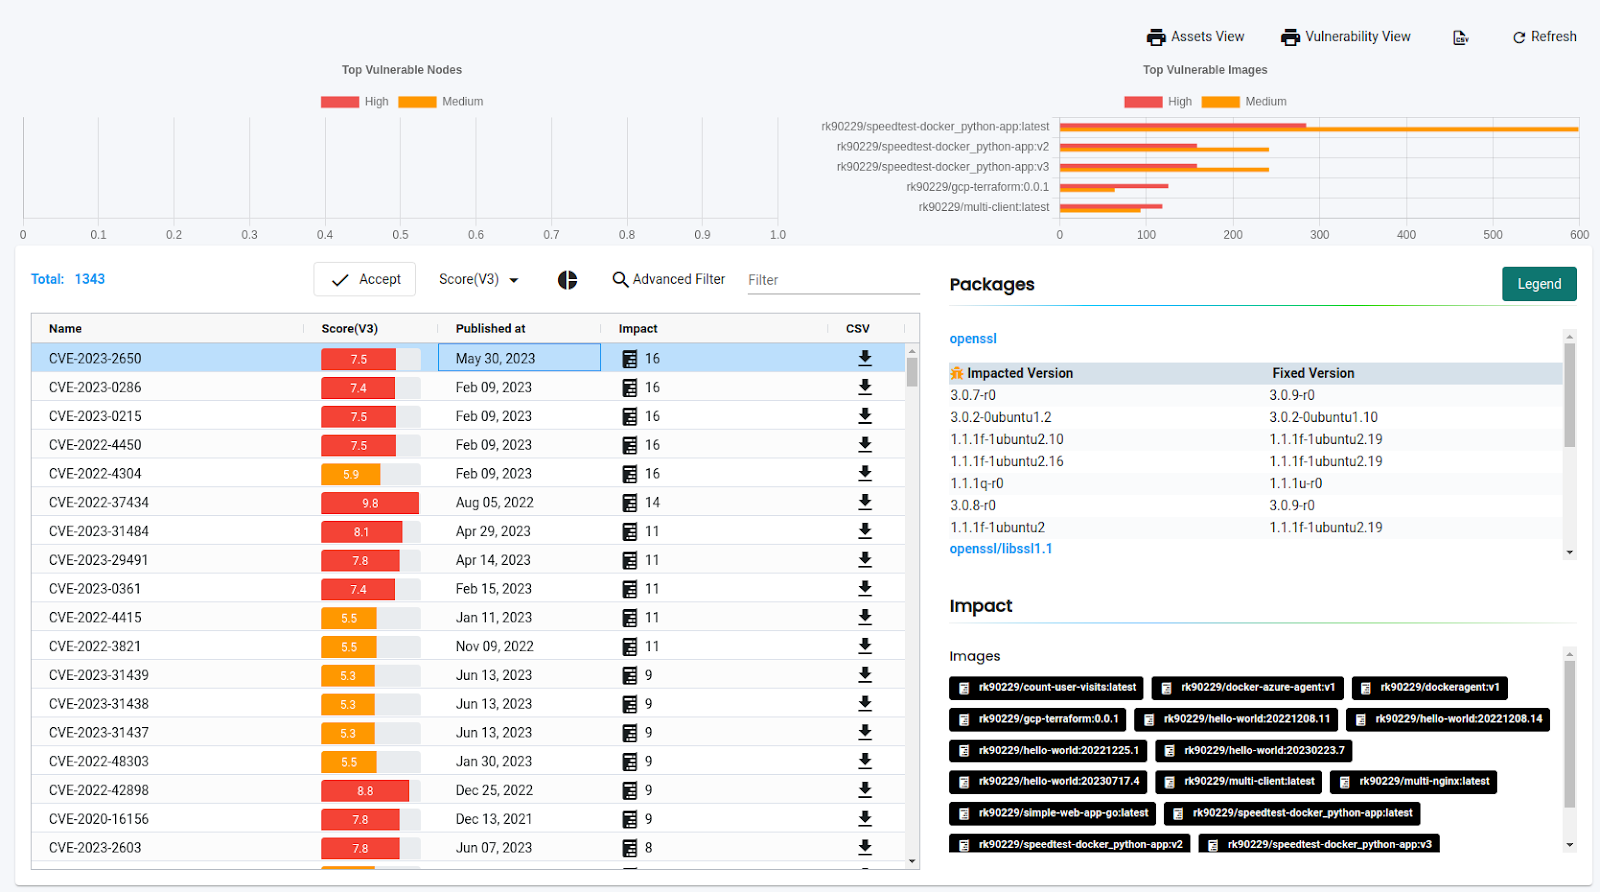
The details page lists all the images and their corresponding number of high and medium vulnerabilities. We can see the top 5 riskiest images in the registry on the overview page.
We can click on the individual images on the details page to see detailed information about the images. The vulnerabilities tab lists all the vulnerabilities in the image. If we have enabled layer scan, it also shows vulnerabilities by layers.
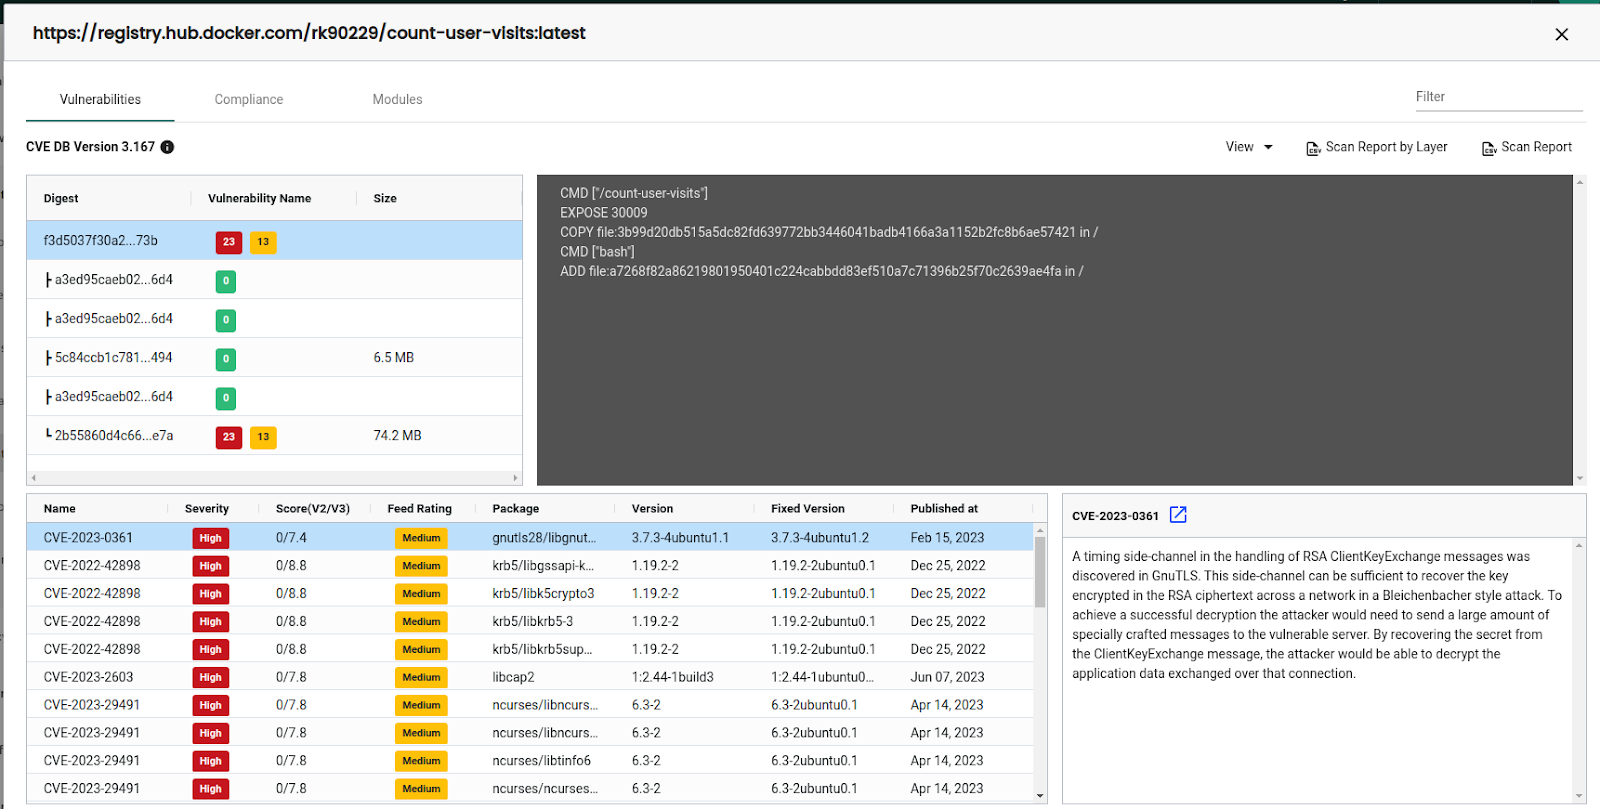
The compliance tab shows the compliance information. As shown below, this particular image has three compliance issues 4.1, 4.6, & 4.8. “I” in compliance means it is an image-type vulnerability. NeuVector can also scan hosts and containers, but we are sticking to it in this blog post.

The modules section shows which packages are vulnerable in the image. With this information available, investigating and mitigating the vulnerabilities becomes easy.
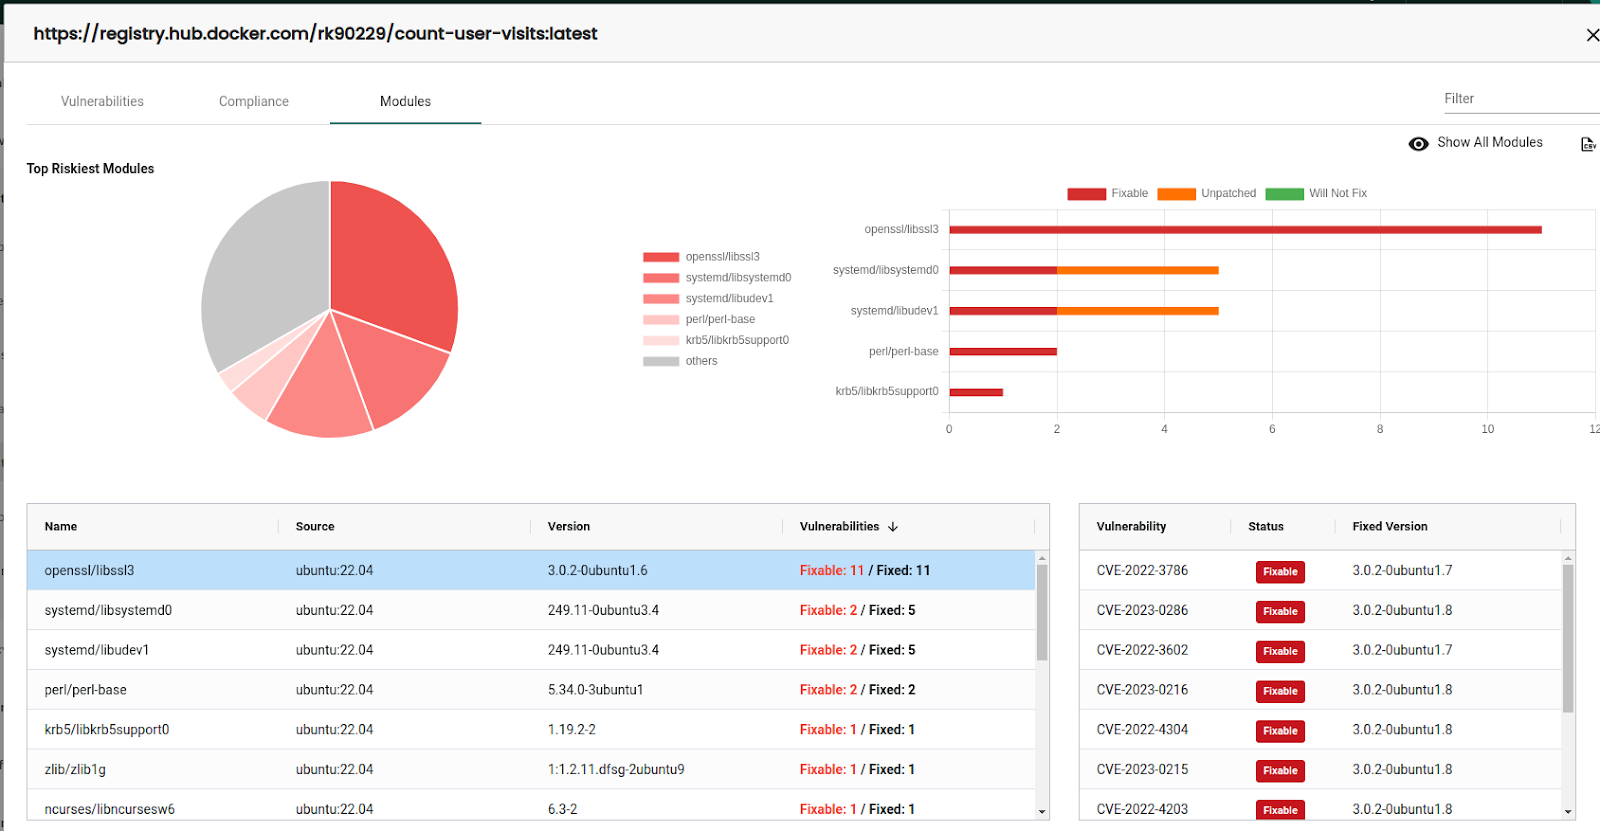
We can download the individual reports from each page we mentioned above. NeuVector also lets us download consolidated reports from the Security risks → Vulnerabilities page.
Managing the Risks
Ensuring the identification of critical severities in images before deployment is crucial, as it requires thorough investigation and subsequent discussions with development teams to address any potential vulnerabilities arising from libraries, packages, and other components. Mitigating such vulnerabilities becomes imperative to maintain the security and integrity of our systems.
Nevertheless, certain vulnerabilities may have limited impact or have already been effectively addressed through other means. For example, if compensating mechanisms like access and authorization controls have been implemented, we may consider accepting the vulnerability under controlled conditions.
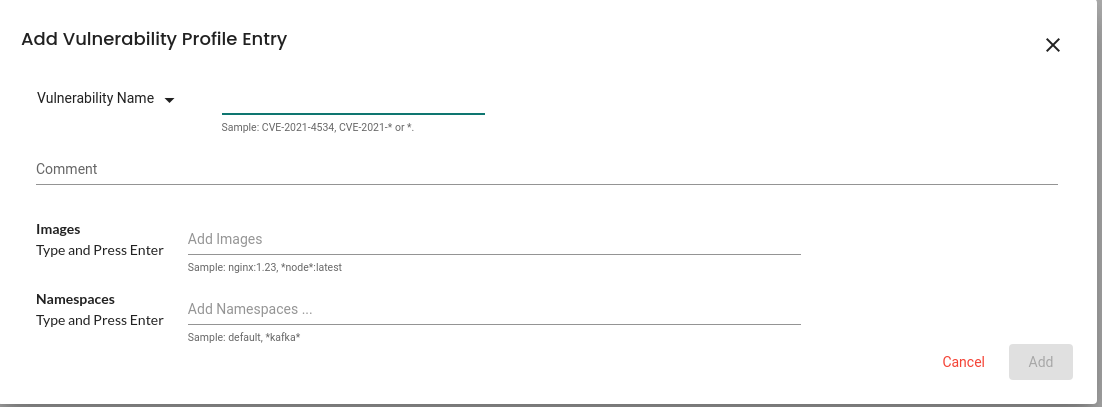
We aim to make informed decisions regarding exceptions for these vulnerabilities in our scan results. This involves carefully creating exceptions tailored to specific images and tags, entire repositories, or all images based on the risk assessment and the corresponding context.
By striking the right balance between security and practicality, we can ensure a robust deployment process while acknowledging unique cases that warrant individual treatment. In the NeuVector, we can “Accept” the vulnerability to exclude it from the reports.
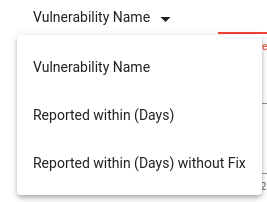
We can also create vulnerability profiles to add exceptions for some specific CVEs. We can create a rule to accept the vulnerabilities if they get reported within days. It makes sense to add criteria for the vulnerabilities that do not have any fixes.
We can add images and namespaces to exclude from the reports as well.
NeuVector is HIPAA, GDPR, NIST, and PCI compliant. We can see the reports under the compliance section, as shown below. The image shows a Docker 4.10 vulnerability with the status WARN and 13 impacted images. It also lists all 13 images and the recommended remediation. We can download the individual compliance report in CSV format or the consolidated reports from the top left of the page.
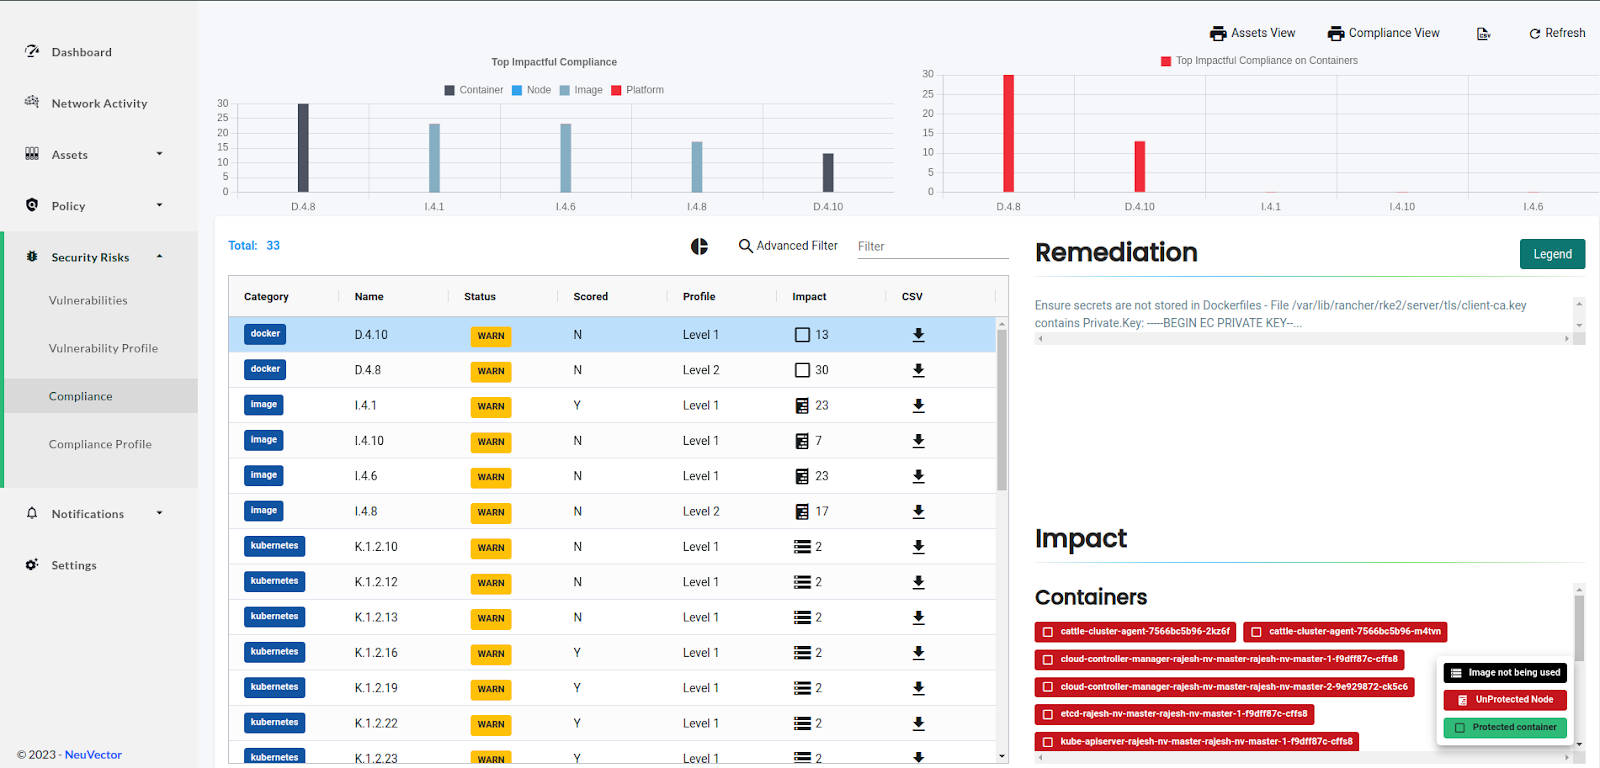
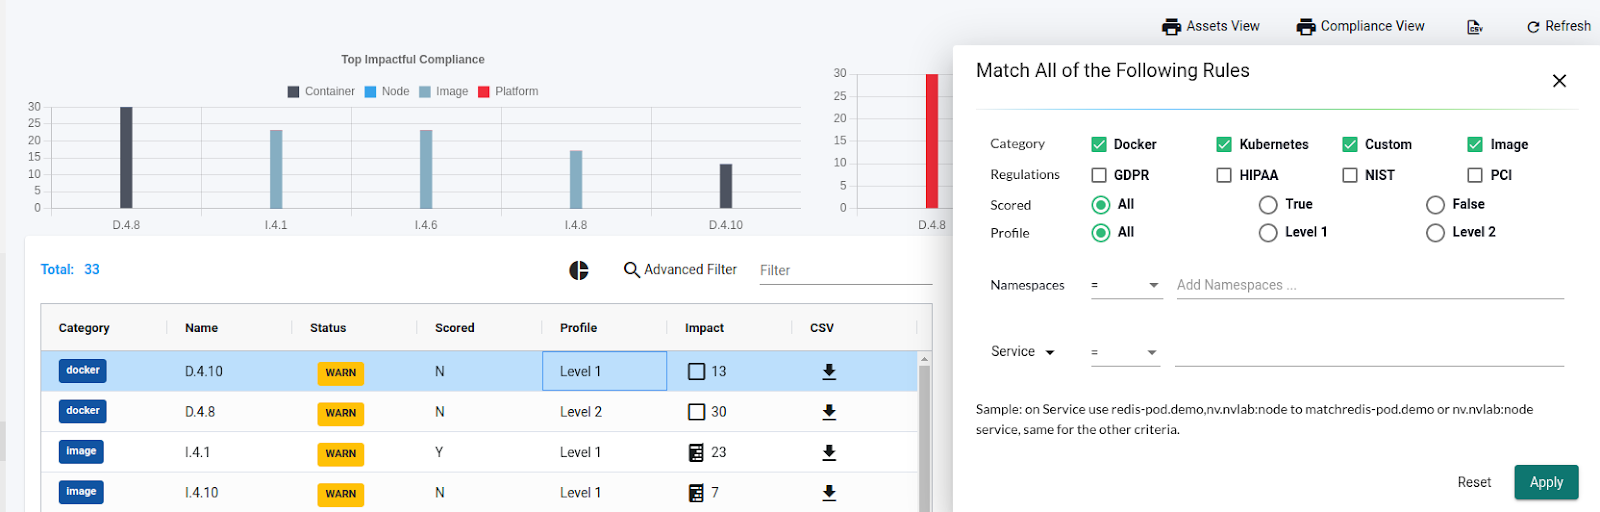
We can also filter the reports using “Advanced Filter.” A filter tab opens with several options, as shown in the image below. We can filter the list as Category, Regulations, Scored, Profile, Namespaces, or Services and then download the report for further inspection.
DevSecOps recommends a layered approach for security. Until now, we have secured our environment by scanning the built images and then periodically scanning the registries. We have created and observed the vulnerabilities and compliance reports. We can assume that we have secured our images by following the best practices.
Next, we will be preventing our cluster from deploying any vulnerable images.
Deploy-Time Protection
Scanning images before deployment is essential to ensure the highest level of security controls. As NeuVector is Kubernetes native, it adds its own verifying admission controller that can be used alongside any Kubernetes orchestration platform, such as Rancher, OpenShift, and Tanzu. Each time a cluster resource, such as a Deployment, is created, the Kubernetes API server forwards the request to one of the NeuVector controllers. The NeuVector controller assesses the request using user-defined admission control rules to decide whether it should be allowed or denied before creating the cluster resource. Once NeuVector makes the policy decision, it is communicated back to the API server for enforcement.
Check if admissionregistration.k8s.io is enabled:
$ kubectl api-versions | grep admissionregistration.k8s.io
Before using the NeuVector admission control, we need to enable this. Go to the Policy → Admission Control page to enable it. We can see a few more options here:
-
Mode: NeuVector works in three modes, Discover, Monitor, and Protect. For admission controls, we have two modes, Monitor and Protect. Monitor mode will only monitor the deployment and raise security notifications for violations. It is useful in development or staging environments where we can test the functionalities. Protect mode is recommended for the production use case as it protects against any violation by denying the request and raising security events and notifications.
-
We can create a YAML with admission control policies and then use “Configuration Assessment” to test the configuration. It is helpful in security as code best practices.
-
By default, NeuVector creates two rules to allow all Deployments in NeuVector and system namespaces. We can also see a 3rd rule which runs at the end after the Deployment has passed all the admission control rules.

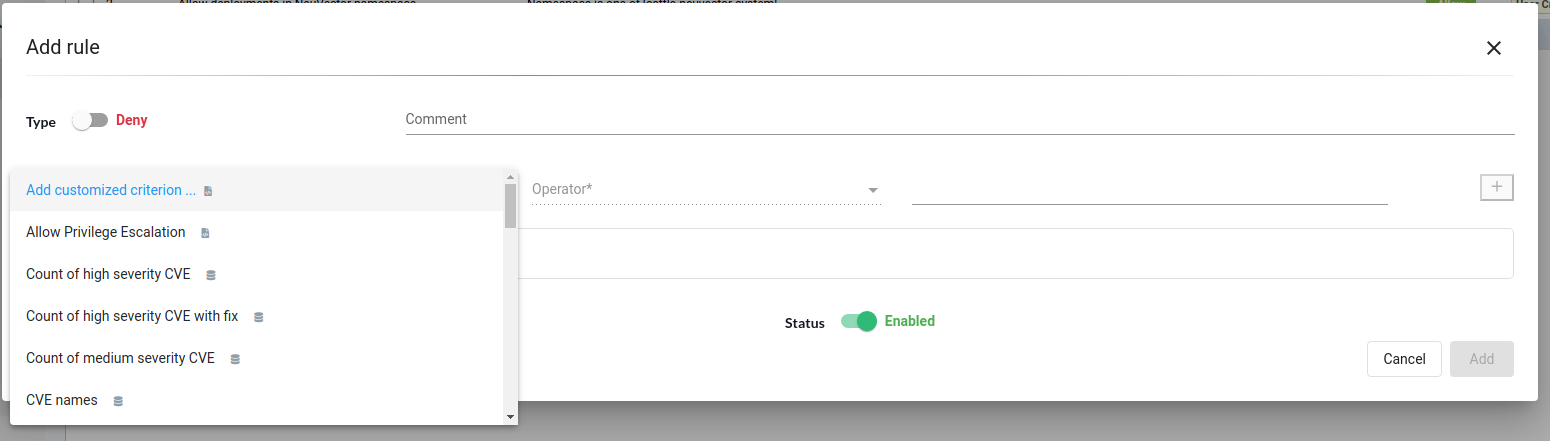
To create a new rule, simply click the “Add” button. Next, specify whether it should be an allow or deny rule. We can then add one or multiple criteria for the rule, select the mode for the specific rule, and toggle the rule on or off as needed.

NeuVector offers various criteria options for creating an Admission Control rule. These include CVE high count, CVE names, image labels, imageScanned status, namespace, user, runAsRoot, and more. There are two possible sources of criteria evaluation: image scans and Deployment YAML file scans. The registry scanning results will be utilized when a criterion necessitates an image scan.
In cases where an image is not scanned, the admission control rule will not be applied. On the other hand, if a criterion requires scanning the deployment YAML, it will be assessed from the Kubernetes Deployment itself. Certain criteria will utilize results from either an image scan or a Deployment YAML scan.
An example of a criterion that requires an image scan is the CVE score evaluation. On the other hand, criteria involving environment variables with secrets rely on the Deployment YAML scan. However, some criteria, such as labels and environment variables, utilize image and Deployment YAML scans (logical OR) results to determine matches.
For our use case, we used image scans to deny any Deployment with the image having a high severity count greater than or equal to 3. Click on the “Add” button to add the rule.
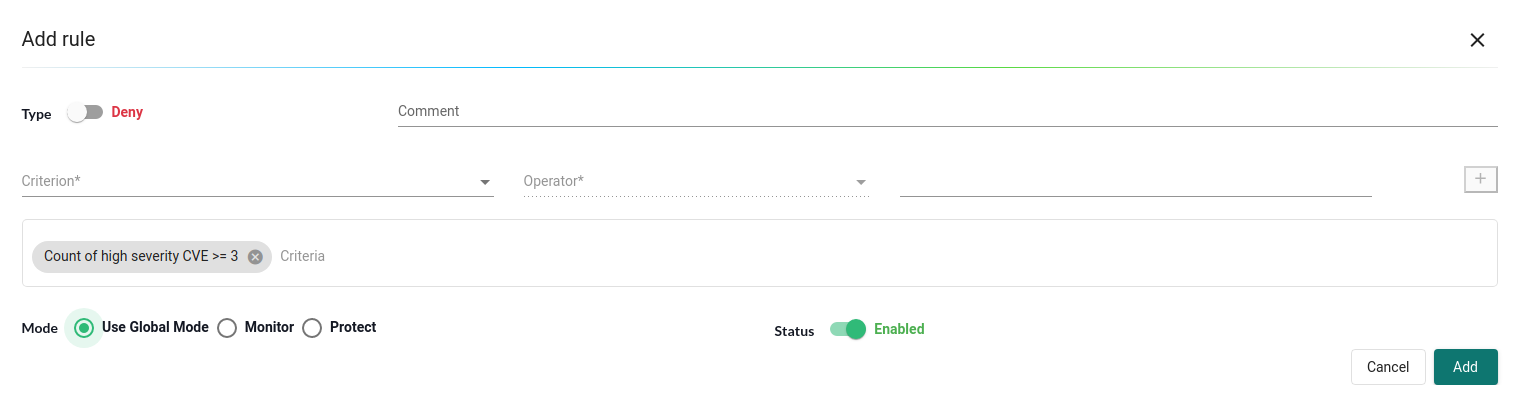
After this, we should see a new rule created under admission control lists.

With this in place, let’s try to deploy a pod with a vulnerable image.
$ kubectl run adm-test --image=rk90229/count-user-visits:latest
Error from server: admission webhook “neuvector-validating-admission-webhook.cattle-neuvector-system.svc” denied the request: Creation of Kubernetes Pod is denied.
We can see that the pod creation was denied. Let’s look at the NeuVector dashboard and whether there are any notifications.

As we can see, an event is created under Notifications → Risk Reports. We have successfully created a rule to deny deploying images with a high severity CVE count greater than or equal to 3. We can also confirm if it does not deny every Deployment. Let’s deploy an Alpine image to confirm the same.
Kubectl run adm-test1 –image=alpine
pod/adm-test1 created
Awesome, we have secured our deployment phase as well. The last piece of the puzzle would be ensuring we continuously monitor the running pods/containers.
Runtime Protection
NeuVector runtime protection triumphs over everything else and deserves a blog post of its own. But this post will introduce it and show how it can protect the clusters from any breach. Let’s get started.
We have deleted the admission control rule created in the previous step and deployed the vulnerable image to see how the NeuVector runtime protection works. First, let’s look at the pod and what details NueVector shows about our pod.
Go to the Assets → Containers section and filter the pods with the pod name. In our case, it was named ‘adm-test.’ A container named ‘adm-test’ runs under the pod ‘adm-test.’ In the “Container Details” section, we see information related to the container like Image, Service Account, Network namespace, Base OS, network interface, and any labels attached to the pod.
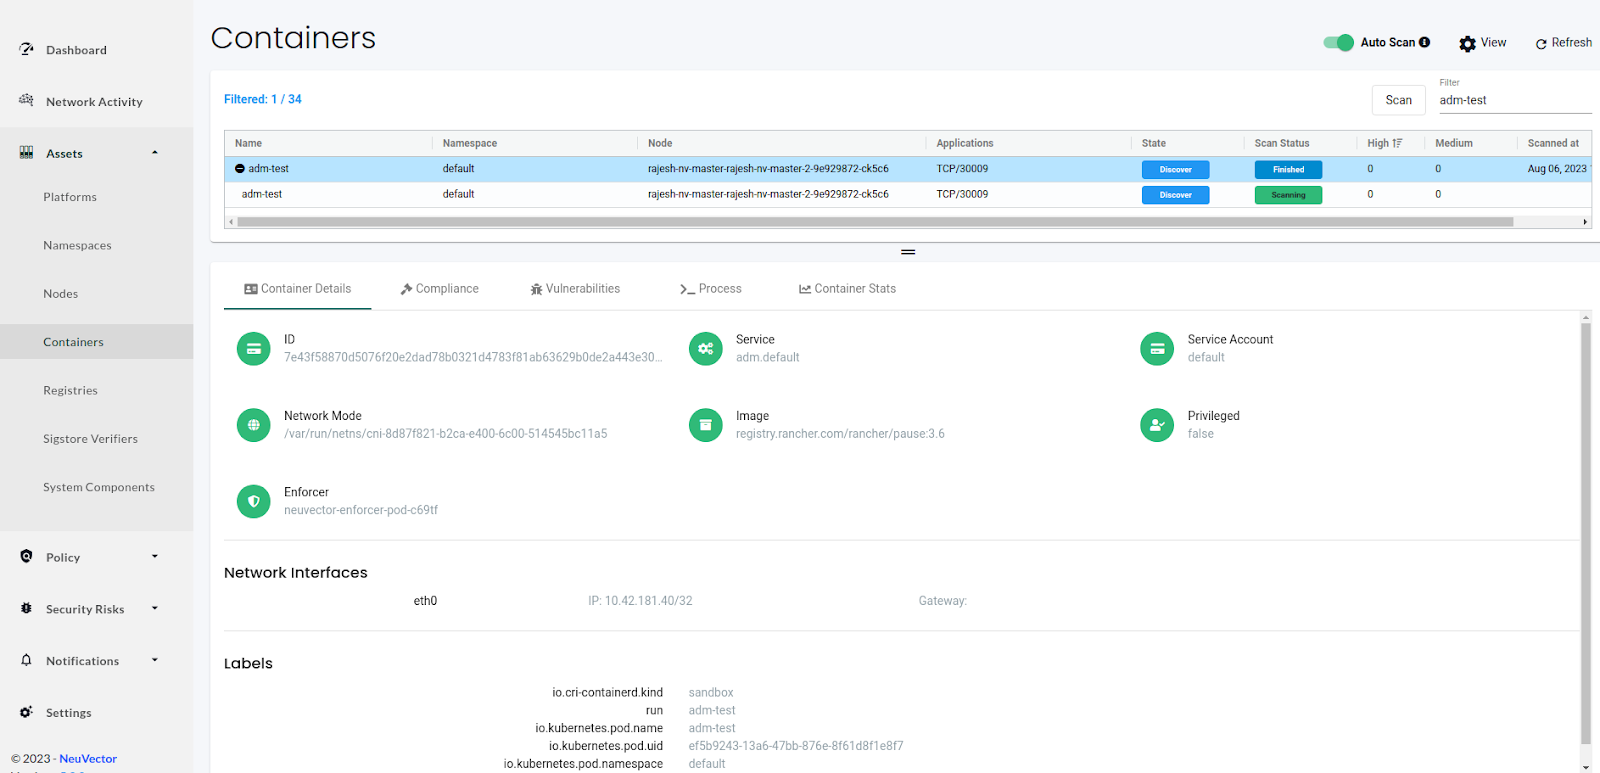
Next, we can see the compliance information on the compliance tab. We have one Level 2 compliance issue of the category Docker, named D.4.8. We can also download the information in the CSV format.

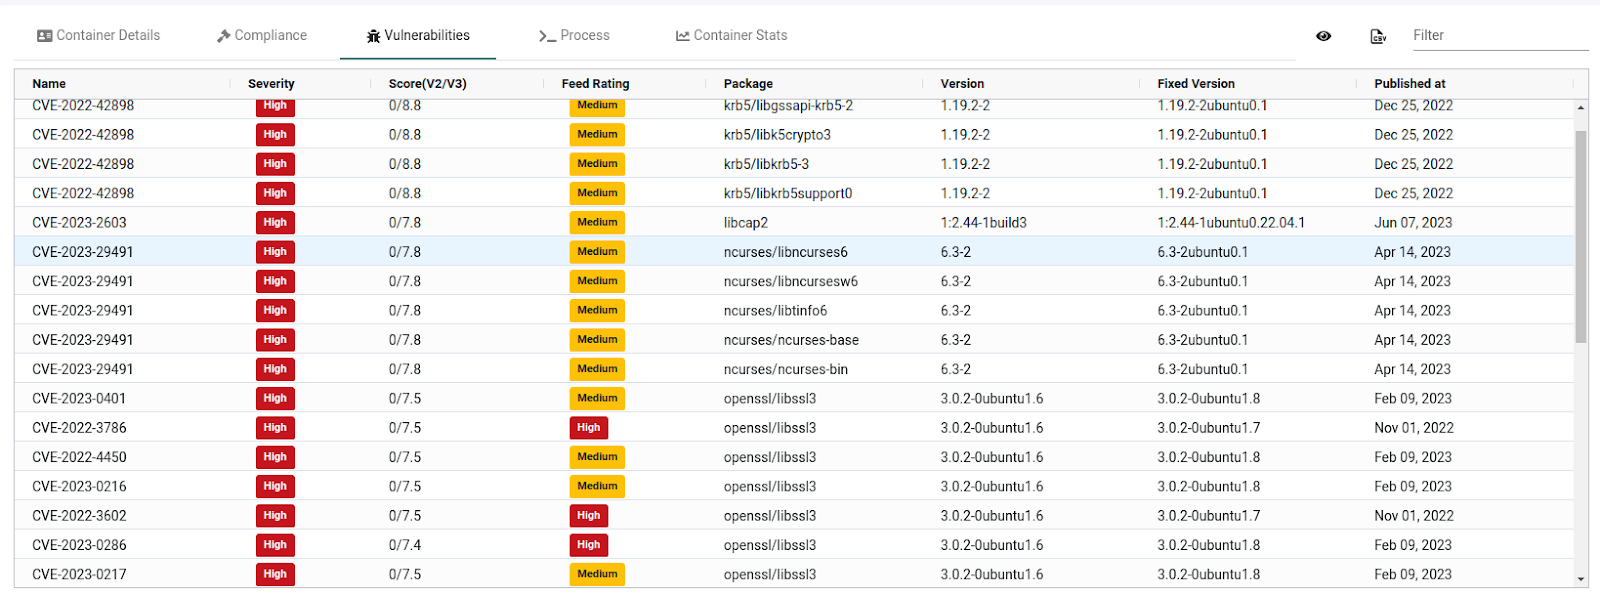
The vulnerability tab lists all the vulnerabilities present in the image. We can select any CVE to see the CVE details. Like other tabs, we can download the report in CSV format.
The process tab shows the running process inside the container and its PID on the host system. This container runs the /count-user-visits command in the pod with PID 679400. It also shows that the root user is running the process and is currently sleeping.
The last tab, “Container Stats,” displays statistics about the container, like CPU, memory, network bandwidth, and sessions.


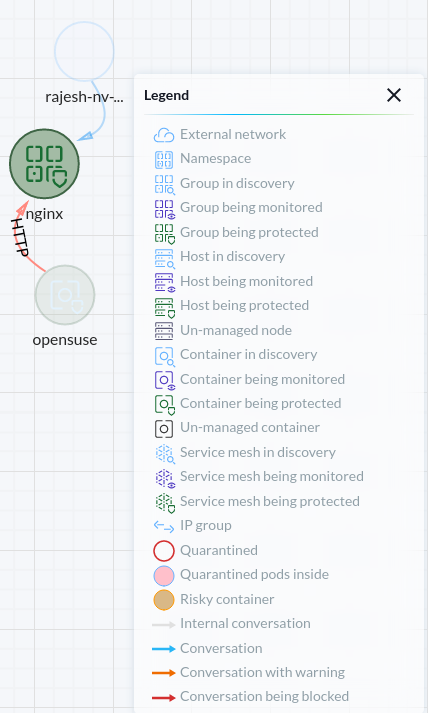
Groups
In NeuVector, the Groups menu under Policy is the key area to view and manage security rules and customize Groups for use in rules. Groups are automatically generated from the running applications based on the images. NeuVector creates policies for groups by observing the application behavior and protects it by denying any deviation from the policies. Additionally, the group menu handles CRD YAML files for ‘security policy as code,’ making it easy to import and export policies. Groups work in Discover, Monitor, and Protect modes.
Discover mode:
NeuVector starts in Discover mode by default. In this mode, it does the following:
- Discovers your container infrastructure: It finds your containers, nodes, and hosts.
- Learns about your applications: NeuVector observes conversations (network connections) between containers to understand how your applications behave.
- Identifies services and applications: It determines which services and applications are running.
- Creates a network rules whitelist: NeuVector automatically builds a list of network rules to protect normal application network behavior.
- Establishes process profiles: It baselines the processes running in containers for each service and creates rules to whitelist these processes.
I have deployed an Nginx pod and accessed it using the NodePort service. You can see the learned network and process rules below:
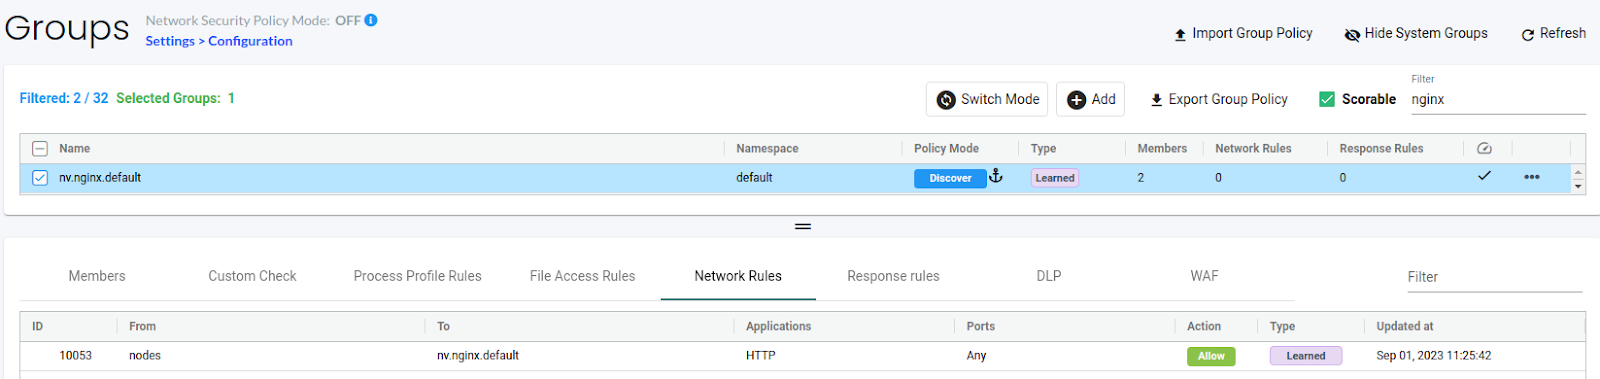
(Learned Network Rules)
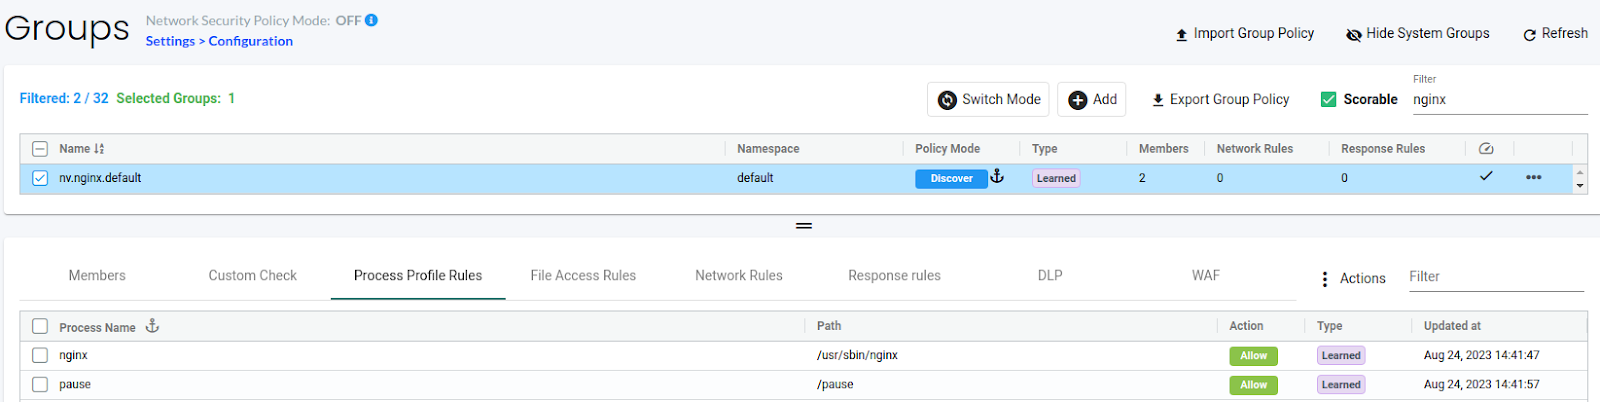
(Learned Process Rules)
In the same way, NeuVector auto-learns all the network connections and processes running inside containers. It creates and allows network and process profile rules for the application to work perfectly.
Note: To determine how long to use Discover mode, run test traffic through your application and review the rules for completeness. Typically, several hours are enough, but some applications may need a few days for full coverage. If unsure, switch to Monitor mode and check for violations that can be converted to whitelist rules before moving to Protect mode.
Monitor mode:
In Monitor mode, NeuVector watches conversations and identifies violations of your Security Policy during runtime. NeuVector doesn’t create new rules automatically in this mode, but you can add rules manually when needed.
When detected, you’ll see violations on the Network Activity map as red lines. They are also logged and displayed in the Notifications tab. Process profile rule and file access violations are logged under Notifications -> Security Events.
You can click on any conversation (green, yellow, red line) in the Network map to see more details about the connection type and the last monitored protocol. You can also use the Search and Filter by Group buttons at the bottom right to narrow down the display of your containers.
$ kubectl exec -it nginx -- /bin/bash
root@nginx:/# ls
bin  boot  dev	docker-entrypoint.d  docker-entrypoint.sh  etc	home  lib  lib32  lib64  libx32  media	mnt  opt  proc	root  run  sbin  srv  sys  tmp	usr  var
root@nginx:/#

(Process alert event in the monitor mode)
opensuse:/ # curl 10.43.204.104
….
<p><em>Thank you for using nginx.</em></p>
</body>
</html>
opensuse:/ #
We could access the nginx pod using the cluster IP from the OpenSUSE pod, but it created alert events. The events are in the Network activity dashboard and the Notifications section.
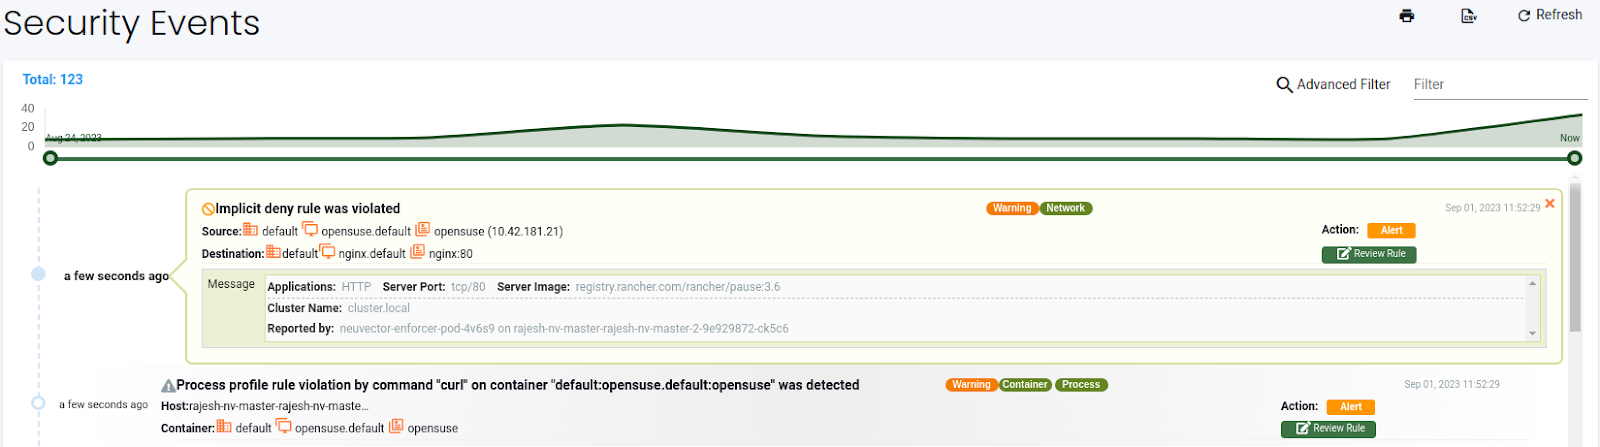
(Network alert event in the monitor mode)
Monitor mode allows us to test the application with the created rules. You can monitor the security events and allow or deny rules as required to run the application securely.
Protect mode:
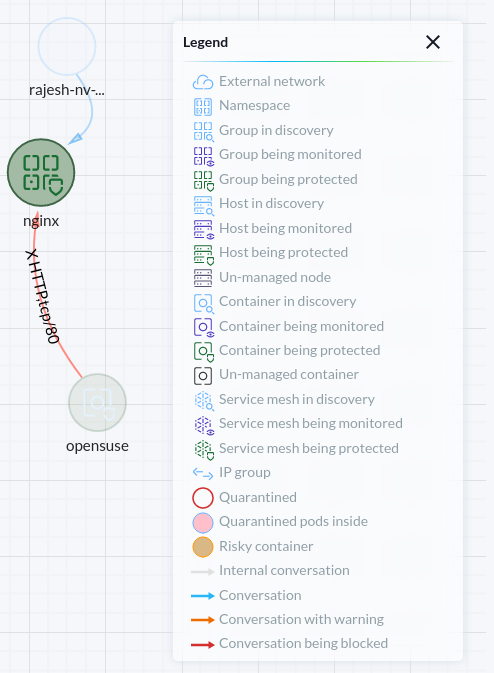
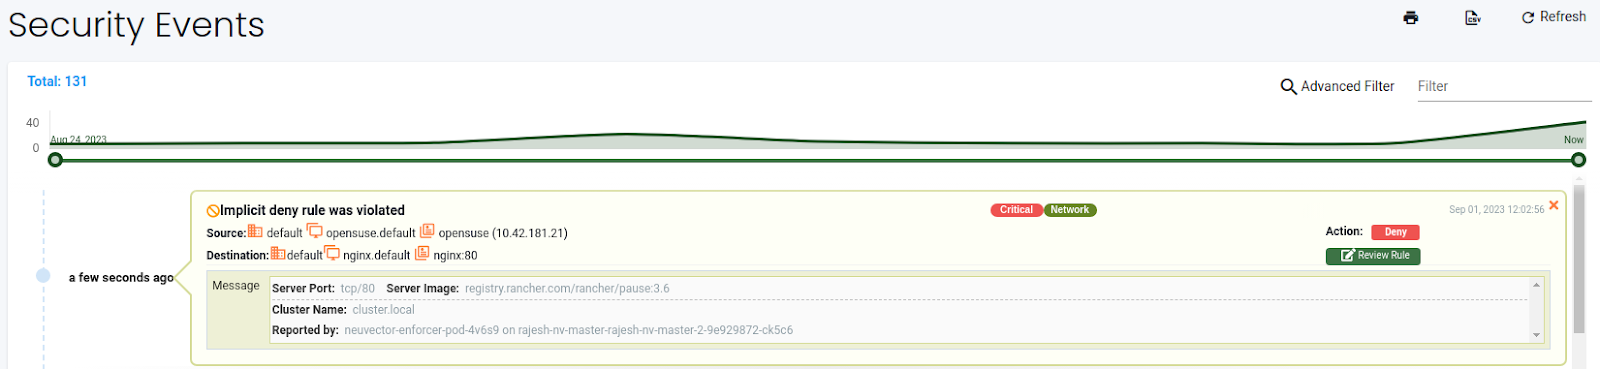
In Protect mode, NeuVector’s enforcers actively block (deny) any network violations and attacks it detects. Violations are indicated on the Network map with a red ‘x,’ meaning they’ve been blocked. Unauthorized processes and file access are also blocked in Protect mode. Data Loss Prevention (DLP) sensors that match will block network connections.
opensuse:/ # curl 10.43.204.104
NeuVector denied the same network connection that was allowed in the Monitor mode once the groups were switched to the Protect mode. You can examine the denied traffic from the Network activity dashboard or Notifications section.
Protect mode is recommended for production clusters. It protects your cluster from any unauthorized access. NeuVector, by default, protects clusters against some well-known network and process threats. You can read about them in the built-in network threat detection and built-in suspicious process detection section.
Whether starting with Discover mode to understand your infrastructure, monitoring with precision in Monitor mode, or fortifying your defenses in Protect mode, NeuVector empowers you to take control of your container security. By leveraging these modes strategically and adapting them to your specific needs, you can enhance the security posture of your containerized environment.
This concludes the runtime security and our DevSecOps pipeline. As you can see, NeuVector’s comprehensive security solutions encompass all phases of the Software Development Life Cycle (SDLC). NeuVector offers a multi-faceted approach to container security, from build-time scanning to runtime protection.
Conclusion
In this blog post, we covered why security is vital in the Kubernetes environment and integrated NeuVector with GitHub Actions to identify the potential vulnerabilities in a CI/CD pipeline. We used the NeuVector registry scanner to scan the registry and looked at leveraging NeuVector admission controls to allow/deny deployments. Finally, we explored NeuVector runtime protection, which restricts and monitors for zero-day vulnerabilities.
This was just the tip of the iceberg, as NeuVector can do much more than just scanning. NeuVector’s runtime security layers also include Data Leak Prevention (DLP), WAF network inspection, network threat detection, automatic packet capture of network threats, and monitoring or blocking network traffic or container processes without impacting performance. Adding the cherry on the cake, all these can be configured using rest-APIs or automated by configuration-as-code, making it one of the best Kubernetes native container protectors. We recommend reading the official docs to learn more about it.
I hope you found this post informative and engaging. For more posts like this, subscribe to our newsletter for a weekly dose of cloud-native. I’d love to hear your thoughts on this post. Let’s connect and start a conversation on LinkedIn.
Looking for help with securing your infrastructure or want to outsource DevSecOps to the experts? Learn why so many startups & enterprises consider us as one of the best DevSecOps consulting & services companies.
References
Stay updated with latest in AI and Cloud Native tech
We hate 😖 spam as much as you do! You're in a safe company.
Only delivering solid AI & cloud native content.
Posts You Might Like