Using Terraform to Provision a YugabyteDB Cluster

This blog post is written by Infranaut – Bhavin Gandhi for Yugabyte.
HashiCorp’s Terraform is an infrastructure as code (IaC) tool as well as a framework. It is used for writing the infrastructure configuration in a declarative way using HashiCorp Configuration Language (HCL) or JSON. It has now become a preferred tool when it comes to provisioning infrastructure on different cloud platforms. This is mainly due to the wide range of supported providers and the extensible nature of the tool itself. One can write provider plugins, modules to extend Terraform.
In this blog post, we will be looking into the Terraform modules for provisioning YugabyteDB on different cloud providers. We will be focusing mostly on the terraform-aws-yugabyte module which is specific to Amazon Web Services (AWS) while pointing out minor differences in other modules. We will cover the topics including provisioning a cluster, managing nodes, understanding different configuration options, and more.
Summary of sections in this post
- Provisioning a cluster on AWS
- Configuration variables
- Running client workload
- High availability of the cluster
- Scaling the YB-TServer nodes
- Security group configuration
- Conclusion
Provisioning a cluster on AWS
Let’s create a 3 node cluster using the terraform-aws-yugabyte module. Before starting with that, make sure you have installed Terraform on your machine. Follow these instructions for Terraform intallations. We are using Terraform v0.13.3 in this post.
Create a new Terraform configuration file deploy-yugabytedb.tf with the following contents:
module "yugabyte-db-cluster" {
  source = "github.com/yugabyte/terraform-aws-yugabyte"

  region_name = "us-east-1"
  vpc_id = "<vpc id>"
  availability_zones = ["us-east-1a", "us-east-1b", "us-east-1c"]
  subnet_ids = ["<subnet id from 1a>", "<subnet id from 1b>", "<subnet id from 1c>"]
  ssh_keypair = "yb-cluster-key"
  ssh_private_key = "/opt/keys/yb-cluster-key.pem"

  cluster_name = "yb-cluster"
  replication_factor = "3"
  num_instances = "3"
}

output "outputs" {
  value = module.yugabyte-db-cluster
}
Configuration variables
The values we set under the module block are the configuration variables for our terraform-aws-yugabyte module.
sourceis the location where the module is hosted. This can be a link to the Git repository or local path to the clone.
AWS related configuration
region_nameis the AWS region where the cluster will be created.vpc_idis the ID of a pre-existing VPC in theregion_name.availability_zonesis a list of availability zones from theregion_nameabove. The cluster nodes are distributed across these zones.subnet_idsis a list of subnets corresponding to the availability zones. The first subnet should belong to the first zone fromavailability_zoneslist and so on.ssh_keypairis the name of the AWS EC2 keypair which is already present in the AWS account. This is used to connect with the nodes.ssh_private_keyis the local path to the .pem file of the above keypair.allowed_sourcesspecifies a list of allowed CIDR source blocks in the security group. We will be talking more about this shortly.cluster_nameis used for naming different resources in AWS.
YugabyteDB cluster related configuration
replication_factorcontrols the replication of the data in the YugabyteDB cluster. Read more about replication factor (RF) here.num_instancesspecifies the number of instances to create for this cluster. This number must be greater than or equal to thereplication_factor.
Take a look at the variables.tf file for a complete list of supported configuration variables.
The output block of deploy-yugabytedb.tf specifies which values to print once the Terraform stack is created. In our case we are printing all the output values from yugabyte-db-cluster, which we have defined using the module block.
AWS access credentials
To set the required AWS configuration and credentials, export following environment variables with appropriate values.
export AWS_ACCESS_KEY_ID="AKIAIOSFODNN7EXAMPLE"
export AWS_SECRET_ACCESS_KEY="wJal/…/bPxRfiCYEXAMPLEKEY"
Take a look at the environment variables section from the AWS Provider docs for more information.
NOTE: The method to pass access credentials to Terraform is provider specific. These details are given in the documentation for the respective modules – terraform-gcp-yugabyte and terraform-azure-yugabyte (and in this post for AWS).
With all the housekeeping done, let’s create our cluster now.
To initialize the Terraform directory where we have created the deploy-yugabytedb.tf file, run the following command.
$ terraform init

Initializing modules...
Downloading github.com/yugabyte/terraform-aws-yugabyte for yugabyte-db-cluster...
- yugabyte-db-cluster in .terraform/modules/yugabyte-db-cluster

Initializing the backend...

Initializing provider plugins...
- Finding latest version of hashicorp/null...
- Finding hashicorp/aws versions matching "~> 3.0"...
- Installing hashicorp/null v2.1.2...
- Installed hashicorp/null v2.1.2 (signed by HashiCorp)
- Installing hashicorp/aws v3.7.0...
- Installed hashicorp/aws v3.7.0 (signed by HashiCorp)

Terraform has been successfully initialized!
This will download the terraform-aws-yugabyte module as well as other dependencies like plugins.
To see the list of resources we will be creating as part of this deployment, run the following command.
$ terraform plan

Refreshing Terraform state in-memory prior to plan...

module.yugabyte-db-cluster.data.aws_ami.yugabyte_ami: Refreshing state...

------------------------------------------------------------------------

An execution plan has been generated and is shown below.
Resource actions are indicated with the following symbols:
  + create

[Terraform](/terraform-consulting/) will perform the following actions:

  # module.yugabyte-db-cluster.aws_instance.yugabyte_nodes[0] will be created
  + resource "aws_instance" "yugabyte_nodes" {
      + ami                          = "ami-0affd"
      + arn                          = (known after apply)
      + associate_public_ip_address  = true
      + availability_zone            = "us-east-1a"
      + instance_type                = "c4.xlarge"

      + root_block_device {
      + volume_size           = 50
      + volume_type           = "gp2"
    }
    }

  # module.yugabyte-db-cluster.aws_security_group.yugabyte will be created
  + resource "aws_security_group" "yugabyte" {
      + arn                    = (known after apply)
      + description            = "Managed by Terraform"
      + egress                 = (known after apply)
      + id                     = (known after apply)
      + ingress                = [
      + {
          + cidr_blocks      = [
          + "0.0.0.0/0",
        ]
          + description      = ""
          + from_port        = 22
          + protocol         = "tcp"
        },
    ]
      + vpc_id                 = "vpc-dab123"
    }

  # module.yugabyte-db-cluster.null_resource.create_yugabyte_universe will be created
  + resource "null_resource" "create_yugabyte_universe" {
      + id       = (known after apply)
      + triggers = (known after apply)
    }

Plan: 6 to add, 0 to change, 0 to destroy.
The above output is redacted for brevity. If everything looks good, we can run the following command to create the actual resources.
$ terraform apply

# …
Plan: 6 to add, 0 to change, 0 to destroy.

Do you want to perform these actions?
  Terraform will perform the actions described above.
  Only 'yes' will be accepted to approve.

  Enter a value: yes

Apply complete! Resources: 6 added, 0 changed, 0 destroyed.

Outputs:

outputs = {
  "JDBC" = "postgresql://yugabyte@35.135.36.37:5433"
  "YCQL" = "ycqlsh 35.135.36.37 9042"
  "YEDIS" = "redis-cli -h 35.135.36.37 -p 6379"
  "YSQL" = "ysqlsh -U yugabyte -h 35.135.36.37 -p 5433"
  "master-ui" = "http://35.135.36.37:7000"
  "private_ips" = [
    "10.0.0.14",
    "10.0.0.30",
    "10.0.0.45",
  ]
  "public_ips" = [
    "35.135.36.37",
    "35.135.36.38",
    "35.135.36.39",
  ]
  "security_group" = "sg-00e12"
  "ssh_key" = "/opt/keys/yb-cluster-key.pem"
  "ssh_user" = "centos"
  "tserver-ui" = "http://35.135.36.37:9000"
}
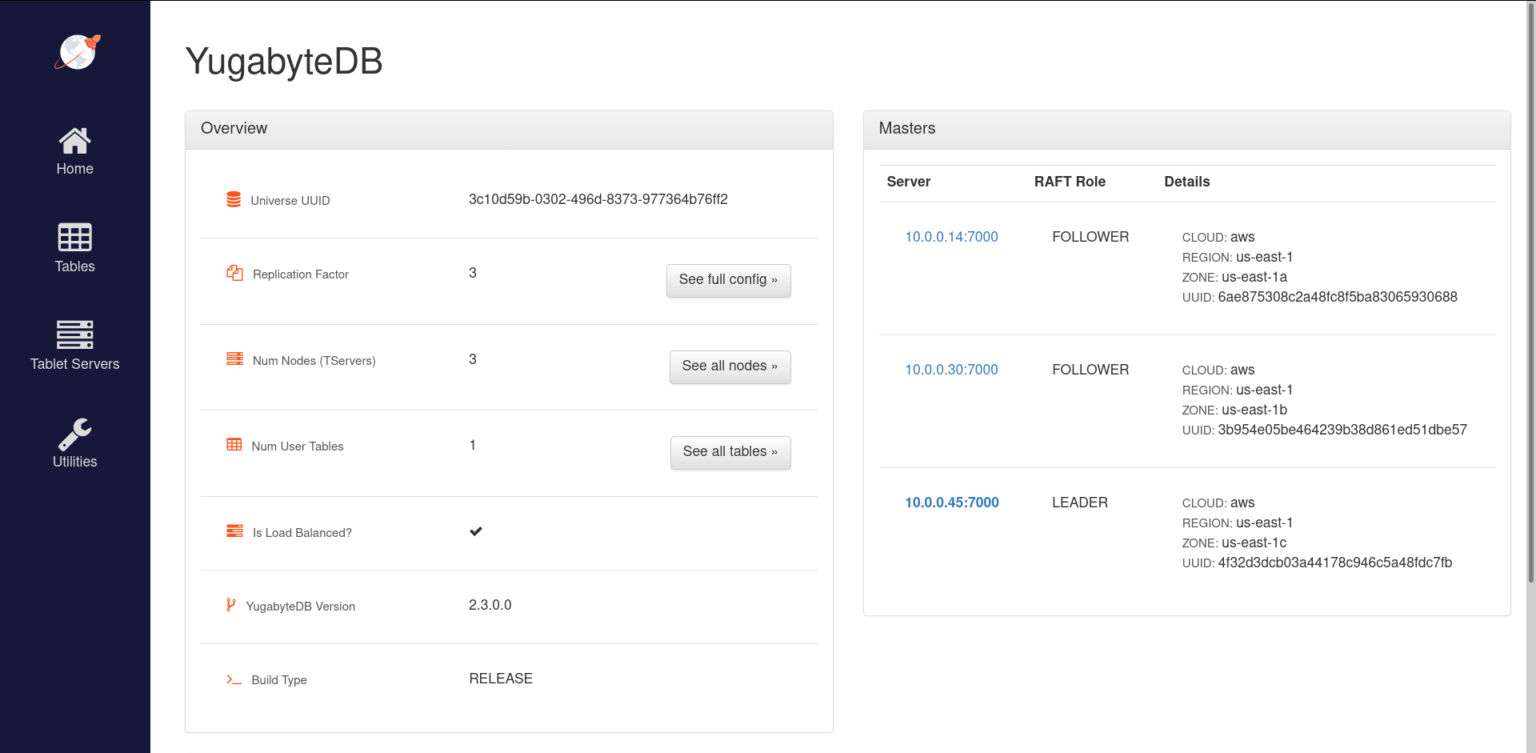
To check the status of the cluster, we can visit one of the masters’ web UI at http://35.135.36.37:7000.
Make sure you persist the Terraform state. It is a record of real world state and metadata of our resources. It is used when we apply the changes made to our infrastructure code. It’s usually saved as a file with name terraform.tfstate in the same directory as the configuration file when using the default configuration.
To check the connectivity to the YCQL and YSQL APIs, we can run following command line clients:
$ docker run --rm -it yugabytedb/yugabyte-client ysqlsh -h 35.135.36.37

ysqlsh (11.2-YB-2.2.0.0-b0)
Type "help" for help.

yugabyte=# \conninfo
You are connected to database "yugabyte" as user "yugabyte" on host "35.135.36.37" at port "5433".
$ docker run --rm -it yugabytedb/yugabyte-client ycqlsh 35.135.36.37

Connected to local cluster at 35.135.36.37:9042.
[cqlsh 5.0.1 | Cassandra 3.9-SNAPSHOT | CQL spec 3.4.2 | Native protocol v4]
Use HELP for help.
cqlsh> SHOW HOST;
Connected to local cluster at 35.135.36.37:9042.
Running client workload
As we have the cluster up and running, now we will run some client workload on it. We will be using the YugabyteDB workload generator container image to do so. This application will connect to the cluster like a real world application will. It will try to insert, retrieve, and update the data.
To run the application, execute the following command:
$ docker run --rm -it yugabytedb/yb-sample-apps \
            --workload SqlInserts \
            --nodes 35.135.36.37:5433 \
            --num_threads_write 1 \
            --num_threads_read 4

…
105109 [Thread-1] INFO com.yugabyte.sample.common.metrics.MetricsTracker  - Read: 9.60 ops/sec (409.58 ms/op), 718 total ops  |  Write: 2.40 ops/sec (409.58 ms/op), 185 total ops  |  Uptime: 100043 ms |
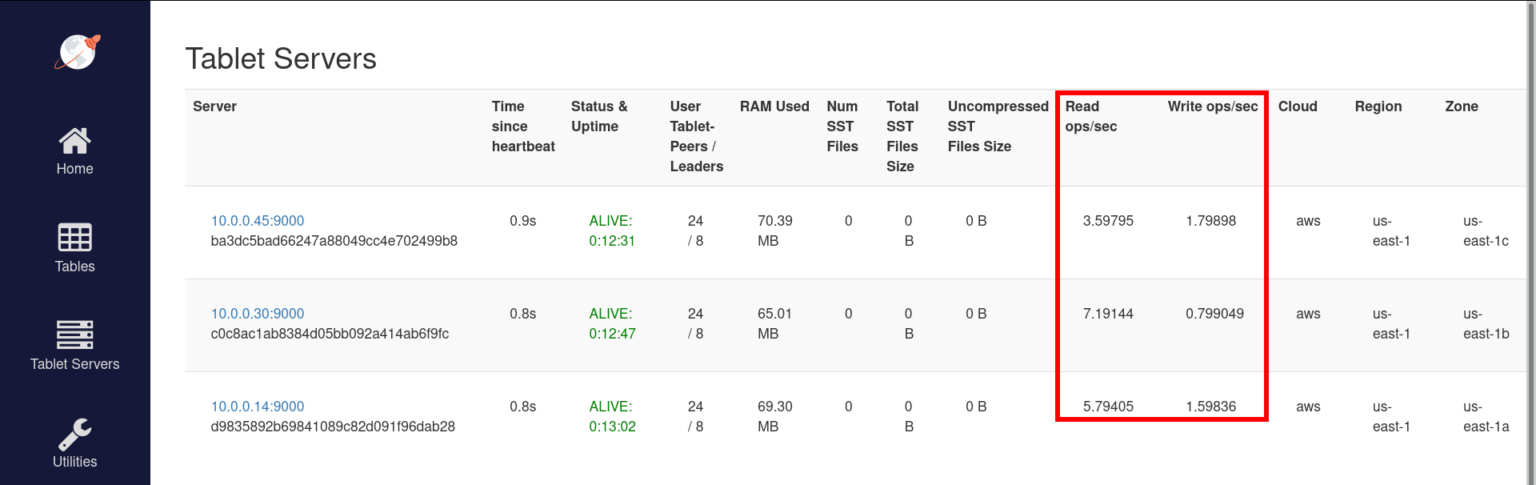
After running for a few minutes, we can see the new tablets and increased read write operation metrics. To view the list of tablet servers, visit http://35.135.36.37:7000/tablet-servers.
High availability of the cluster
To ensure high availability (HA) of the data, it is recommended to at least have replication factor (RF) of 3. For replication factor of 3, the cluster needs to have at least 3 nodes, with YB-Master and YB-TServer running on all of them. If the supplied replication_factor is greater than the num_instances, then the stack creation will fail.
To make the cluster tolerant to availability zone (AZ) failures, it’s better to use a number of availability zones which is greater than or equal to the RF. In our example, we are using 3 AZs (us-east-1a, us-east-1b, and us-east-1c).
The cluster provisioning script starts YB-Masters equal to the given RF. It also tries to make sure that they are spread across the given AZs.
For example, if we have RF of 3, 3 AZs (a, b, c), and 6 nodes, then the script will start a total of 6 nodes, and 3 of them will have YB-Master running on them. The 3 YB-Masters will be running on one node from each of the AZs – a, b, and c. All 6 nodes will have the YB-TServer process running on them.
You can read the documentation sections Replication factor, High availability, and Fault tolerance for more information.
NOTE: The terraform-gcp-yugabyte module automatically selects all the availability zones from the given region. Basically, we don’t have to pass the AZ or subnet list.
Scaling the YB-TServer nodes
The YB-TServer process / service from the cluster is responsible for the user IO. It stores all the tablets (the user data). Client communication happens with this service.
You might need to scale this service horizontally in case of more storage or throughput requirements. In our case, this translates to increasing the number of nodes we have in the cluster.
Scaling out the nodes
To increase the number of nodes, modify the deployment configuration in deploy-yugabytedb.tf with a new value of num_instances.
module "yugabyte-db-cluster" {
  # …
  num_instances = "5"
}
Applying these changes will add two new nodes to the cluster while keeping other nodes untouched.
$ terraform plan

Terraform will perform the following actions:

  # module.yugabyte-db-cluster.aws_instance.yugabyte_nodes[3] will be created
  …
  # module.yugabyte-db-cluster.aws_instance.yugabyte_nodes[4] will be created
  …
  # module.yugabyte-db-cluster.null_resource.create_yugabyte_universe must be replaced
-/+ resource "null_resource" "create_yugabyte_universe" {
      ~ id       = "1450910725944170537" -> (known after apply)
      ~ triggers = {
      - "cluster_instance_ids" = "i-0a32,i-08b5,i-0a25"
    } -> (known after apply) # forces replacement
    }

Plan: 3 to add, 0 to change, 1 to destroy.

$ terraform apply

…
Apply complete! Resources: 3 added, 0 changed, 1 destroyed.

Outputs:
…
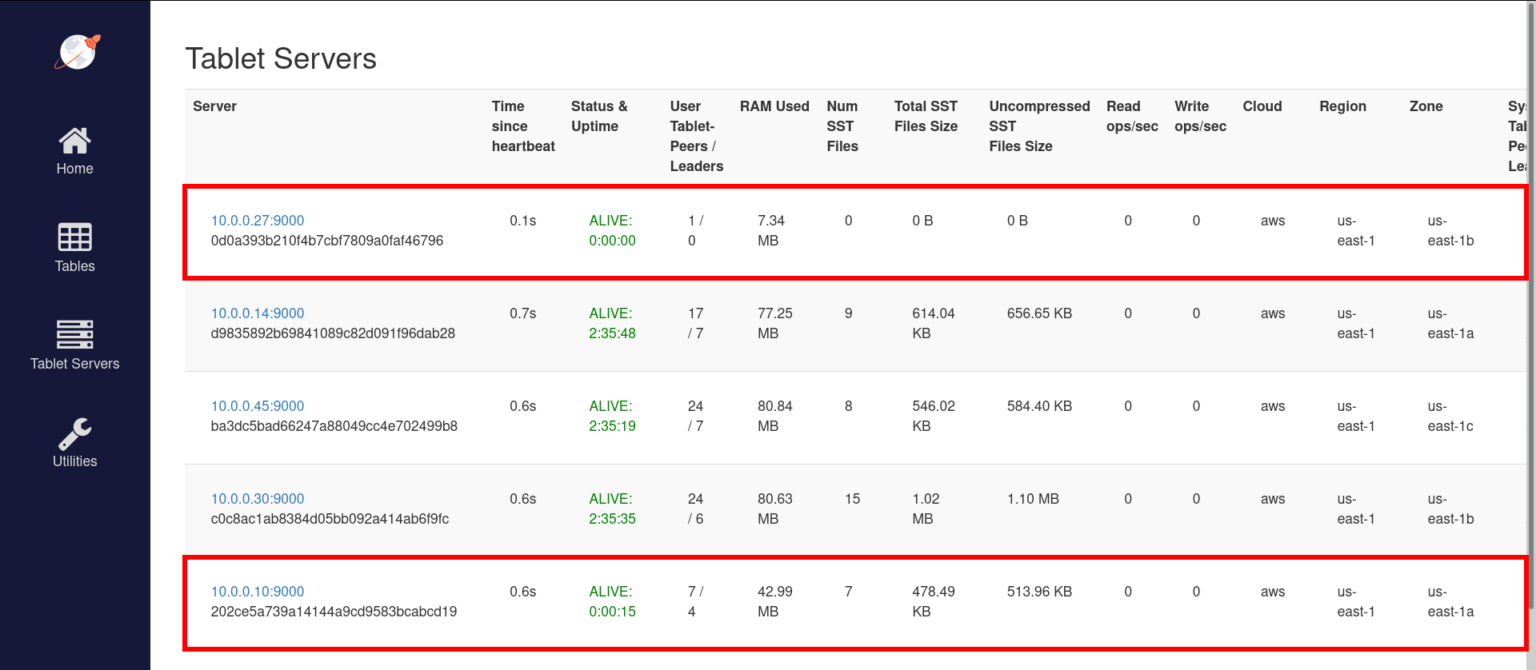
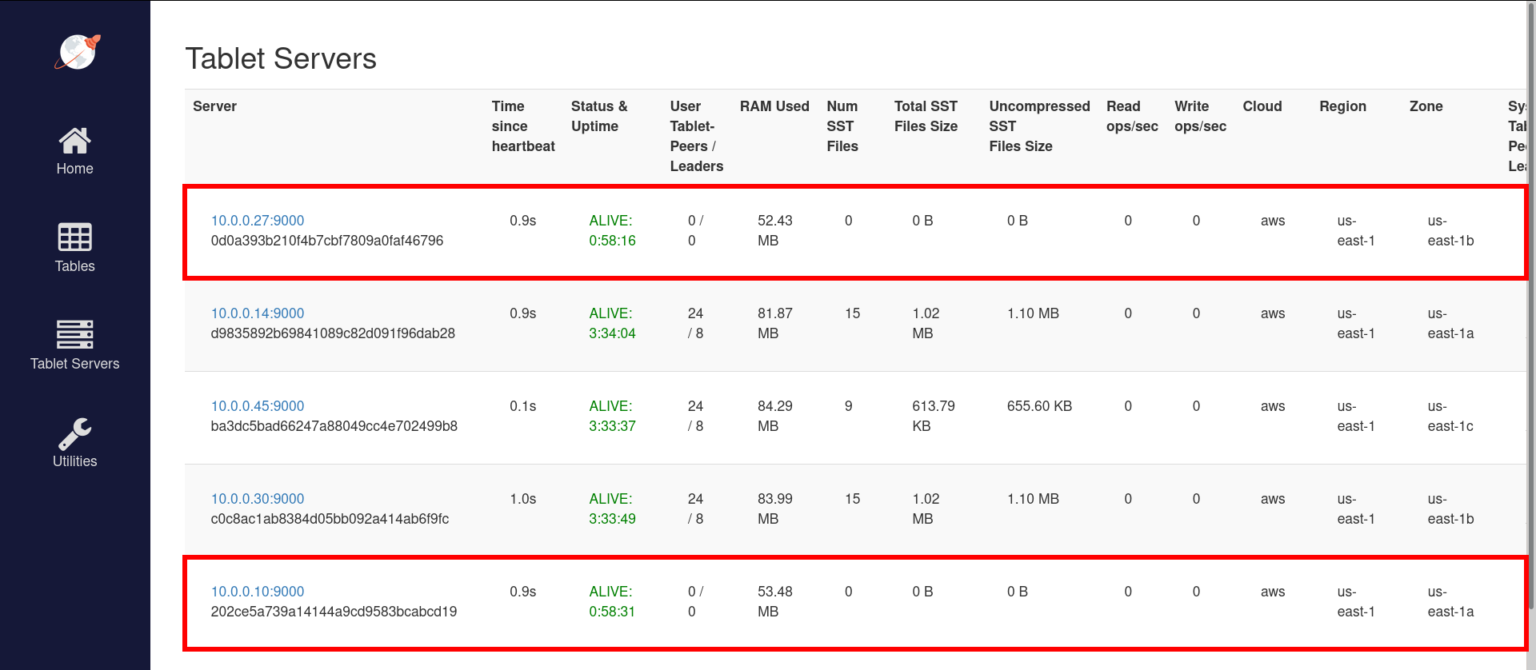
The newly added YB-TServers should be visible in the YB-Master UI at http://35.135.36.37:7000/tablet-servers. These newly added TServers will automatically pick up tablets from the existing TServers to balance the distribution of tablets.
Scaling back the nodes
The scale down operation is a special operation as directly terminating nodes might result in data loss.
For example, if we terminate one node from a cluster with RF 3 and 6 nodes, YB-Master will mark the node as dead after a configurable amount of time. It will use 2 other replicas to recover the tablets and replicate those to some other node. If we try to terminate more than or equal to RF number of nodes at the same time, then it might result in complete deletion of a tablet in a non-recoverable way.
Let’s scale down the newly added nodes from the cluster. Those are the ones with private IPs 10.0.0.10 and 10.0.0.22. Make sure any of the nodes you are scaling down don’t have the YB-Master process running on them. This can be checked by going to the YB-Master UI at http://35.135.36.37:7000/.
NOTE: You can run terraform output to get the output of the Terraform stack at any time.
First, let’s move all data out of the nodes that we are going to remove from the cluster. SSH into the first master node and run the following commands:
$ ssh -i /opt/keys/yb-cluster-key.pem centos@35.135.36.37
[centos@ip-10-0-0-14 ~]$ export YB_MASTERS="10.0.0.14:7100,10.0.0.30:7100,10.0.0.45:7100"
[centos@ip-10-0-0-14 ~]$ /home/centos/yugabyte-db/master/bin/yb-admin \
               -master_addresses $YB_MASTERS \
               change_blacklist ADD 10.0.0.10:9100 10.0.0.27:9100
This exports the private IPs of all the master nodes. It modifies the blacklist to add the two nodes which we want to remove.
To verify that the nodes are added correctly, run the following command:
[centos@ip-10-0-0-14 ~]$ /home/centos/yugabyte-db/master/bin/yb-admin \
               -master_addresses $YB_MASTERS \
               get_universe_config

{
  "version": 7,
  …
  "serverBlacklist": {
    "hosts": [
      {
    "host": "10.0.0.10",
    "port": 9100
      },
      {
    "host": "10.0.0.27",
    "port": 9100
      }
    ],
    "initialReplicaLoad": 13
  },
}
Once the nodes are added into the blacklist, YB-Master will start moving out the data from them to other nodes. To check the progress of the data move, run the get_load_move_completion command. Run the command periodically to see the progress.
[centos@ip-10-0-0-14 ~]$ /home/centos/yugabyte-db/master/bin/yb-admin \
               -master_addresses $YB_MASTERS \
               get_load_move_completion
Percent complete = 53.8466 : 6 remaining out of 13

[centos@ip-10-0-0-14 ~]$ /home/centos/yugabyte-db/master/bin/yb-admin \
               -master_addresses $YB_MASTERS \
               get_load_move_completion
Percent complete = 100 : 0 remaining out of 13
Now the YB-Master UI should show that the two nodes have 0 tablets. The next step is to modify our Terraform configuration. We will set num_instances back to 3 and apply the changes.
$ terraform plan

Terraform will perform the following actions:

  # module.yugabyte-db-cluster.aws_instance.yugabyte_nodes[3] will be destroyed
  - resource "aws_instance" "yugabyte_nodes" {
      - id                           = "i-0a95" -> null
      - private_dns                  = "ip-10-0-0-10.ec2.internal" -> null
      - private_ip                   = "10.0.0.10" -> null
      - public_ip                    = "35.135.36.40" -> null
      - …
    }

  # module.yugabyte-db-cluster.aws_instance.yugabyte_nodes[4] will be destroyed
  - resource "aws_instance" "yugabyte_nodes" {
      - id                           = "i-0dab" -> null
      - private_dns                  = "ip-10-0-0-27.ec2.internal" -> null
      - private_ip                   = "10.0.0.27" -> null
      - public_ip                    = "35.135.36.41" -> null
      - …
    }

  # module.yugabyte-db-cluster.null_resource.create_yugabyte_universe must be replaced
-/+ resource "null_resource" "create_yugabyte_universe" {
      ~ id       = "5810245081236049803" -> (known after apply)
      ~ triggers = { # forces replacement
      ~ "cluster_instance_ids" = "i-0a32,i-08b5,i-0a25,i-0a95,i-0dab" -> "i-0a32,i-08b5,i-0a25"
    }
    }

Plan: 1 to add, 0 to change, 3 to destroy.

$ terraform apply

…
Apply complete! Resources: 1 added, 0 changed, 3 destroyed.
Remove the nodes from the blacklist; this will avoid issues if a node with the same IP address is added later to the cluster.
$ ssh -i /opt/keys/yb-cluster-key.pem centos@35.135.36.37
[centos@ip-10-0-0-14 ~]$ export YB_MASTERS="10.0.0.14:7100,10.0.0.30:7100,10.0.0.45:7100"
[centos@ip-10-0-0-14 ~]$ /home/centos/yugabyte-db/master/bin/yb-admin \
               -master_addresses $YB_MASTERS \
               change_blacklist REMOVE 10.0.0.10:9100 10.0.0.27:9100
Once the nodes are terminated, YB-Master will show those as dead. As of now there is no way to remove those entries without restarting the leader YB-Master node (this will change in the future).
$ ssh -i /opt/keys/yb-cluster-key.pem centos@35.135.36.39
[centos@ip-10-0-0-45 ~]$ kill -TERM $(pgrep yb-master); sleep 10s; ./start_master.sh
yb-master process is not running - restarting..
Take a look at the Perform data move section from the ‘Change cluster configuration’ page for more information.
Security group configuration
The default value of the configuration variable allowed_sources is ["0.0.0.0/0"]. This allows anyone to access the nodes from our cluster. The default configuration is only for usability purposes and it’s recommended to change it.
The value can be set to a list of CIDR blocks and security group IDs. This can be an office IP address, CIDR block of the VPC or some specific security group. That way the cluster nodes will be accessible only from those IPs. The allowed ports are YB-Master UI (7000), YB-TServer UI (9000), Yedis (6379), YCQL (9042), YSQL (5433), and SSH (22). For example, setting the value to ["1.2.3.4/32", "5.6.7.8/32"] will allow connections from these IP addresses only.
Refer to the Security groups for your VPC document from AWS for more information.
NOTE: The security group restriction is only available in the AWS module as of now. Similar configuration will be added to the modules for GCP and Azure soon.
Conclusion
That’s it! You now have a YugabyteDB cluster running on AWS that was provisioned using Terraform. To recap, in this blog post, we showed you how you can use Terraform modules for provisioning YugabyteDB on different cloud providers. We walked you through provisioning a cluster, managing nodes, understanding different configuration options. For the official documentation, usage description, and code, check out the AWS/Terraform page on GitHub.
Stay updated with latest in AI and Cloud Native tech
We hate 😖 spam as much as you do! You're in a safe company.
Only delivering solid AI & cloud native content.
Posts You Might Like