How to Create Ephemeral Environments using Crossplane and ArgoCD?

What if you could just spin up a temporary cluster to test your application and set it to delete it after a certain time period automatically, all of that using a custom resource? That’s what we are going to talk about in this blog post - How to Create Ephemeral Environments using Crossplane and ArgoCD?
Introduction
What if I wanted to create a throwaway cluster to test my application? Now, usually I prefer to test the cluster in my local minikube cluster but when you are talking about big applications, you have cloud provider specific Ingresses, storage classes etc., and you end up creating a cluster to test your changes because you want to make sure nothing breaks when you deploy this in production (on the same cloud provider).
Now, depending on the feature you are working on, the time it takes to complete it might vary from an hour to a couple of days to weeks or even more. So, assuming we break the big features into smaller days or hours based tasks, once you are done with the small feature part, you want to test it out on a cluster. Usually, this would look something like you create a cluster manually and keep updating it with the new changes or if the feature is small you just create a cluster, make sure it works and delete it (or forget to delete it and one morning while brushing your teeth you suddenly realize that you have a big fat cluster running since Friday :D). For updating the cluster with new changes, you can apply templates with the updated changes, or you can update your Helm chart and use something like helm upgrade in your cluster (there can be other options here, like a GitOps pipeline)
Long story short
I am talking about two broad cases here,
- Creating temporary dev clusters to use for a couple of days, to test the changes, update with new changes and repeat
- Creating temporary dev clusters for a couple of hours or a day to test small changes and delete once done
Provisioning a cluster can be broadly divided into two categories:
- Manual (go to the cloud provider webpage e.g., GCP console or use
gcloudcli ) - Use a third party multi-cloud cluster provisioning tool like Terraform, Rancher, Crossplane etc.
Updating the changes can be broadly divided into two categories:
- Use kubectl or a third part tool like Helm to update the changes through cli
- Setup a GitOps pipeline to watch the repo and let it handle updating the cluster with new changes (e.g., ArgoCD)
To sum up
We are looking at 3 distinct steps here. That is,
- Create a cluster
- Install and update it with new changes when I push some code
- Delete it after a certain amount of time (optional)
What would be a convenient, possibly least-steps-involved, automated way of doing this thing instead of manually doing this every time you want to test out something on a cluster? And is there a Kubernetes native way of doing this? I mean sure, there are other ways to do this but since we are already familiar with Kubernetes, it’d be nice to have a Kubernetes way of doing it, a custom resource perhaps!
Crossplane and ArgoCD - Kubernetes native way!
Enter Crossplane and ArgoCD. Crossplane has many features which overlap with tools like Terraform, but it provides a Kubernetes native aka Custom Resource (CR) way of creating cluster across major cloud providers. This means, it has a client-go API I can use. ArgoCD is one of the most popular Kubernetes native GitOps pipeline with a client go api I can use.
Some pre-requisites
Couple of things you should be familiar with before we go ahead (not a hard and fast rule but it will definitely help):
- Crossplane (Here‘s a post around intro to Crossplane)
- ArgoCD (Here‘s a post around intro to ArgoCD). ArgoCD’s Getting Started doc is also pretty good)
- Minikube (Quickstart)
- Helm 3 (Quickstart)
- GKE (Quickstart. We will be creating a GKE cluster as our ephemeral cluster)
You will need a GCP account for using GKE.
Plan for creating the Ephemeral Environment using Crossplane and ArgoCD
Before proceeding, make sure you have a basic idea about what Crossplane and ArgoCD does (check the links in the last section).
The broad idea is we create a custom resource which would allow us to specify what kind of cluster we want. Whatever we want to install in that cluster and any new changes we push to our git repo should be picked up and updated in our installed cluster.
Something akin to this,
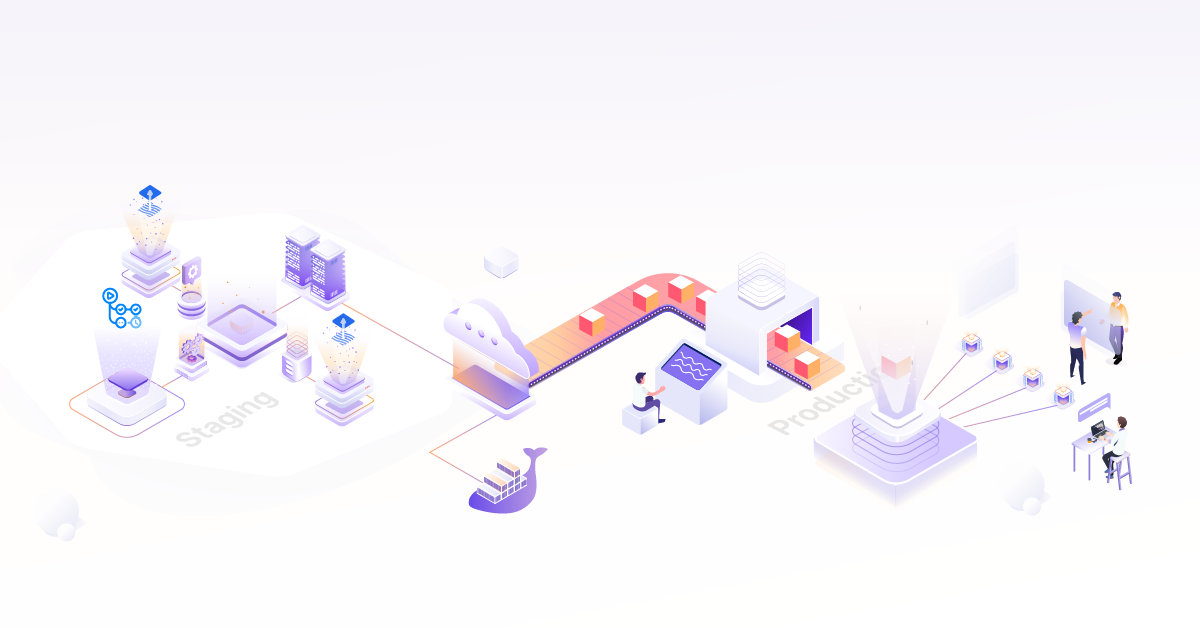
 Above image might look complicated but here is what it is doing in a nutshell,
-
Read values from our
Environmentcustom resource to provision a Kubernetes cluster using Crossplane’s custom resources (this implies we need Crossplane installed in our cluster). This will be taken care of by our Environment Controller. -
Add the provisioned cluster to ArgoCD. This is done by taking the cluster connection secret that Crossplane creates for talking to the provisioned cluster and using the information in the secret to add the cluster to ArgoCD. Adding a cluster to ArgoCD is just creating a secret in ArgoCD’s namespace with specific annotations so that ArgoCD can recognize it as an added cluster (This is the
TargetClusterin our image). This will be taken care of by our ArgoCD Connector controller which watches any newly created connection secrets in Crossplane’s namespace and uses it to create cluster connection in ArgoCD’s namespace for adding a cluster. -
Read values from our
Environmentcustom resource and install the applications in our provisioned cluster. This will be taken care of by our Environment Controller. -
(optional, not shown in the image) If any
TTLaka time to live is specified in theEnvironmentcustom resource, honor it and delete the cluster after the specified time. E.g., ifTTLis specified as say2h, delete the cluster after two hours. This will be taken care of by our Environment Controller
Installation of Crossplane and ArgoCD
Now, for all of this to work, we need Crossplane and ArgoCD installed in our cluster. We can go with the latest version of Crossplane at the time of writing this blog (0.9) but as for ArgoCD, there’s a bit of a problem.
You can tell Crossplane that you want a cluster with the name coolpandas and Crossplane will do that for you, but while adding a cluster to ArgoCD, you have to provide the IP for the cluster you want to add in your ArgoCD Application CRD. This can be a bit of a problem because, we do not have the IP of the cluster until the cluster is actually provisioned.
apiVersion: argoproj.io/v1alpha1
kind: Application
metadata:
  name: guestbook
  namespace: argocd
  finalizers:
    - resources-finalizer.argocd.argoproj.io
spec:
  # Source of the application manifests
  source:
    repoURL: https://github.com/argoproj/argocd-example-apps.git
    targetRevision: HEAD
    path: guestbook

    # helm specific config
    helm:
 ...

  # Destination cluster and namespace to deploy the application
  destination:
    server: https://kubernetes.default.svc # or IP
    namespace: guestbook
 ...
Environment Controller will create the resources required to provision a cluster through Crossplane and the Application CR where we have to specify which cluster we want to install the application in (this is specified using IP). ArgoCD assumes that there will be a connection Secret present matching the provided IP which it can use to deploy the application in the cluster. Now, cluster IP is a required field in the ArgoCD Application CR but we don’t know the IP of our cluster until we have actually provisioned it. There are two possible ways to go about this,
-
Add a dummy IP in the
ApplicationCR to create the resource and once the cluster the provisioned, get the IP from Crossplane’s connection secret and update the Application CR -
Find if Application has some way to specify the name because we know the name of the cluster and if we could provide a name instead of an IP,
Applicationwould pass validation checks and we won’t have to update theApplicationCR later (of course, the actual job of creating a connection secret from Crossplane’s connectionSecretis handled by theArgoCD Connectorcontroller)
(2) sounded more exciting because it greatly simplified things. I did a bit of research to see if (2) would be possible and turns out there’s a PR which does exactly this! It’s WIP but when I tried it out, it worked and pretty much satisfies our use case. The only problem is, it’s not merged yet. It’s under active development and we will see it soon in the future! (Here‘s the PR I am talking about. But for now, I went ahead and started maintaining a fork which I could use.
Alright, with that out of the way, let’s actually get into installation. Let’s get minikube up and running so that we can install the dependencies first,
$ minikube start -p ephemeral
😄  [ephemeral] minikube v1.7.2 on Ubuntu 18.04
✨  Automatically selected the virtualbox driver
🔥  Creating virtualbox VM (CPUs=2, Memory=2000MB, Disk=20000MB) ...
⚠️  Node may be unable to resolve external DNS records
⚠️  VM is unable to access k8s.gcr.io, you may need to configure a proxy or set --image-repository
🐳  Preparing Kubernetes v1.17.2 on Docker 19.03.5 ...
🚀  Launching Kubernetes ...
🌟  Enabling addons: default-storageclass, storage-provisioner
⌛  Waiting for cluster to come online ...
🏄  Done! kubectl is now configured to use "ephemeral"
Let’s setup all the dependencies first.
$ git clone https://github.com/infracloudio/dev-env
$ cd devenv-controller
$ make install-base
helm repo add crossplane-alpha https://charts.crossplane.io/alpha
"crossplane-alpha" has been added to your repositories
helm repo update
Hang tight while we grab the latest from your chart repositories...
...Successfully got an update from the "argo" chart repository
...Successfully got an update from the "crossplane-alpha" chart repository
...Successfully got an update from the "stable" chart repository
Update Complete. ⎈ Happy Helming!⎈
kubectl create ns crossplane-system
namespace/crossplane-system created
helm install crossplane --namespace crossplane-system crossplane-alpha/crossplane --version 0.9.0 \
--set clusterStacks.gcp.deploy=true --set clusterStacks.gcp.version=v0.7.0
manifest_sorter.go:192: info: skipping unknown hook: "crd-install"
manifest_sorter.go:192: info: skipping unknown hook: "crd-install"
NAME: crossplane
LAST DEPLOYED: Fri May 22 17:13:20 2020
NAMESPACE: crossplane-system
STATUS: deployed
REVISION: 1
TEST SUITE: None
NOTES:
Release: crossplane

Chart Name: crossplane
Chart Description: Crossplane, the open source multicloud control plane, allows you to manage your cloud-native applications and infrastructure across environments, clusters, regions and clouds.
Chart Version: 0.9.0
Chart Application Version: 0.9.0

Kube Version: v1.17.2
kubectl create ns argocd
namespace/argocd created
kubectl apply -f custom-argo-install.yaml -nargocd
customresourcedefinition.apiextensions.k8s.io/applications.argoproj.io created
customresourcedefinition.apiextensions.k8s.io/appprojects.argoproj.io created
serviceaccount/argocd-application-controller created
serviceaccount/argocd-dex-server created
serviceaccount/argocd-server created
role.rbac.authorization.k8s.io/argocd-application-controller created
role.rbac.authorization.k8s.io/argocd-dex-server created
role.rbac.authorization.k8s.io/argocd-server created
clusterrole.rbac.authorization.k8s.io/argocd-application-controller created
clusterrole.rbac.authorization.k8s.io/argocd-server created
rolebinding.rbac.authorization.k8s.io/argocd-application-controller created
rolebinding.rbac.authorization.k8s.io/argocd-dex-server created
rolebinding.rbac.authorization.k8s.io/argocd-server created
clusterrolebinding.rbac.authorization.k8s.io/argocd-application-controller created
clusterrolebinding.rbac.authorization.k8s.io/argocd-server created
configmap/argocd-cm created
configmap/argocd-rbac-cm created
configmap/argocd-ssh-known-hosts-cm created
configmap/argocd-tls-certs-cm created
secret/argocd-secret created
service/argocd-dex-server created
service/argocd-metrics created
service/argocd-redis created
service/argocd-repo-server created
service/argocd-server-metrics created
service/argocd-server created
deployment.apps/argocd-application-controller created
deployment.apps/argocd-dex-server created
deployment.apps/argocd-redis created
deployment.apps/argocd-repo-server created
deployment.apps/argocd-server created
What are Pre-requisites for Crossplane?
make install-base should install all the base components that we need including Crossplane and ArgoCD. One thing we will have to do though is configure cloud provider credentials and the type of cluster we want in Crossplane’s GKEClusterClass and Provider custom resource. But before that, let’s set the default namespace to crossplane-system,
$ kubectl config set-context --current --namespace=crossplane-system
Here’s Provider yaml that we will be using,
apiVersion: gcp.crossplane.io/v1alpha3
kind: Provider
metadata:
  name: gcp-provider
spec:
  projectID: myproject-163105 # this is your GCP project ID
  credentialsSecretRef:
    namespace: crossplane-system
    name: gcp-account-creds # name of the secret which contains your GCP service account json contents
    key: credentials # name of the key in the secret
Here’s the GKEClusterClass yaml that we will be using:
apiVersion: container.gcp.crossplane.io/v1beta1
kind: GKEClusterClass
metadata:
  labels:
    className: "app-kubernetes-env2"
  name: app-kubernetes-env2
  namespace: crossplane-system
specTemplate:
  forProvider:
    location: us-central1-b
    masterAuth:
      username: barbaz # username for the masternode (GCP returns generated password)
      # clientCertificateConfig:
      #   issueClientCertificate: true
  providerRef:
    name: gcp-provider # provider name that we created abobe
  reclaimPolicy: Delete
  writeConnectionSecretsToNamespace: crossplane-system
You can find more info on how to set that up in Intro to Crossplane blog post. Just kubectl apply -f the above templates in their respective order.
How to Install ArgoCD Connector?
We have most of the things we need now. Let’s install the controller Helm charts. First we will install the ArgoCD Connector Helm chart.
$ git clone git@github.com:infracloudio/crossplane-secrets-controller.git
$ cd crossplane-secrets-controller
$ helm install argocd-connector charts/argocd-connector
NAME: argocd-connector
LAST DEPLOYED: Sun May 24 16:10:54 2020
NAMESPACE: crossplane-system
STATUS: deployed
REVISION: 1
TEST SUITE: None
I am using Helm 3. Make sure you are using the same. Please note that we will be installing everything in the crossplane-system namespace to simplify things a bit.
Let’s check the pods (you might have to wait for a while because argocd-connector image is quite big (around 900MB! 🙁 ). Check Limitations and potential future changes at the end for why this is the case). If you don’t want to pull the image from Docker Hub, you can also build it locally which can be faster (check Shortcomings for more clues on this).
$ kubectl get po
NAME                                        READY   STATUS      RESTARTS   AGE
argocd-connector-6f4b75798f-pb5vp           1/1     Running     0          12m
argocd-connector-6f4b75798f-skndv           1/1     Running     0          12m
crossplane-54b7c6fcfb-4k64g                 1/1     Running     0          14m
crossplane-stack-manager-54864f454b-wrjcf   1/1     Running     0          14m
provider-gcp-cltcf                          0/1     Completed   0          14m
provider-gcp-controller-79995974d8-bqstw    1/1     Running     0          14s
Alright! All good there.
Installing Environment Controller
Now, onto our Environment Controller.
$ cd devenv-controller
$ make install
/home/suraj/go/bin/controller-gen "crd:trivialVersions=true" rbac:roleName=manager-role webhook paths="./..." output:crd:artifacts:config=config/crd/bases
kustomize build config/crd | kubectl apply -f -
customresourcedefinition.apiextensions.k8s.io/environments.dev.vadasambar.github.io created
$ helm install dev-env charts/dev-env
NAME: dev-env
LAST DEPLOYED: Sun May 24 16:24:12 2020
NAMESPACE: crossplane-system
STATUS: deployed
REVISION: 1
TEST SUITE: None
Let’s check if the pods are running,
$ kubectl get po
NAME                                        READY   STATUS      RESTARTS   AGE
argocd-connector-6f4b75798f-pb5vp           1/1     Running     0          28m
argocd-connector-6f4b75798f-skndv           1/1     Running     0          28m
crossplane-54b7c6fcfb-4k64g                 1/1     Running     0          31m
crossplane-stack-manager-54864f454b-wrjcf   1/1     Running     0          31m
dev-env-7f99889b65-5s4px                    1/1     Running     0          20s
dev-env-7f99889b65-jj6m9                    1/1     Running     0          20s
provider-gcp-cltcf                          0/1     Completed   0          31m
provider-gcp-controller-79995974d8-bqstw    1/1     Running     0          16m
Alright! All good here. Now comes, the most interesting part! Our custom resource!
Usage
I will just copy and paste the sample under config/samples/dev_v1alpha1_environment.yaml from our Environment Controller repo,
apiVersion: dev.vadasambar.github.io/v1alpha1
kind: Environment
metadata:
  name: new-environment-5m
spec:
  source:
    name: "myapp-5m"
    namespace: "default"
    path: "guestbook"
    repoURL: "https://github.com/argoproj/argocd-example-apps.git"
    revision: "HEAD"
  dependencies:
    - name: "nginx-ingress-5m"
      namespace: "default"
      chartName: "nginx-ingress"
      repoURL: "https://kubernetes-charts.storage.googleapis.com/"
      revision: "1.27.0"
  clusterClassLabel: app-kubernetes-env2
  clusterName: new-cluster-5m
  ttl: 5m
source: This is the actual application we want to install in our cluster.name: name of our applicationnamespace: namespace where we want to deploy our application in the newly provisioned clusterpath: path of the application Helm chart in git reporepoURLrepoURL: path of our Helm chart git reporevision: branch/release version that we want to install.HEADdefaults tomasterdependencies: If your application is dependent on something else, you can specify its Helm chart here. Fields underdependencieshave the same meaning as ones undersourceclusterClassLabel: this is the label which is used to select the cluster class e.g.,GKEClusterClasswhere we define what kind of cluster we want. All the nitty gritties like machine type, cpu etc.,clusterName: name of the cluster we want to provisionttl: the time limit after which the cluster would be deleted from the cloud provider. As of now, it supportsmfor minutes,hfor hours,dfor days, andyfor years (I have addedyjust because. I don’t think it’s really needed right now).
One important thing to note here is that, the ttl starts only after all the applications are deployed and are in running state. So, providing a ttl of 5m would mean, wait until all the applications are ready and start counting only after that. So, if you have a big application with many microservices, it might actually take 10m to get the application up and then ttl would countdown for 5m and your cluster would be deleted after 15m.
Well, that’s that. Let’s go ahead and create our Environment CR. All the values in the above sample work and you can apply it as is to see how it works.
$ kubectl apply -f config/samples/dev_v1alpha1_environment.yaml
$ kubectl get environment
NAME                 READY
new-environment-5m
Now, all you have to do is wait and keep checking your cloud provider web page for the cluster. This might take a while but if everything goes well, you should see, 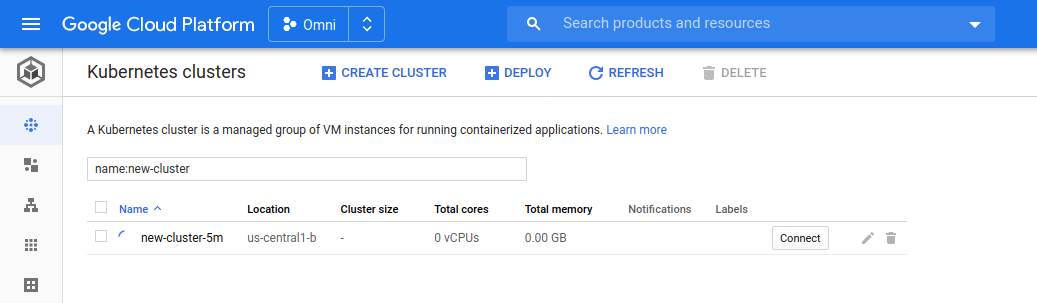
You can check the status of your cluster by checking the logs for dev-env controller pod,
$ kubectl logs -f deploy/dev-env
2020-05-24T11:19:47.680Z    INFO    controllers.Environment argocd app is not ready yet
2020-05-24T11:19:47.680Z    INFO    controllers.Environment status before updating  {"env.Status.TTLStartTimestamp": {"clusterStatus":{"metadata":{}},"applicationStatus":{"metadata":{}},"dependencyStatus":{"metadata":{}}}}
You can also check the status of cluster in ArgoCD,
$ kubectl port-forward svc/argocd-server 3000:80 -nargocd
Forwarding from 127.0.0.1:3000 -> 8080
Forwarding from [::1]:3000 -> 8080
And go to localhost:3000 in the browser
For username, enter admin and for password paste the output of kubectl get pods -n argocd -l app.kubernetes.io/name=argocd-server -o name | cut -d'/' -f 2
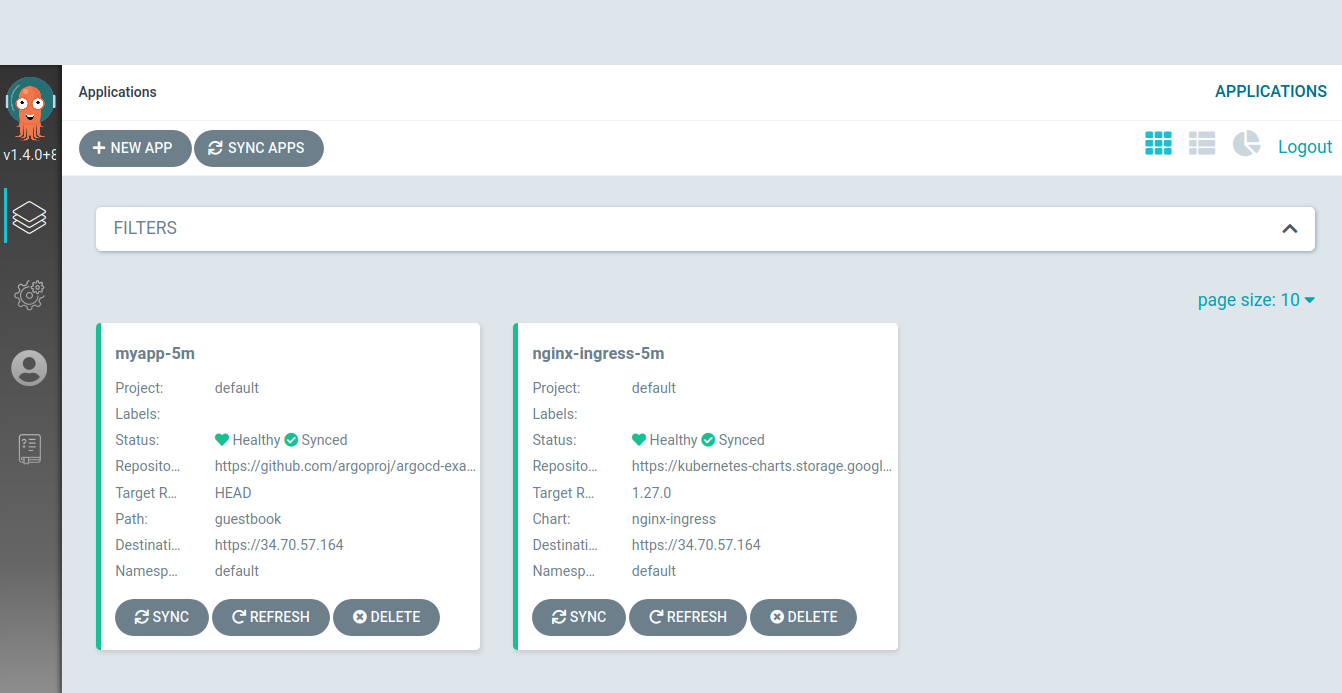 Looks like both of our apps are
 Healthy and Synced. Which means everything went well.
Let’s login to the cluster and see if our pods are running fine, 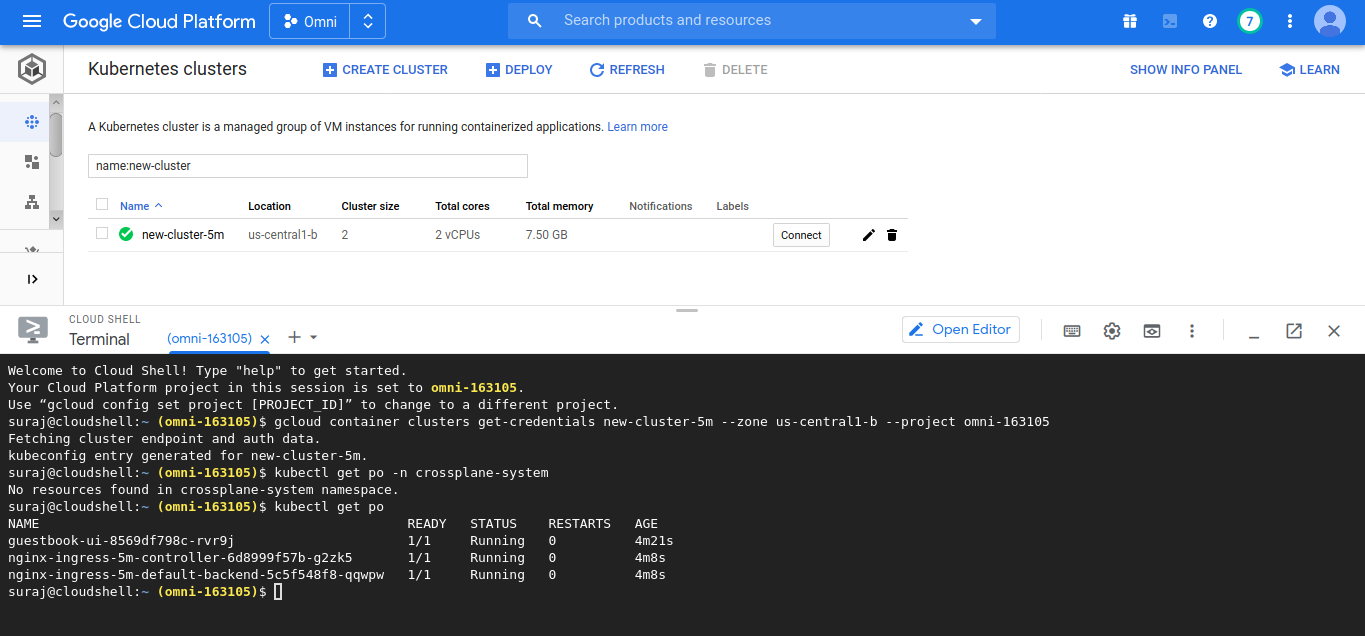
Alrightie! If you check the logs for dev-env controller, you should see something like this,
$ kubectl logs -f deploy/dev-env
2020-05-24T11:25:38.446Z    INFO    controllers.Environment environment object  {"env": {"kind":"Environment","apiVersion":"dev.vadasambar.github.io/v1alpha1","metadata":{"name":"new-environment-5m","selfLink":"/apis/dev.vadasambar.github.io/v1alpha1/environments/new-environment-5m","uid":"43f94957-6803-42ec-9bf2-14301c866781","resourceVersion":"7825","generation":1,"creationTimestamp":"2020-05-24T11:14:33Z","annotations":{"kubectl.kubernetes.io/last-applied-configuration":"{\"apiVersion\":\"dev.vadasambar.github.io/v1alpha1\",\"kind\":\"Environment\",\"metadata\":{\"annotations\":{},\"name\":\"new-environment-5m\"},\"spec\":{\"clusterClassLabel\":\"app-kubernetes-env2\",\"clusterName\":\"new-cluster-5m\",\"dependencies\":[{\"chartName\":\"nginx-ingress\",\"name\":\"nginx-ingress-5m\",\"namespace\":\"default\",\"repoURL\":\"https://kubernetes-charts.storage.googleapis.com/\",\"revision\":\"1.27.0\"}],\"source\":{\"name\":\"myapp-5m\",\"namespace\":\"default\",\"path\":\"guestbook\",\"repoURL\":\"https://github.com/argoproj/argocd-example-apps.git\",\"revision\":\"HEAD\"},\"ttl\":\"5m\"}}\n"}},"spec":{"source":{"name":"myapp-5m","namespace":"default","path":"guestbook","revision":"HEAD","repoURL":"https://github.com/argoproj/argocd-example-apps.git"},"dependencies":[{"name":"nginx-ingress-5m","namespace":"default","revision":"1.27.0","chartName":"nginx-ingress","repoURL":"https://kubernetes-charts.storage.googleapis.com/"}],"clusterClassLabel":"app-kubernetes-env2","clusterName":"new-cluster-5m","ttl":"5m"},"status":{"clusterStatus":{"metadata":{}},"applicationStatus":{"metadata":{}},"dependencyStatus":{"metadata":{}},"ready":true,"ttlStartTimestamp":"2020-05-24T11:20:46Z"}}}
2020-05-24T11:25:38.447Z    INFO    controllers.Environment argocd app is ready
2020-05-24T11:25:38.448Z    INFO    controllers.Environment cluster has been provisioned
2020-05-24T11:25:38.449Z    INFO    controllers.Environment argocd app is ready
2020-05-24T11:25:38.449Z    INFO    controllers.Environment cluster has been provisioned
2020-05-24T11:25:38.449Z    INFO    controllers.Environment argocd app is ready
2020-05-24T11:25:38.450Z    INFO    controllers.Environment argocd app is ready
Everything is looking good. Notice the ttlStartTimestamp":"2020-05-24T11:20:46Z. Our cluster should be deleted 5 minutes after this.
And sure enough, our cluster gets deleted.

If you check the cluster logs in GKE,
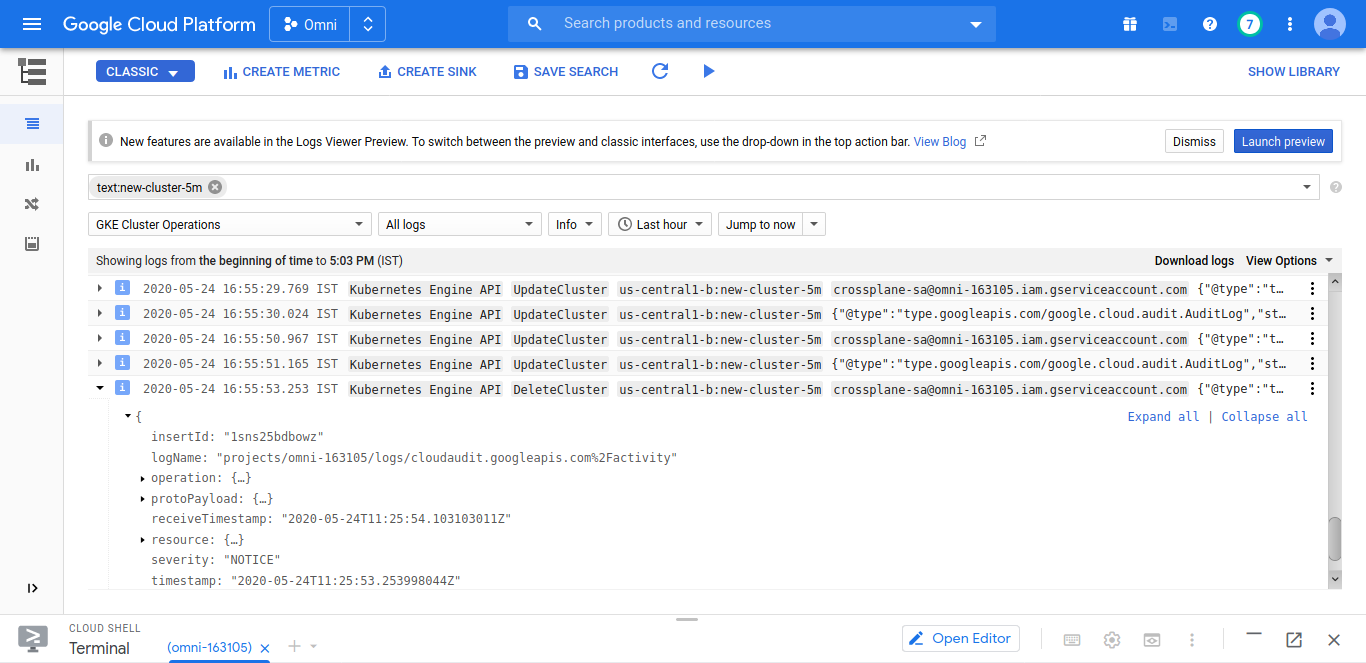
Notice the deletion timeStamp is at 2020-05-24T11:25:53.253998044Z which is approximately 5 minutes after the ttlStartTimeStamp of 2020-05-24T11:20:46Z above.
And it works!
Limitations and potential future changes
- It’s still in the early prototype stage. There are ton of things that can be done to improve the CR
- As of now, it only supports GKE clusters
- Lack of conditions or valuable information in the
statusfield of theEnvironmentresource - Lurking bugs in ArgoCD Connector controller
- Supports only 2 nodepools right now
argocd-connectorimage is quite large (~900MB), this is because some apis from ArgoCD depend on a whole lot of other things in the argo repo and we need that as well, which kind of bumps up the size of the image. Here’s the issue around the same: https://github.com/argoproj/argo-cd/issues/2907 . If you don’t like the long wait, you can build the image locally bycding into the repo and runningmake docker-buildand update thevalues.yamlandChart.yaml(image url is built as<image-repo>:<version in chart.yaml>)- No conditions which show the current status of the resource
Hope you found this blog informative and engaging. For more reads like this one, subscribe to our weekly newsletter.
Looking for help with building your DevOps strategy or want to outsource DevOps to the experts? learn why so many startups & enterprises consider us as one of the best DevOps consulting & services companies. If you’re looking for commercial ArgoCD support, check our support model.
Stay updated with latest in AI and Cloud Native tech
We hate 😖 spam as much as you do! You're in a safe company.
Only delivering solid AI & cloud native content.
Posts You Might Like