Kubernetes Cluster Provisioning using Crossplane

Introduction
What if you could provision a Kubernetes cluster across major cloud providers like Google Cloud Platform (GCP), Microsoft Azure or Amazon Web Services (AWS) through a resource like Deployment or a PersistentVolumeClaim (PVC) and manage it like you manage any other Kubernetes resource? That’s what you can do through Crossplane (among many other things).
Okay, what’s with the PersistentVolumeClaim (PVC) analogy? PersistentVolumeClaim requests a PersistentVolume (PV), which under the hood provisions a storage volume according to whatever kind of storage you specify in the StorageClass. More about PV and PVCs and the difference between PV & PVC’s. Let’s look at how you provision a kubernetes cluster using Crossplane.
Crossplane and stacks
Imagine a Kubernetes resource pair like PVC-PV but for provisioning a Kubernetes cluster instead of storage. That is, if I create a claim (like PVC) which says I want a cluster, it would provision a cluster resource (like PV) in Kubernetes which in turn would create a cluster (actual cluster, in as in a GKE cluster) in whichever cloud provider I want based on the storage class, except in this case this storage class would hold the information about the cloud provider where I want to provision the cluster (and it’s called a Provider instead of StorageClass). This is roughly what Crossplane does.
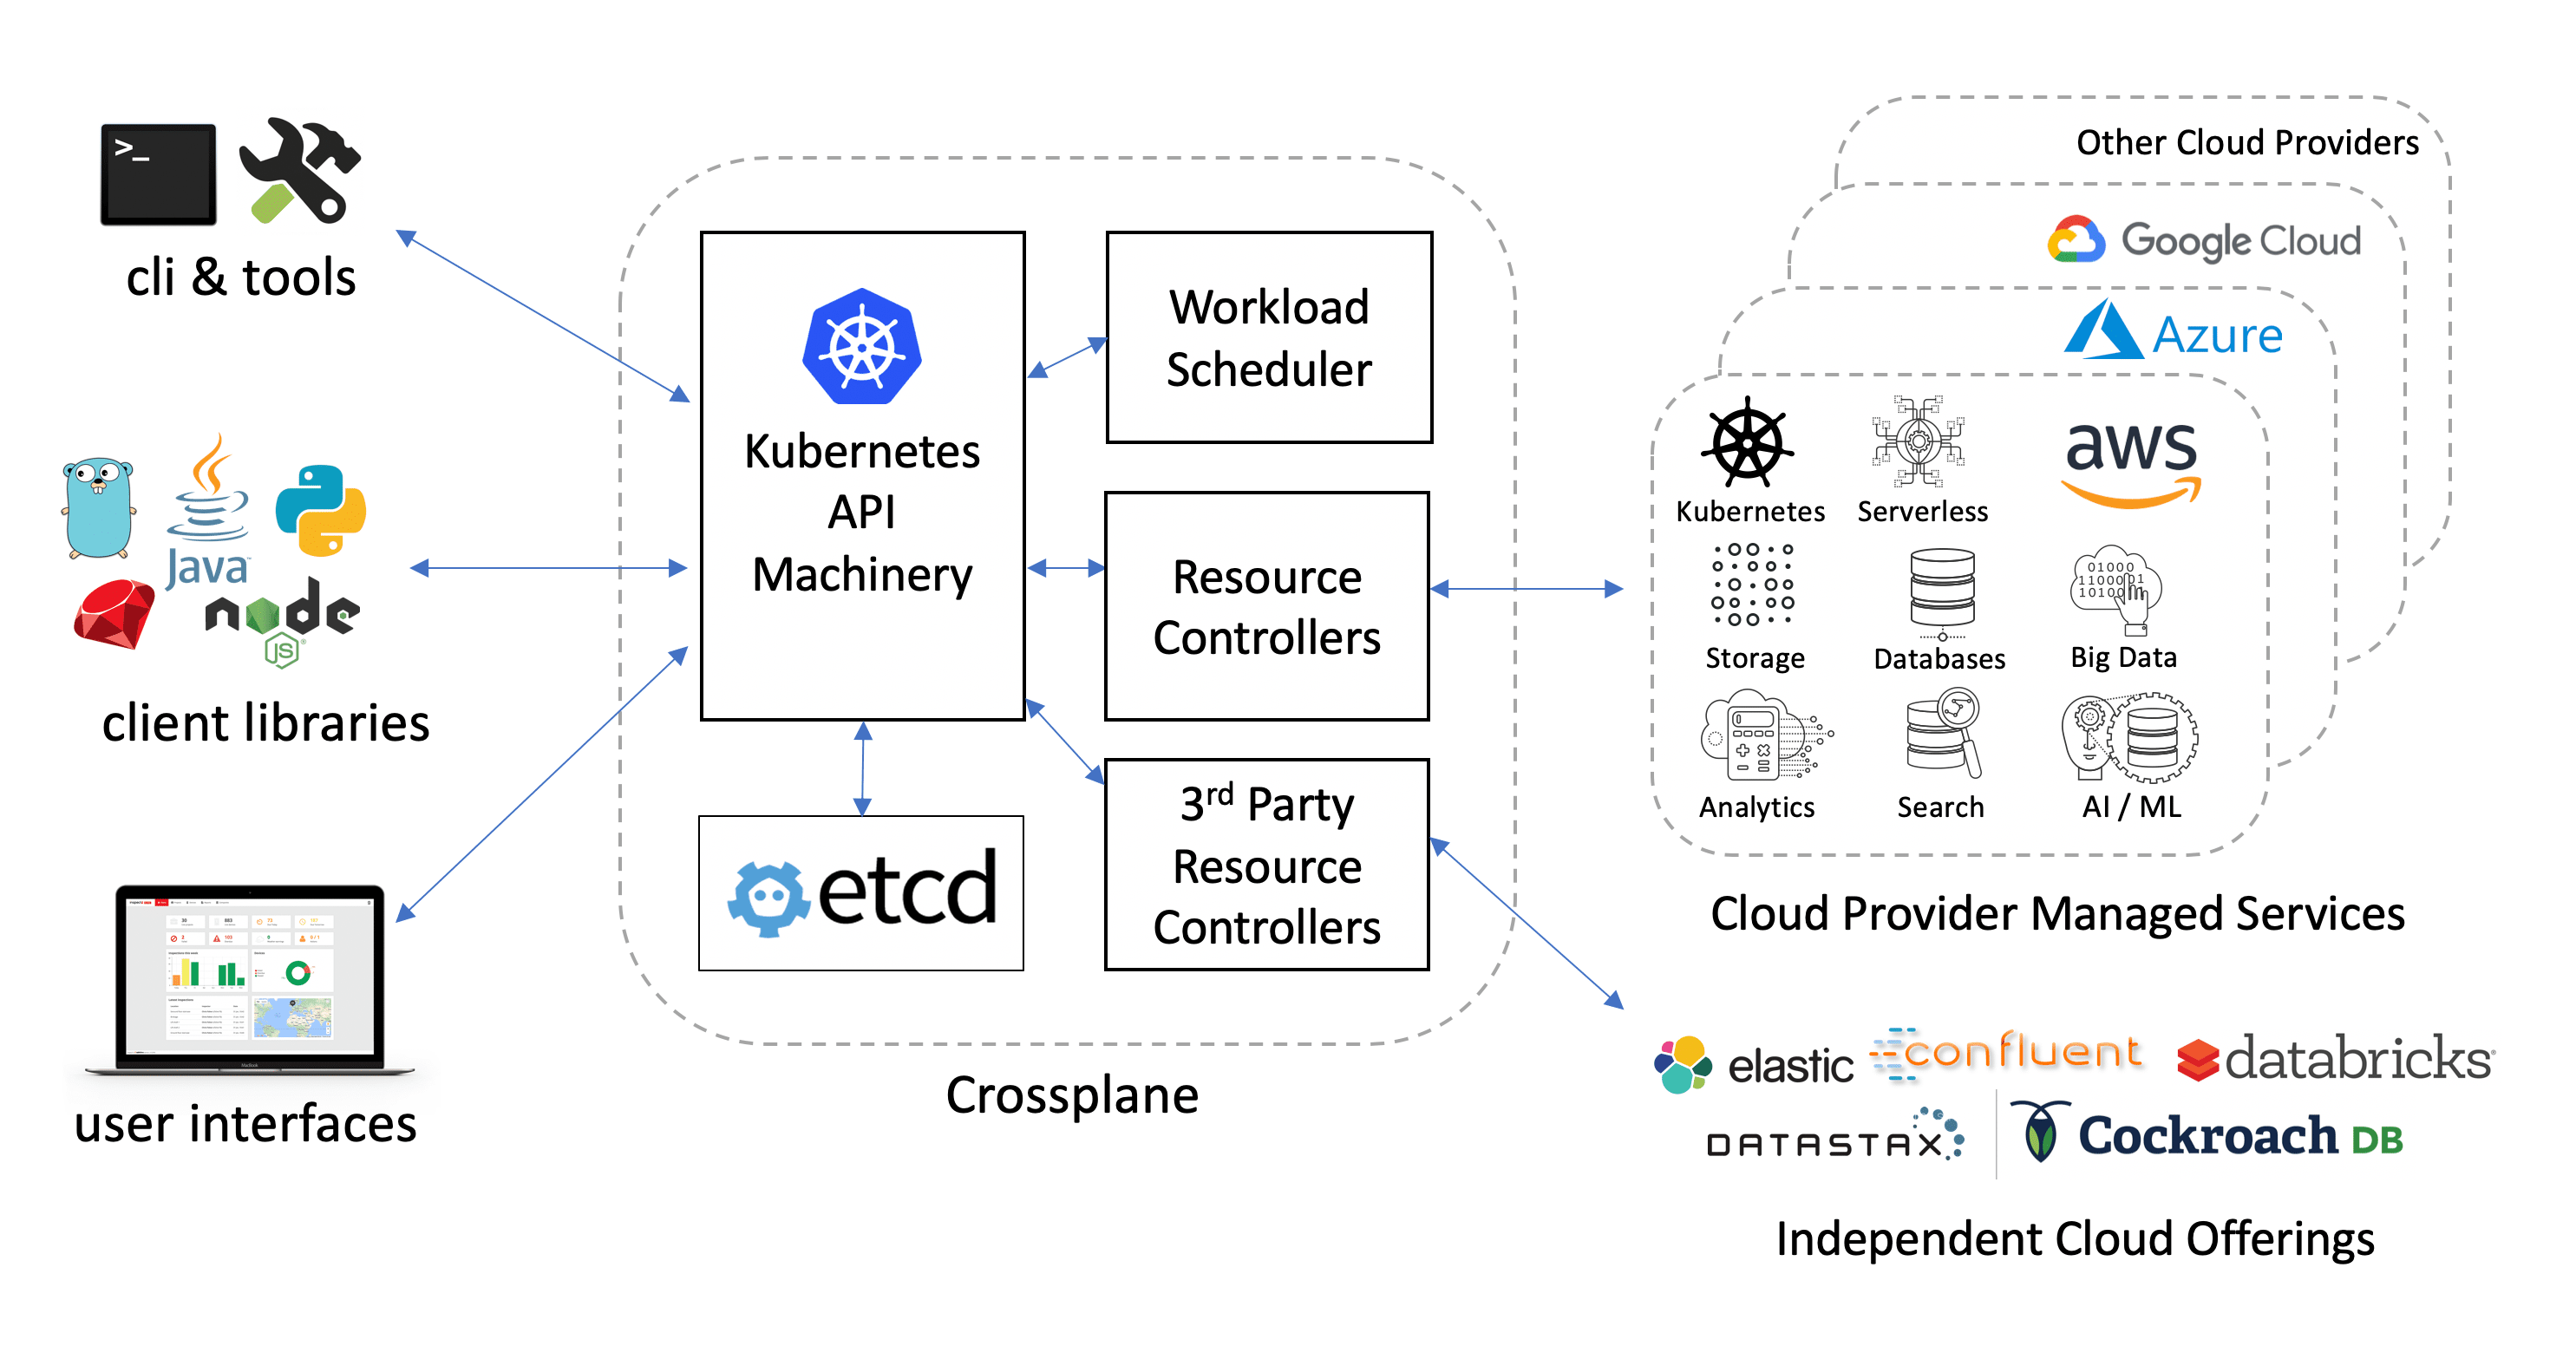
Crossplane Architecture
Crossplane is basically a bunch of core controllers with core CustomResources (claims) which can be extended using Stacks. Stack is another bunch of controllers with CustomResourceDefinitions (CRDs) which plug into the core library to satisfy the claim. Of course I am oversimplifying here. It offers lot more than just a bunch of controllers with CRDs but for the time being, let’s assume that’s all it is. So, you have Crossplane core which is a bunch of controllers containing generic resource claims like (e.g., KubernetesCluster, analogous to PersistentVolumeClaim) while stacks on the other hand implement the specific resources (e.g., GKECluster in GCP stack, analogous to PersistentVolumes) in Crossplane. Let’s take the example of GCP stack to understand this better.
Installating Crossplane
Let’s try provisioning a cluster in GKE (Google Kubernetes Engine) through Crossplane.
We will be using Minikube to install Crossplane but you can install it in Kind or whichever cluster you want to install it in (as long as you can use kubectl and you have the permissions to install CRDs aka Custom Resource Definitions).
Let’s fire up Minikube first:
$ minikube start
😄  minikube v1.2.0 on linux (amd64)
💥  Kubernetes downgrade is not supported, will continue to use v1.15.2
🏃  Re-using the currently running virtualbox VM for "minikube" ...
⌛  Waiting for SSH access ...
🐳  Configuring environment for Kubernetes v1.15.2 on Docker 18.09.6
🔄  Relaunching Kubernetes v1.15.2 using kubeadm ...
⌛  Verifying: apiserver proxy etcd scheduler controller dns
🏄  Done! kubectl is now configured to use "minikube"
We will be using Helm 3 to install Crossplane but you should be fine using helm 2 as well (installation using helm 2) with slight modifications in the commands. Note that we will be installing Crossplane in the default namespace.
$ helm version
version.BuildInfo{Version:"v3.0.2", GitCommit:"19e47ee3283ae98139d98460de796c1be1e3975f", GitTreeState:"clean", GoVersion:"go1.13.5"}
Let’s first add the helm repo for Crossplane:
$ helm repo add crossplane-alpha https://charts.crossplane.io/alpha
"crossplane-alpha" has been added to your repositories
Now we can check the Crossplane versions available for installation:
$ helm search repo -l crossplane
NAME                        CHART VERSION   APP VERSION DESCRIPTION
crossplane-alpha/crossplane 0.6.0           0.6.0       Crossplane - Managed Cloud Resources Operator
crossplane-alpha/crossplane 0.5.1           0.5.1       Crossplane - Managed Cloud Resources Operator
crossplane-alpha/crossplane 0.5.0           0.5.0       Crossplane - Managed Cloud Resources Operator
crossplane-alpha/crossplane 0.4.1           0.4.1       Crossplane - Managed Cloud Resources Operator
crossplane-alpha/crossplane 0.4.0           0.4.0       Crossplane - Managed Cloud Resources Operator
crossplane-alpha/crossplane 0.3.0           0.3.0       Crossplane - Managed Cloud Resources Operator
crossplane-alpha/crossplane 0.2.0           0.2.0       Crossplane - Managed Cloud Resources Operator
crossplane-alpha/crossplane 0.1.0           0.1.0       Crossplane - Managed Cloud Resources Operator
We will be installing the latest release of Crossplane when writing this post, which is 0.6.
$ helm install crossplane crossplane-alpha/crossplane --version 0.6.0
manifest_sorter.go:175: info: skipping unknown hook: "crd-install"
manifest_sorter.go:175: info: skipping unknown hook: "crd-install"
NAME: crossplane
LAST DEPLOYED: Tue Jan 21 14:56:28 2020
NAMESPACE: default
STATUS: deployed
REVISION: 1
TEST SUITE: None
NOTES:
Release: crossplane

Chart Name: crossplane
Chart Description: Crossplane - Managed Cloud Resources Operator
Chart Version: 0.6.0
Chart Application Version: 0.6.0

Kube Version: v1.15.2
You should see two running pods:
kubectl get po
NAME                                        READY   STATUS    RESTARTS   AGE
crossplane-65bdd6599c-9j8tj                 1/1     Running   0          37s
crossplane-stack-manager-5556749f76-r7cvh   1/1     Running   0          37s
GCP Stack (which gives us the Custom Resources to provision resources in GCP) does not come in-built in our Crossplane installation. Let’s install it first. You can install the Stack either through Crossplane’s own cli tool (kubectl plugin) or if you don’t want to do that, just kubectl apply -f stack.yaml.
Here’s our stack.yaml (yes, you install stack using a custom resource. Crossplane’s cli tool does the same thing under the hood):
apiVersion: stacks.crossplane.io/v1alpha1
kind: ClusterStackInstall
metadata:
  name: "stack-gcp"
spec:
  package: "crossplane/stack-gcp:v0.4.1"
Version v0.4.1 of GCP stack, was the latest version at the time of writing this post. You can check all the available versions at the Crossplane’s GCP Stack repo here. If all goes well, you can check if the stack-gcp pods are running using kubectl get po. You should see something similar to this:
NAME                                        READY   STATUS      RESTARTS   AGE
crossplane-65bdd6599c-9j8tj                 1/1     Running     3          26h
crossplane-stack-manager-5556749f76-r7cvh   1/1     Running     2          26h
stack-gcp-5954848cfd-hsbgn                  1/1     Running     1          90m
stack-gcp-7blq5                             0/1     Completed   0          91m
You can also check if the GCP custom resources are available:
kubectl get crd | grep "gcp.crossplane"
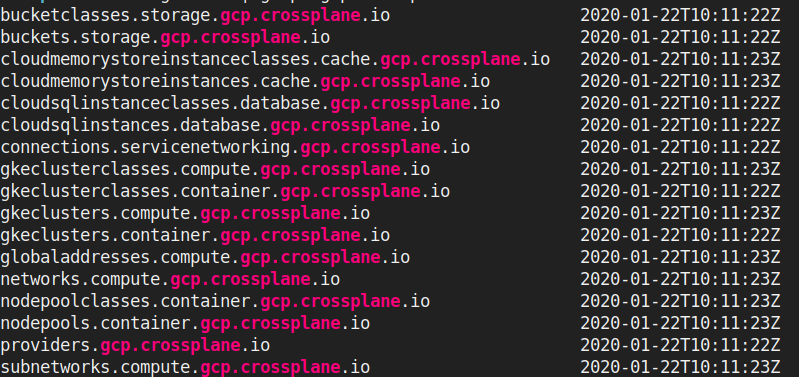
Custom Resources which are of interest to us here are gkeclusters.container.gcp.crossplane.io (aka GKECluster resources) , gkeclusterclasses.container.gcp.crossplane.io (aka GKEClusterClass resource) and providers.gcp.crossplane.io (aka Provider resource).
Sidenote: <resource>.compute.gcp.crossplane.io is the older version of <resource>.container.gcp.crossplane.io so you will see same resources in both the APIs. We will be using resources from *.container.gcp.crossplane.io wherever available.
Alright, now that Crossplane is up and running, let’s go a little deeper
Provisioning the Kubernetes cluster using Crossplane
Here’s a TL:DR; image of what we are going to do:
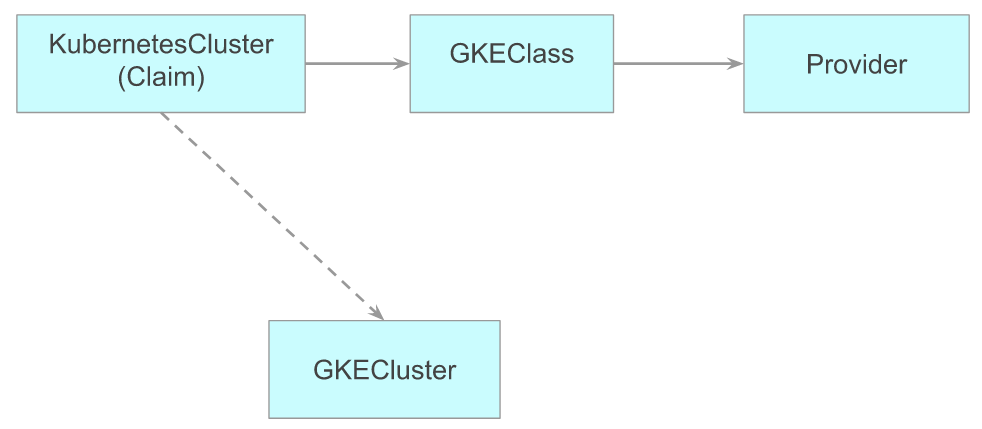
Relation between resources used to provision a cluster in Crossplane
A KubernetesCluster uses a GKEClass using cloud provider information from Provider to provision a GKECluster (this is the resource which represents an actual cluster. Deleting this deletes the actual cluster).
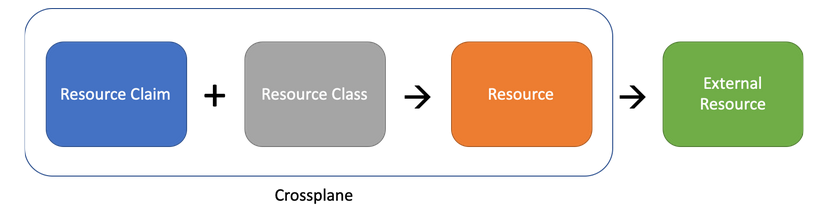 Here’s another image to give better context. Here,
 KubernetesCluster is our Resource Claim, GKEClass is our Resource Class and the resource which is provisioned by KubernetesCluster using GKEClass is GKECluster Resource (more commonly, Managed Resource) in the above image. External Resource is the actual cluster which sits in our GKE and is accessible through GCP Console.
If you don’t want to copy and paste things, here’s the intro-to-crossplane repo for all the templates used.
Creating the Provider resource
Provider is the custom resource which holds information about the GCP Project we are connecting to (including reference to the project credentials aka GCP service account). Crossplane uses Provider to provision our cluster and communicate with it. Please make a note that you need to have a GCP project with owner or editor access.
We will setup theProvider by creating a file named provider.yaml. Now, there are two ways we can go about configuring this. If you have gcloud cli installed (or if you want to install it), you can just use this:
# fill in your project ID
PROJECT_ID=

gcloud --project $PROJECT_ID services enable container.googleapis.com # enables GKE service
gcloud --project $PROJECT_ID services enable compute.googleapis.com # enables VM service

# create service account for Crossplane
gcloud iam service-accounts --project $PROJECT_ID create crossplane \
    --description "The service account that Crossplane uses to provision resources" \
    --display-name "crossplane-sa"

# grant Kubernetes Engine Admin role and service account user (service account user is required to use the VMs as GKE nodes)
gcloud projects add-iam-policy-binding $PROJECT_ID \
  --member serviceAccount:crossplane@$PROJECT_ID.iam.gserviceaccount.com \
  --role roles/container.admin
gcloud projects add-iam-policy-binding $PROJECT_ID \
  --member serviceAccount:crossplane@$PROJECT_ID.iam.gserviceaccount.com \
  --role roles/iam.serviceAccountUser

# create key (this is our service account json)
gcloud --project $PROJECT_ID iam service-accounts keys create --iam-account crossplane@$PROJECT_ID.iam.gserviceaccount.com crossplane-gcp-provider-key.json

# base64 encode it (tr -d "\n" removes the trailing newline)
BASE64ENCODED_GCP_PROVIDER_CREDS=$(base64 crossplane-gcp-provider-key.json | tr -d "\n")
OR
If you don’t have gcloud installed or you don’t want to install it, you can do the same thing as above manually. Crossplane has this excellent documentation on setting up Provider. Following is a shortened and a hopefully simplified copypasta from that link:
Set PROJECT_ID env variable to your GCP Project ID and BASE64ENCODED_GCP_PROVIDER_CREDS to the contents of your service account json encoded in base64.
$ export PROJECT_ID=my-project # replace this with your project id
$ export BASE64ENCODED_GCP_PROVIDER_CREDS=$(base64 crossplane-gcp-provider-key.json | tr -d "\n")
For service account, let’s go with Kubernetes Engine Admin role in GCP (here’s the doc for how to grant a role and here’s what Kubernetes Engine Admin can do).
Aand with that painful thing of setting up service account and all those environment variables done, let’s create our Provider resource (environment variables we set before replace the ${} thingies).
cat > provider.yaml <<EOF
---
apiVersion: v1
kind: Secret
metadata:
  name: gcp-account-creds
  namespace: default
type: Opaque
data:
  credentials: ${BASE64ENCODED_GCP_PROVIDER_CREDS}
---
apiVersion: gcp.crossplane.io/v1alpha3
kind: Provider
metadata:
  name: gcp-provider
spec:
  projectID: ${PROJECT_ID}
  credentialsSecretRef:
    namespace: default
    name: gcp-account-creds
    key: credentials
EOF
Notice that the Provider does not hold the credentials to our GCP account. Instead, it delegates that to a Secret which in turn is referenced in the Provider.
Once you’re all set, apply the the provider.yaml with
$ kubectl apply -f "provider.yaml"
$ kubectl get providers.gcp.crossplane.io
NAME           PROJECT-ID    AGE
gcp-provider   my-project    3h6m
Note that we are using providers.gcp.crossplane.io instead of simply providers because there are multiple resources with the name providers in Crossplane (e.g., Azure Kubernetes Service aka AKS has its own Provider resource which points to providers.azure.crossplane.io ).
Now that we’re all set with the credentials (if you face any problems, feel free to comment below or just skip to the end to see where you can get support if you get stuck).
Creating GKEClusterClass resource
With that out of the way, let’s get to the heart of what this post is all about. Configuring a cluster! This is taken care of through GKEClusterClass Kubernetes resource. Here’s what I am talking about:
apiVersion: container.gcp.crossplane.io/v1beta1
kind: GKEClusterClass
metadata:
  labels:
    className: "gke-class"
  name: gke-class
  namespace: default
specTemplate:
  forProvider:
    location: us-central1-b
  providerRef:
    name: gcp-provider
  reclaimPolicy: Delete
  writeConnectionSecretsToNamespace: default
This is where we specify the details for our cluster. Think of this is a template that you can re-use to create many clusters with the same settings. Notice the label here. This is going to be important later.
Let’s kubectl apply -f the above GKEClusterClass template first:
$ kubectl apply -f gkeclusterclass.yaml
Here’s what it should look like:
$ kubectl get gkeclusterclasses
NAME        PROVIDER-REF   RECLAIM-POLICY   AGE
gke-class   gcp-provider   Delete           6s
If you take a closer look at the yaml template above, you might ask, hey you said I can configure my cluster in GKEClusterClass but where do I specify how many nodes I want machine type, disk size and all the important things? Well, up until recently, specifying what kind of nodepools you want was a part of the yaml template above but it was recently moved into a separate NodePool resource which has to be created separately (what a pain right? well, it’s kinda complicated. You can read more about it in CrossPlane’s Slack community. You might have to login to the Crossplane slack channel to view this. Sorry 🙁 but to summarize, this pain is a part of a grand plan to something good. It’s a secret, well not really).
Here’s what our NodePool resource looks like (except you will have to replace my-project with your GCP project ID):
apiVersion: container.gcp.crossplane.io/v1alpha1
kind: NodePool
metadata:
  name: gke-nodepool
  namespace: default
spec:
  providerRef:
    name: gcp-provider
  writeConnectionSecretToRef:
    name: gke-nodepool
    namespace: default

  forProvider:
    initialNodeCount: 2
    # substitute my-project with your gcp project id here
    cluster: "projects/my-project/locations/us-central1-b/clusters/example-cluster"
    config:
      machineType: n1-standard-2 # default is n1-standard-1 if not specified
      diskSizeGb: 20 # default is 10GB if not specified
Let’s save this to a file nodepool.yaml and apply it:
$ kubectl apply -f nodepool.yaml
If we kubectl get nodepools, you should see something like this:
$ kubectl get nodepools
NAME           STATUS   STATE   CLUSTER-NAME                                                            NODE-POOL-CLASS   RECLAIM-POLICY   AGE
gke-nodepool                    projects/my-project/locations/us-central1-b/clusters/example-cluster                                      2s
Note that the Nodepool has no State right now because our cluster has not been provisioned yet. State field will be updated once our NodePool resource starts provisioning a node pool (GKE nodepool) for us which happens once the cluster has provisioned.
Creating KubernetesCluster resource
There’s only one more thing left to do now (phew!) and that is our KubernetesCluster resource. KubernetesCluster is the claim resource I was talking about at the beginning of this post. This is the analogue of PersistentVolumeClaim in our PVC-PV analogy and the very last piece in the puzzle to create our very own cluster using Crossplane.
apiVersion: compute.crossplane.io/v1alpha1
kind: KubernetesCluster
metadata:
  name: example-cluster
  namespace: default
  annotations:
    crossplane.io/external-name: example-cluster
spec:
  classSelector:
    matchLabels:
      className: "gke-class"
  writeConnectionSecretToRef:
    name: example-cluster
Aaand, once this is done, all you have to do is sit and watch . Ahem, I meant:
$ kubectl get kubernetescluster --watch
Also, remember the label we talked about when adding GKEClusterClass, well that is used by our KubernetesCluster to match the class for itself. You might ask, why not just allow adding the class name instead? Well, label makes things more flexibile. You don’t have to depend on the name of the class anymore but a label which can be present on any class (if that’s not very convincing, you can use the classRef instead to specify your class name). Note that Crossplane does not use the name of KubernetesCluster resource to name the provisioned cluster in GCP Console. You have to explicitly specify what you want to name your provisioned cluster. Notice the crossplane.io/external-name: my-cluster here. This is used to specify the name of the actual cluster being provisioned in GCP console. If you don’t specify this, Crossplane will just pick an arbitrary name for the cluster being provisioned.
Let’s check how our KubernetesCluster resource is doing first.
$ kubectl get kubernetescluster
NAME              STATUS   CLASS-KIND        CLASS-NAME   RESOURCE-KIND   RESOURCE-NAME                   AGE
example-cluster            GKEClusterClass   gke-class    GKECluster      default-example-cluster-mq75g   7s
You should see something like this (if you don’t see CLASS-NAME name populated with RESOURCE-NAME name, something is wrong. Go to the end of this post to see how you can debug this).
default-example-cluster-mq75g is the GKECluster resource that Crossplane provisioned for us. These kind of resources which are managed by another resource are called Managed Resources in the Crossplane lingo. If you notice, NodePool represents an actual NodePool resource which seems similar to GKECluster as in, it is the resource which actually represents an external resource in the cloud provider, you might wonder if NodePool might be a Managed Resource and you would be right but the thing is, the resource which would actually manage this NodePool is not there. You read that right. It’s something that the Crossplane community is working on right now.
You can go and check the status of provisioning by doing kubectl get gkecluster default-example-cluster-mq75g -o yaml:
$ kubectl get gkeclusters
NAME                            STATUS   STATE          ENDPOINT   CLUSTER-CLASS   LOCATION        RECLAIM-POLICY   AGE
default-example-cluster-mq75g            PROVISIONING              gke-class       us-central1-b   Delete           19s
So the cluster is being provisioned but the STATUS is empty. This will be populated once the cluster is fully provisioned.
Provisioning a cluster might take some time, so if you are bored or want to stretch a bit or grab a cup of coffee maybe, now’s the time.
If everything goes well, you should see Bound status in your KubernetesCluster resource.
$ kubectl get kubernetescluster
NAME              STATUS   CLASS-KIND        CLASS-NAME   RESOURCE-KIND   RESOURCE-NAME                   AGE
example-cluster   Bound    GKEClusterClass   gke-class    GKECluster      default-example-cluster-mq75g   3h9m
Troubleshooting
Well, that’s all! But oh wait, what do you do if you run into any problems?
The first place to look at is your GKECluster. Just do kubectl get container.gcp.crossplane.io <resource-name> -o yaml. For example, if we take the above case:
apiVersion: container.gcp.crossplane.io/v1beta1
kind: GKECluster
metadata:
  annotations:
    crossplane.io/external-name: example-cluster
  creationTimestamp: "2020-01-23T09:15:39Z"
  finalizers:
  - finalizer.managedresource.crossplane.io
  generateName: default-example-cluster-
  generation: 2
  name: default-example-cluster-mq75g
  resourceVersion: "39804"
  selfLink: /apis/container.gcp.crossplane.io/v1beta1/gkeclusters/default-example-cluster-mq75g
  uid: 325ad1a4-71f9-4e38-bd55-98f9e2bfa980
spec:
  claimRef:
    apiVersion: compute.crossplane.io/v1alpha1
    kind: KubernetesCluster
    name: example-cluster
    namespace: default
    uid: b08afb38-f58e-422d-add4-4560c1ddcb0b
  ...
status:
  atProvider:
    ...
    selfLink: https://container.googleapis.com/v1beta1/projects/my-project/zones/us-central1-b/clusters/example-cluster
    status: PROVISIONING
    zone: us-central1-b
  conditions:
  - lastTransitionTime: "2020-01-23T09:15:39Z"
    reason: Successfully resolved managed resource references to other resources
    status: "True"
    type: ReferencesResolved
  - lastTransitionTime: "2020-01-23T09:15:40Z"
    reason: Managed resource is being created
    status: "False"
    type: Ready
  - lastTransitionTime: "2020-01-23T09:15:46Z"
    reason: Successfully reconciled managed resource
    status: "True"
    type: Synced
You can find what went wrong in the conditions section.
If you still can’t fix the issue,
- You can ask for help on #general of Crossplane Slack channel (folks there are super helpful and don’t mind being asked stupid questions. Here is the link to Crossplane slack.
- You can also raise an issue on the repo
Where to go from here?
- If you are interested in what else Crossplane can do, besides provisioning cluster (trust me, Crossplane can do much much more than just provisioning clusters, check the docs).
- If you’re interested in the general architecture of Crossplane, look here.
- Also, Crossplane examples directory can be super helpful (it contains examples for most of the resources that you can create through Crossplane).
- If you want to understand how Crossplane fares with other similar tools, check this.
- Crossplane hosts a fortnightly podcast TBS on every alternate Thursday (check #tbs on slack for this). You can check the past Crossplane podcast recordings here. -Using Crossplane to compose & package infrastructure as code & build your own control plane on top cloud providers or any API[/blogs/custom-control-plane-crossplane/]
Hope you enjoyed this detailed introduction and walkthrough of how to do cluster provisioning using Crossplane. For more informartive blogs, you can follow us on Twitter and LinkedIn.
Looking for help with Kubernetes adoption or Day 2 operations? learn more about our capabilities and why startups & enterprises consider as one of the best Kubernetes consulting services companies.
Stay updated with latest in AI and Cloud Native tech
We hate 😖 spam as much as you do! You're in a safe company.
Only delivering solid AI & cloud native content.
Posts You Might Like