This article was originally published here: https://www.infracloud.io/blogs/kubernetes-autoscaling-explained/
In one of recent Kubernetes Pune meetups – someone asked: How does Kubernetes Autoscaling work? I have seen this question pop in various forms at meetups and conference talks. The “auto” part of the word can be a bit misleading in the sense that people think it’s all automatic. While the scaling part is definitely intended to be automatic, the devil is in the details. This post aims to start with an explanation of various areas in Kubernetes autoscaling, dive slightly deeper into each and provide pointers/references for further experimentation and exploration. Before we dive into technical details, let’s start with some basic questions and answers. And oh, we will be discussing everything in the context of Kubernetes here.
Autoscaling: Explained to a 5-year-old (TubScaling)
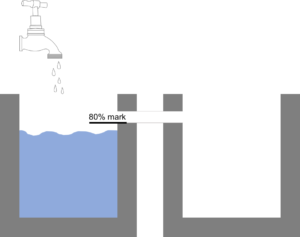
Let’s imagine we have a water tub being filled from a water tap. We want to ensure that once the first tub is 80% full, another tub should be placed and the water should be sent to the second tub. This is simple to do with tubs – you introduce a pipe connection between the first and second tub at appropriate mark. Of course, you will need to maintain a stock of tubs as long as we want to scale.

Thanks to the cloud, we don’t have to maintain physical VMs for autoscaling 🙂 So in this toy setup, following are terms:
Tub – the unit of scaling (What to scale?)
80% mark – metric and trigger for scaling (When to scale?)
Pipe – the operation which enables scaling in this case (How to scale?)
What to Scale?
In the context of Kubernetes cluster, there are typically two things you want to scale as a user:
Pods: For a given application let’s say you are running X replicas, if more requests come than the pool of X pods can handle, it is a good idea to scale to more than X replicas for that application. For this to work seamlessly, your nodes should have enough available resources so that those extra pods can be scheduled and executed successfully. That brings us to the second part of what to scale.
Nodes: Capacity of all nodes put together represents your cluster’s capacity. If the workload demand goes beyond this capacity, then you would have to add nodes to the cluster and make sure the workload can be scheduled and executed effectively. If the PODs keep scaling, at some point the resources that nodes have available will run out and you will have to add more nodes to increase overall resources available at the cluster level.
When to Scale?
The decision of when to scale has two parts – one is measuring a certain metric continuously and when the metric crosses a threshold value, then acting on it by scaling a certain resource. For example, you might want to measure the average CPU consumption of your pods and then trigger a scale operation if the CPU consumption crosses 80%. But one metric does not fit all use cases and for different kind of applications, the metric might vary. For example for a message queue, the number of messages in waiting state might be the appropriate metric. For memory intensive applications, memory consumption might be that metric. If you have a business application which handles about 1000 transactions per second for a given capacity pod, then you might want to use that metric and scale out when the TPS in pod reach above 850 for example.
So far we have only considered the scale-up part, but when the workload usage drops, there should be a way to scale down gracefully and without causing interruption to existing requests being processed. We will look at implementation details of these things in later sections.
How to Scale?
This is really the implementation detail, but nevertheless an important one. In case of pods, simply changing the number of replicas in replication controller is enough. In case of nodes, there should be a way to call the cloud provider’s API, create a new instance and make it a part of the cluster – which is relatively non-trivial operation and may take more time comparatively.
Kubernetes Autoscaling
With this understanding of autoscaling, let’s talk about specific implementation and technical details of Kubernetes autoscaling.
Cluster Autoscaler
Cluster autoscaler is used in Kubernetes to scale cluster i.e. nodes dynamically. It watches the pods continuously and if it finds that a pod cannot be scheduled – then based on the PodCondition, it chooses to scale up. This is far more effective than looking at the CPU percentage of nodes in aggregate. Since a node creation can take up to a minute or more depending on your cloud provider and other factors, it may take some time till the pod can be scheduled. Within a cluster, you might have multiple node pools, for example, a node pool for billing applications and another node pool for machine learning workloads. Also, the nodes can be spread across AZs in a region and how you scale might vary based on your topology. Cluster Autoscaler provides various flags and ways to tweak the node scaling behaviour, you can check the details here.
For scaling down, it looks at average utilisation on that node, but there are other factors which come into play. For example, if a pod with pod disruption budget is running on a node which cannot be re-scheduled then the node cannot be removed from the cluster. Cluster autoscaler provides a way to gracefully terminate nodes and gives up to 10 minutes for pods to relocate.
Horizontal Pod Autoscaler (HPA)
Horizontal pod autoscaler is a control loop which watches and scales a pod in the deployment. This can be done by creating an HPA object that refers to a deployment/replication controller. You can define the threshold and minimum and maximum scale to which the deployment should scale. The original version of HPA which is GA (autoscaling/v1) only supports CPU as a metric that can be monitored. The current version of HPA which is in beta (autoscaling/v2beta1) supports memory and other custom metrics. Once you create an HPA object and it is able to query the metrics for that pod, you can see it reporting the details:
$ kubectl get hpa
NAME               REFERENCE                     TARGETS  MINPODS MAXPODS REPLICAS AGE
helloetst-ownay28d Deployment/helloetst-ownay28d 8% / 60% 1       4       1        23h
There are a few tweaks that you can make to the behaviour of horizontal pod autoscaler by adding flags to controller manager:
- Determine how frequently the hpa monitors the given metrics on a pool of pods by using the flag –horizontal-pod-autoscaler-sync-period on controller manager. The default sync period is 30 seconds.
- The delay between two upscale operations defaults to 3 minutes and can be controlled by using the flag –horizontal-pod-autoscaler-upscale-delay
- Similarly, the delay between two downscaling operations is by default 5 minutes and adjustible with flag –horizontal-pod-autoscaler-downscale-delay
Metrics & Cloud Provider
For measuring metrics your server should have Heapster working or API aggregation enabled along with Kubernetes custom metrics enabled. API metrics server is the prefered method in Kubernetes 1.9 onwards. For provisioning nodes, you should have appropriate cloud provider enabled and configured in your cluster, more details of which can be found here
And some more
In the context of this discussion, there are a few more projects and ideas which are relevant and interesting. Vertical pod autoscaler allows you to optimize the resources you assign to a pod over time using various modes. Another is addon resizer which watches and resizes the container vertically. Fission project creates a hpa for you when you create a function of executor type new deployment.
Finally, when I see a question like “Is autoscaling built out of the box?” next time, hopefully, I can direct to this article on Kubernetes autoscaling! What is your story of autoscaling?


