
Manage Envoy Proxy using go-control-plane
If you are working closely with cloud native technologies, you have most likely heard about Envoy. For those who dont know What is Envoy Proxy? Envoy is an open source edge and service proxy designed explicitly for cloud native applications. It is a highly performant proxy written in C++ by Lyft and being used by various products and organizations. It is a self-contained process that runs alongside the application servers. In this article, we’ll look at how you can manage Envoy using go-control-plane and what’s better than getting the concept wrapped around a use case for better understanding? Let’s get started then!
Use case - Configuring Envoy for dynamic changes
We have a bunch of backend servers which restart frequently. At every restart, their IPs and ports are different. Clients connecting to these servers need a fixed IP and port. Envoy proxy is placed in front of all the servers, which means Envoy configuration always needs to be up to date. Envoy provides various configuration management approaches. In this case, we can use Envoy’s dynamic configuration feature to manage the changing parameter like IPs and ports. A control plane component controls the dynamic configuration. We won’t be using a full-fledged service mesh solution available in the market as most of them are heavy, and we do not need all of the service mesh functionalities, so we decided to proceed with the go-control-plane library.
Enter the go-control-plane
The go-control-plane is a Go library that implements almost all of the xDS (data plane) APIs. The xDS are collections of APIs implemented in gRPC/REST, which allows us to configure various parts of Envoy.
How to configure Envoy?
Before moving to the implementation, let’s check how you can configure Envoy:
- Static configuration
- Dynamic configuration
The configuration has following sections:
- Listeners (Configuration of ports on which to listen for traffic)
- Endpoints (Configuration of endpoints where to redirect traffic)
- Routes (Configuration of routes which are exposed by Envoy)
- Clusters (Configuration of backend services to which we can route traffic)
- Secrets (Configuration of distributing secrets like certificates and keys)
Envoy static configuration
The static configuration comes in handy when your upstreams are not frequently modified. As Envoy is kind a of proxy, every request will go through it. It needs to have the latest configuration about the backend servers (upstream clusters) like IP and port to connect to the backend server and serve the client request. Whenever the backend details are updated, Envoy configuration needs to be updated in the static configuration file, and a restart is required.
Envoy dynamic configuration
In the microservices world, mostly, backend servers are ephemeral. After every change in the backend server, a restart of the Envoy instance is not desirable as there can be a direct impact on clients’ applications. This is where the dynamic configuration of Envoy comes to the rescue! As soon as there is a change in the backend servers/upstream clusters, this change is propagated on the Envoy proxy using the data plane APIs.
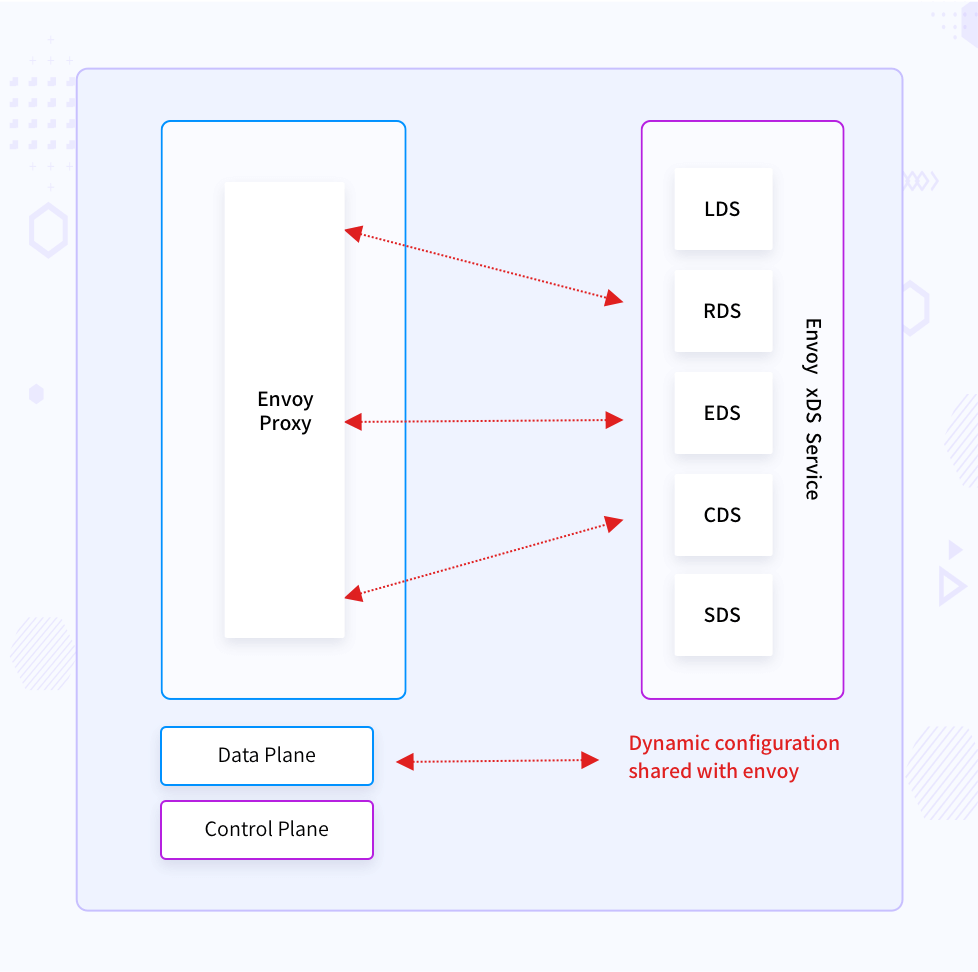
The control plane implementers can update the Envoy configuration through these APIs:
- Listeners Discovery Service API (LDS): To publish ports on which to listen for traffic.
- Endpoints Discovery Service API (EDS): For service discovery.
- Routes Discovery Service API (RDS): For traffic routing decisions.
- Clusters Discovery Service API (CDS): For backend services to which we can route traffic.
- Secrets Discovery Service API (SDS): For distributing secrets (certificates and keys).
When you use Envoy with Istio, Heptio Contour, or Gloo, these service mesh solutions update Envoy configuration using the data plane APIs. Dataplane and control plane are the terms which are usually used in service meshes. This blog post explains it further.
go-control-plane in action
With enough background of Envoy’s configuration, we can see how we have implemented these xDS (x is a placeholder, x can be anything from the above configuration groups) APIs.
The code we are using here is available here.
We are going to make use of dynamic configuration here. The overall structure of the repository/demo is like below.
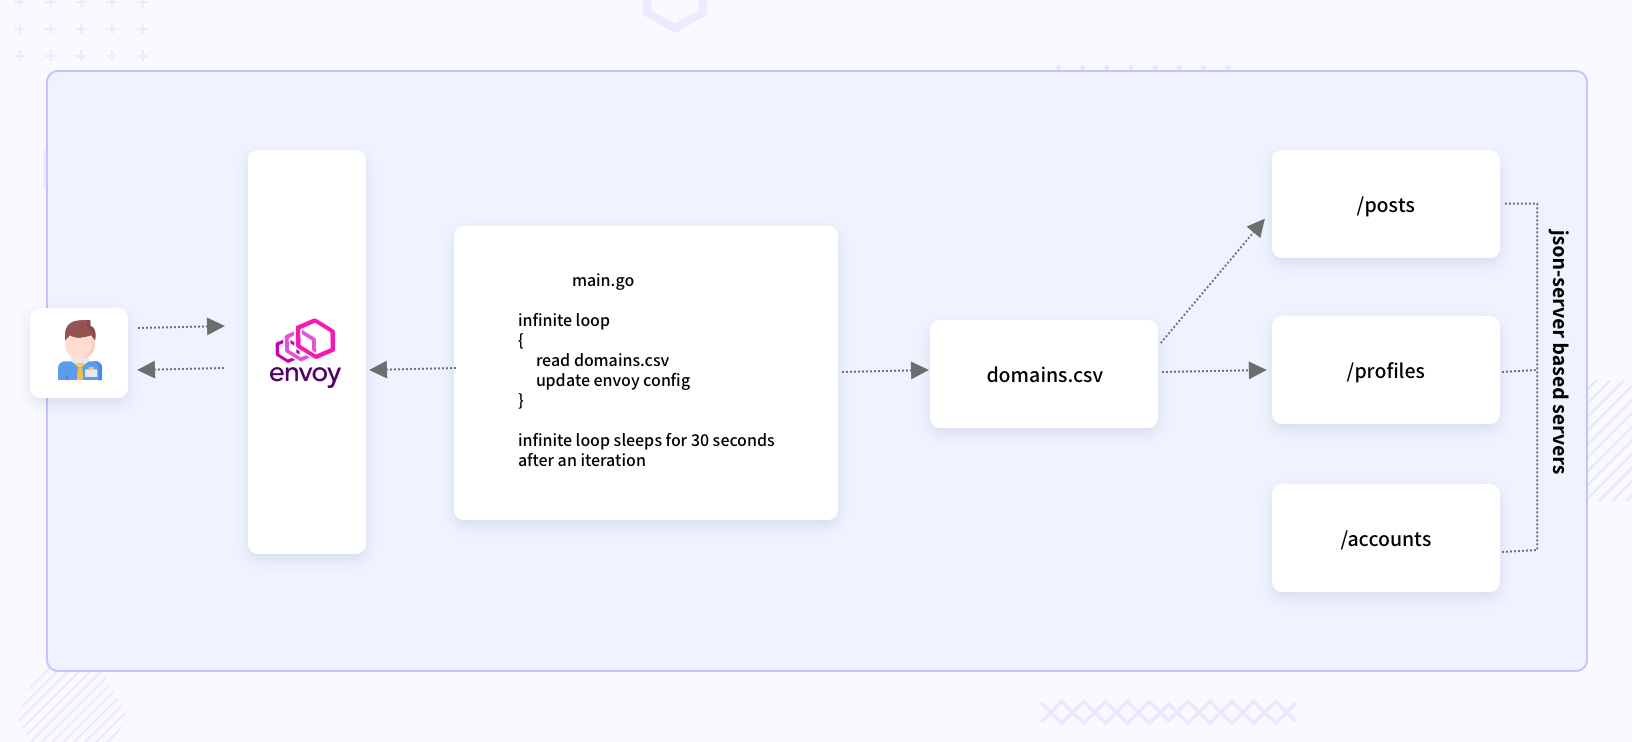
As you can see in the above diagram, the main.go has a for loop which checks for changes in the file domains.csv, and creates a snapshot of the configuration to share with Envoy. The domains.csv file contains details of the backend servers. If you want to access your backend server through Envoy, you will need to add an entry in domains.csv. The main.go’s for loop will pick that change and share it with Envoy. The json-server based servers are dummy REST servers which can be actual servers in production use cases. Instead of having a file like domains.csv, there will be some logic which fetches the updated IPs of the backend servers.
Once you clone the repository, you will find the following directories in it:
certs: scripts, configuration, and certificates for the Envoy instance.sample_servers: The json-server can run JSON files.src: control-plane code in Go and a trigger.
The src directory contains main.go and domainsreader.go. The main.go has methods for creating clusters and listeners struct from the data made available out of the domains.csv file.
In the RunManagementServer method, you can notice the RegisterAggregatedDiscoveryServiceServer call. You can either register each of DiscoveryService one by one or just register the AggregatedDiscoveryService.
In the root directory, you will find these two configuration files.
- static-configuration.yaml
- dynamic-configuration.yaml
Running the control-plane
To run the control-plane code, you need to fire the below commands.
go run src/main.go
This will start a control-plane (management server) on port 18000.
You then need to start any one of the servers.
Running the sample_servers
Here, I am using a dummy json-server Node.js module. You can follow the steps provided here to install it. Once you install the json-server, open another terminal window and navigate to the root directory of the repository you cloned, and fire the below command.
json-server --watch sample_servers/profiles.json --host {your-local-ip} --port 10002
This command will start a server on port 10002, and the requests to this server will be proxied through Envoy.
Let’s see how to run Envoy with a dynamic configuration
To run Envoy, download a copy of the envoy binary.
docker cp $(docker create envoyproxy/envoy:v1.16-latest):/usr/local/bin/envoy .
We are fetching the container image of Envoy and copying the envoy binary from it to our local directory.
Then invoke the Envoy binary with the dynamic configuration.
./envoy -c dynamic-configuration.yaml -l debug
Now that everything is set up, it’s time to access the profiles server through the Envoy endpoint. You will need another terminal window to execute the below command.
curl -H "Host: router.mahendrabagul.io" \
  --resolve  router.mahendrabagul.io:10000:127.0.0.1 \
  --cacert certs/envoy-intermediate-and-envoy-root-ca-chain.crt https://router.mahendrabagul.io:10000/
This command tells curl to resolve router.mahendrabagul.io to 127.0.0.1.
You can perform the below steps to check if the dynamic configuration is applied to Envoy or not.
We will need to start another json-server. Below command starts the posts server.
json-server --watch sample_servers/posts.json --host {your-local-ip} --port 10003
You now need to update the IP and port in domains.csv present in the root of the project like below:
"{your-local-ip}","10003","/posts"
The next iteration in the management server will pick up this change and push it to Envoy. You will then be able to access /posts API from Envoy’s IP and port. The management server uses a snapshot-based approach. The whole configuration is reshared with Envoy for every iteration.
That’s it for the dynamic configuration. I would recommend checking the dynamic-configuration.yaml file and static-configuration.yaml.
How do you run Envoy with static configuration?
You can start Envoy using a static configuration like below. There is no need for a management server in case of static configuration.
./envoy -c static-configuration.yaml -l debug
curl  -H "Host: router.mahendrabagul.io" \
   --resolve  router.mahendrabagul.io:10000:127.0.0.1 \
   --cacert certs/envoy-intermediate-and-envoy-root-ca-chain.crt
You should see the robots.txt for www.linkedin.com, because that’s what is configured in static-configuration.yaml.
You can check the static-configuration.yaml to know how I have configured TLS setup for Envoy. The TLS configuration goes under the secrets key. You can then configure server_cert, client_cert, and validationcontext. Validation context has a reference to the trusted certificate chain.
Conclusion
You can either use the existing, full-fledged control plane implementation or try creating your own using go-control-plane, but it depends on the use case you are solving. If you are more into Java, there is a Java alternative (java-control-plane) available. The popularity of Go and support for all xDS APIs makes it a preferred choice for small applications where a full-fledged service mesh is not desirable.
Hope this was helpful to you. Do try this process and share your thoughts on how you are managing Envoy in your case via Twitter. Happy Coding :)
Looking for help with your cloud native journey? do check out how we’re helping startups & enterprises with our cloud native consulting services and capabilities to achieve the cloud native transformation.
Stay updated with latest in AI and Cloud Native tech
We hate 😖 spam as much as you do! You're in a safe company.
Only delivering solid AI & cloud native content.
Posts You Might Like