Packaging Cloud Native Applications With Gravity

How do you deliver your SaaS product in a restricted on-premise environment as identical as it is in the cloud? As a vendor how can you deliver cloud-native solutions in a regulated environment in a cost-efficient manner? As a SRE team, how do you manage your Kubernetes clusters with efficiency? In this post, we will try to explore a solution on how to package cloud native applications, which can help to answer these questions.
What is Gravity?
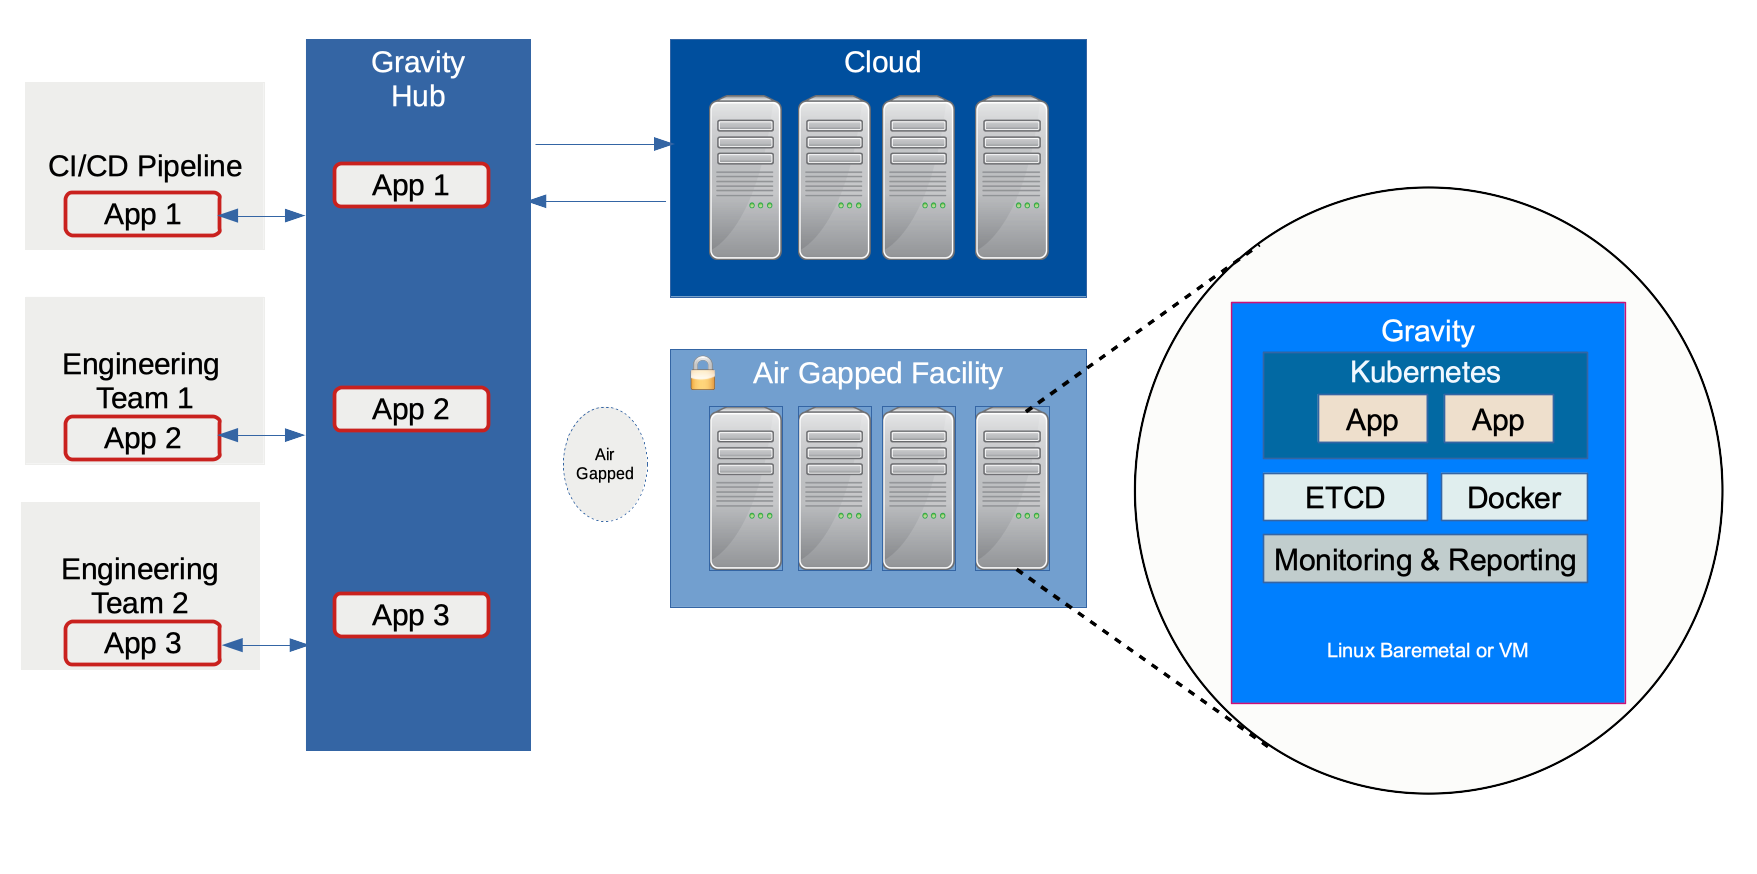
Gravity is an application delivery solution for cloud-native applications in a regulated and restricted environment simplifying the experience for the administrators. It provides out of the box compliance, security, and monitoring.
Gravity does this by packaging the Kubernetes cluster along with applications and their dependencies in a single file (as .tar file), also known as the gravity “cluster image”. Each Gravity cluster has a gravity daemon that acts as a Kubernetes hypervisor, monitoring the health of the cluster and re-configuring it. Each cluster is equipped with an authentication gateway that simplifies remote troubleshooting using SSH or Kubernetes APIs, even if they are behind the firewall.
Gravity Components
- tele – this is a build tool, used to create the cluster image and publish the image to Gravity Hub
- tsh – the remote access client to authenticate against a SAML/OAuth identity provider and remotely connect to Kubernetes clusters via SSH or Kubernetes API
- gravity (service) – cluster management daemon runs on every node
- gravity (CLI) – the CLI tool is used to perform high-level cluster management tasks
- Control panel – the web GUI to administer the cluster
- Gravity hub – it is a catalog of applications and web portal to monitor and push applications to remote clusters
Gravity Workflow
Below is the lifecycle of the deployment:
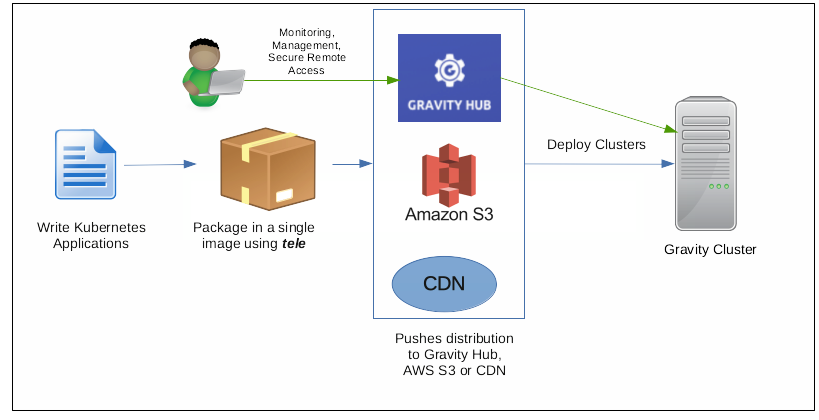
- Application developers write Kubernetes applications
- Package the applications and Kubernetes cluster in a single image (tarball) using tele command.
- Publish the distribution to Amazon S3 or CDN or Gravity Hub
- Through Gravity Hub, deploy the application in Gravity Cluster(s).
Gravity Use Cases
- Delivering Kubernetes applications to third party premises – Those SaaS vendors who want to package and distribute their applications in their client environments, either in public clouds or on-premise datacenters, can utilize this to deliver identical, out-of-the-box security, monitoring, and compliance to industry regulations.
- Multi-cluster deployments for Organization – Teams who want to deliver Kubernetes-as-a-service across multiple public cloud or in hybrid environments can package their clusters. It reduces operational overhead and brings agility to the process.
Let’s Try Out Gravity
What could be better than understanding with an example of hello world.
Pre-requisites
- An application which can be containerized
- Linux x86 VM(s) for the cluster nodes with at least 2 CPUs
- Ensure sufficient space is available in the working directory and in root volume
gravityandteleCLI
Download and install the CLI.
$ tar xvf gravity-7.0.4-linux-x86_64-bin.tar.gz
$ sudo ./install.sh
Building a Cluster Image
Below are the steps to build the cluster image:
- Create the Docker image of your application.
- Create the definitions of Kubernetes resources required for your application. You can put all resources (YAMLs) in the same directory or you can use Helm.
- Create a cluster image manifest to describe the requirement of Kubernetes cluster capable of running the application.
- Run tele build CLI to build the image.
Let’s see in detail. I am using a sample app available on Github. The main file of interest is app.yaml which has the specification of the cluster deployment.
Initialize the helm CLI as per below.
$ helm init --client-only
$ sudo tele build -o /root/demo-app.tar demo-app/resources/app.yaml

Tue May 12 12:51:54 UTC Building cluster image demo-app 0.0.1
Tue May 12 12:51:54 UTC Selecting base image version
        Will use base image version 7.0.4
Tue May 12 12:51:54 UTC Downloading dependencies from s3://hub.gravitational.io
        Still downloading dependencies from s3://hub.gravitational.io (10 seconds elapsed)
        ...
        Still downloading dependencies from s3://hub.gravitational.io (5 minutes elapsed)
Tue May 12 12:57:40 UTC Embedding application container images
        Using local image quay.io/gravitational/debian-tall:0.0.1
        Using local image quay.io/gravitational/provisioner:ci.82
        Using local image demo-app-worker:0.0.1
        Using local image quay.io/gravitational/debian-tall:buster
        Vendored image gravitational/debian-tall:0.0.1
        Still embedding application container images (10 seconds elapsed)
        Vendored image gravitational/debian-tall:buster
        Still embedding application container images (20 seconds elapsed)
        Still embedding application container images (30 seconds elapsed)
        Vendored image gravitational/provisioner:ci.82
        Vendored image demo-app-worker:0.0.1
Tue May 12 12:58:13 UTC Creating application
        Still creating application (10 seconds elapsed)
Tue May 12 12:58:26 UTC Generating the cluster image
        Still generating the cluster image (10 seconds elapsed)
      ...
        Still generating the cluster image (1 minute elapsed)
Tue May 12 12:59:45 UTC Saving the image as /root/demo-app.tar
        Still saving the image as /root/demo-app.tar (10 seconds elapsed)
       ...
        Still saving the image as /root/demo-app.tar (1 minute elapsed)
Tue May 12 13:01:35 UTC Build finished in 9 minutes
The resulting file is demo-app.tar after the build which has all the dependency to create the Kubernetes cluster. It contains the Kubernetes binaries, Docker engine, Docker registry, and the demo application. This can be deployed to any number of Linux servers.
Now we are ready to spin up new clusters. Transfer the cluster image to the node where you want to build the cluster. From the same directory, execute the following command to create new cluster.
$ sudo ./gravity install --advertise-addr=10.128.0.3 --token=secret
This will take a few minutes to install. If it fails, you can restart with ./gravity resumecommand.
At any point, you can also check the status of installation with ./gravity plan
$ sudo ./gravity plan
Phase                   Description                                                           State           Node           Requires                  Updated
-----                   -----------                                                           -----           ----           --------                  -------
✓ init                  Initialize operation on all nodes                                     Completed       -              -                         Tue May 12 14:07 UTC
  ✓ gravity             Initialize operation on node gravity                                  Completed       10.128.0.3     -                         Tue May 12 14:07 UTC
✓ checks                Execute preflight checks                                              Completed       -              /init                     Tue May 12 14:07 UTC
✓ configure             Configure packages for all nodes                                      Completed       -              -                         Tue May 12 14:07 UTC
✓ bootstrap             Bootstrap all nodes                                                   Completed       -              -                         Tue May 12 14:07 UTC
  ✓ gravity             Bootstrap master node gravity                                         Completed       10.128.0.3     -                         Tue May 12 14:07 UTC
✓ pull                  Pull configured packages                                              Completed       -              /configure,/bootstrap     Tue May 12 14:10 UTC
  ✓ gravity             Pull packages on master node gravity                                  Completed       10.128.0.3     /configure,/bootstrap     Tue May 12 14:10 UTC
✓ masters               Install system software on master nodes                               Completed       -              /pull                     Tue May 12 14:11 UTC
  ✓ gravity             Install system software on master node gravity                        Completed       -              /pull/gravity             Tue May 12 14:11 UTC
    ✓ teleport          Install system package teleport:3.2.14 on master node gravity         Completed       10.128.0.3     /pull/gravity             Tue May 12 14:11 UTC
    ✓ planet            Install system package planet:7.0.26-11704 on master node gravity     Completed       10.128.0.3     /pull/gravity             Tue May 12 14:11 UTC
✓ wait                  Wait for Kubernetes to become available                               Completed       -              /masters                  Tue May 12 14:22 UTC
✓ rbac                  Bootstrap Kubernetes roles and PSPs                                   Completed       -              /wait                     Tue May 12 14:22 UTC
✓ coredns               Configure CoreDNS                                                     Completed       -              /wait                     Tue May 12 14:22 UTC
✓ system-resources      Create system Kubernetes resources                                    Completed       -              /rbac                     Tue May 12 14:22 UTC
✓ export                Export applications layers to Docker registries                       Completed       -              /wait                     Tue May 12 14:24 UTC
  ✓ gravity             Populate Docker registry on master node gravity                       Completed       10.128.0.3     /wait                     Tue May 12 14:24 UTC
→ health                Wait for cluster to pass health checks                                In Progress     -              /export                   Tue May 12 14:24 UTC
* runtime               Install system applications                                           Unstarted       -              /rbac                     -
  * dns-app             Install system application dns-app:0.4.1                              Unstarted       -              /rbac                     -
  * logging-app         Install system application logging-app:6.0.4                          Unstarted       -              /rbac                     -
  * monitoring-app      Install system application monitoring-app:6.0.8                       Unstarted       -              /rbac                     -
  * tiller-app          Install system application tiller-app:7.0.1                           Unstarted       -              /rbac                     -
  * site                Install system application site:7.0.4                                 Unstarted       -              /rbac                     -
  * kubernetes          Install system application kubernetes:7.0.4                           Unstarted       -              /rbac                     -
* app                   Install user application                                              Unstarted       -              /runtime                  -
  * demo-app            Install application demo-app:0.0.1                                    Unstarted       -              /runtime                  -
* connect-installer     Connect to installer                                                  Unstarted       -              /runtime                  -
* election              Enable cluster leader elections                                       Unstarted       -              /app                      -
Once installation is successful, you can expand the cluster by adding more nodes. You can add node using ./gravity join command.
You can use Kubernetes user with the same CLI. It will print out a signup URL pointing to control panel.
gravity users add --roles=@teleadmin demo
Introducing Teleport
Security is the most critical aspect of cloud-native solutions and with ever-increasing bad actors, the need for zero-trust security is unavoidable. Traditional security practices like castle-and-moat were focusing only on securing the perimeter of your infrastructure. This strategy had a severe drawback that trusts all internal systems by default. In the modern cloud era, with the sharing of infrastructure resources in the cloud, third party dependencies and libraries and various as-a-Service entities in the system, it has been a mandate to have a zero-trust security framework. In this framework, all internal and external resources are not trusted.
Zero trust principles
- No users, machines or resources, internal or external should be trusted.
- Least privilege access
- Micro-segmentation
- Multi-factor authentication
Teleport is one such product which fits in this space. It implements zero-trust security for cloud applications. It uses the existing security primitives and open standards like OpenSSH, encryption, and network protocols.
 source: https://goteleport.com/docs/architecture/overview/
- Initiate Client Connection
- Authenticate Client
- Connect to Node
- Authorize Client Access to Node
- Grant User User Access
Quick Teleport Demo
- You can install teleport from the binaries
- As root, create a directory to keep its data and start teleport service
$ mkdir -p /var/lib/teleport
$ teleport start
If it is successful, you will see the below output.
[AUTH] Auth service is starting on 0.0.0.0:3025.
[PROXY] Reverse tunnel service is starting on 0.0.0.0:3024.
[PROXY] Web proxy service is starting on 0.0.0.0:3080.
[PROXY] SSH proxy service is starting on 0.0.0.0:3023.
[NODE] Service is starting on 0.0.0.0:3022.
- Create a user sign-up token
- Create an OS user
$ useradd demo # if it doesn't exist in OS. Mapping to OS user is required.
$ tctl users add demo
Output:
Signup token has been created and is valid for 1 hours. Share this URL with the user:
https://teleporthost:3080/web/newuser/f8b8e58ae8ee822b21c5d9ea10b7400d

NOTE: Make sure teleporthost:3080 points at a Teleport proxy which users can access.
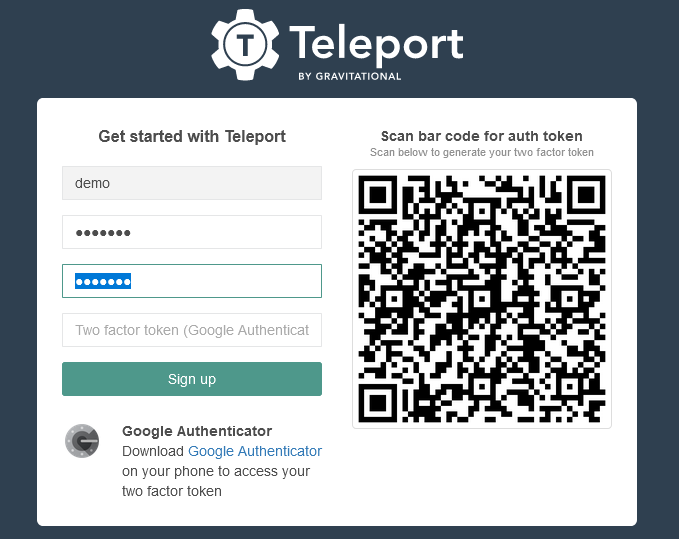
- Register a User:
This will generate a signup URL where you can setup the 2FA authentication using Google Authenticator app
- Login to demo user via teleport proxy
tsh --proxy=localhost--insecure login --user demo # in my demo, teleport proxy is localhost
WARNING: You are using insecure connection to SSH proxy https://localhost:3080
Enter password for Teleport user demo:
Enter your OTP token:
568439
WARNING: You are using insecure connection to SSH proxy https://localhost:3080
> Profile URL:  https://localhost:3080
  Logged in as: demo
  Cluster:      *********
  Roles:        admin*
  Logins:       demo
  Valid until:  2020-05-12 10:41:48 +1000 AEST [valid for 12h0m0s]  Extensions:   permit-agent-forwarding, permit-port-forwarding, permit-pty* RBAC is only available in Teleport Enterprise
  https://gravitational.com/teleport/docs/enterprise
- Using tsh you can do ssh or scp now and even record the session.
PS: You can find more information on achieving security and compliance with Teleport in this blog.
Hope you enjoyed the article. If you have questions, feel free to reach out to me via Twitter.
Looking for help with your cloud native journey? do check our cloud native consulting capabilities and expertise to know how we can help with your transformation journey.
References
Stay updated with latest in AI and Cloud Native tech
We hate 😖 spam as much as you do! You're in a safe company.
Only delivering solid AI & cloud native content.
Posts You Might Like