Getting Started with Syndesis as an Integration Platform

In their own words, Syndesis folks define it as a “No coding required integration platform that allows literally anyone to create integrations from the simplest to the most complex”. Doesn’t make much sense? Don’t worry. When you come back to this line again after having gone through this blog, it will all start making sense.
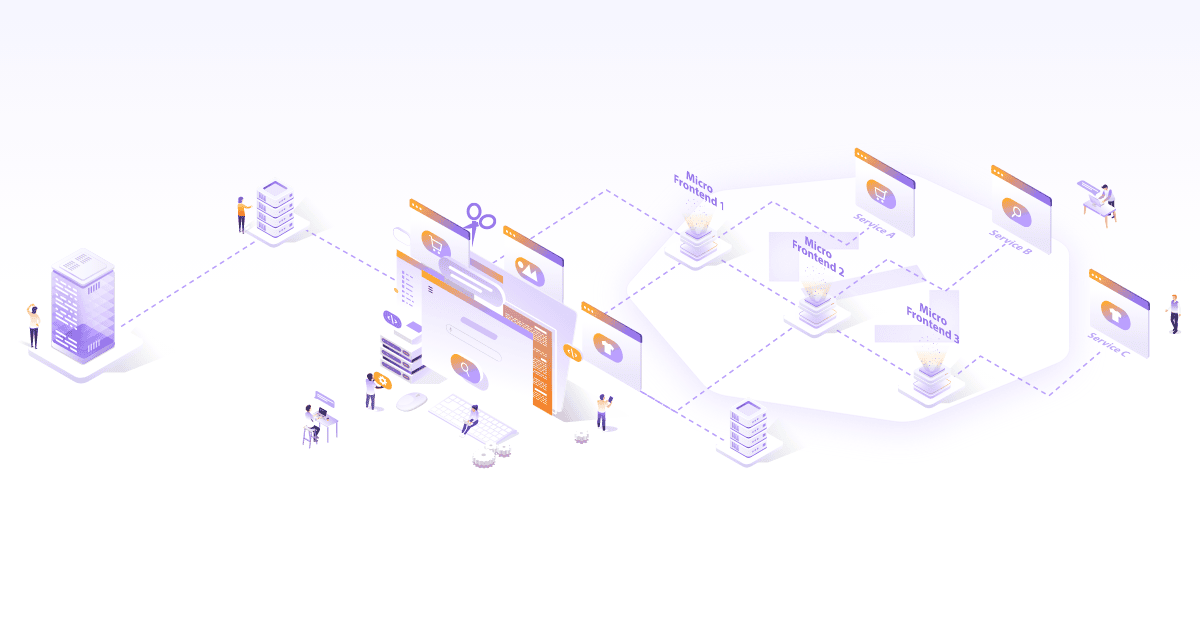
To understand Syndesis, we have to first understand the problem it addresses, which is ‘integration of heterogeneous systems/applications’. The word ‘integration’ refers, more specifically, to the data transformation and exchange between heterogeneous systems. Heterogeneity among various systems exists in the form of different protocols used for communication, different data formats, etc. Given that systems are not built with the integration needs in mind, integrating diverse applications has been, and continues to be, a major challenge for integration experts. This has lead to the creation of ‘integration platforms’, which are specialized software meant to address the complexities of system integrations.
Integration Platforms, Apache Camel, and Syndesis
An ‘integration platform’ is a software that facilitates system integration. There are many popular commercial and open source integration platforms available in the market; the de-facto open source framework being Apache Camel. Syndesis uses Apache Camel as its backbone technology to execute integrations. Apache Camel is the vanilla integration platform used to built integration applications by programmers. Whereas Syndesis is the platform built on top of it, which provides a UI for non-technical users to define and execute integrations.
Apache Camel is an implementation of integration patterns from the famous book Enterprise Integration Patterns by Gregor Hohpe and Bobby Woolf. This book is a catalog of common and repetitive solutions (patterns) that experts have used over years to solve integration problems. In addition, Apache Camel also comes with a library of over 300 connectors to connect to most of the popular systems like SalesForce, DropBox, Twitter, AWS services, and many more. These are called ‘Components’ in Apache Camel’s terminology. These allow programmers to avoid writing boilerplate code to connect to different systems. For the systems for which there is no component out of the box, Apache Camel provides a battle-tested framework to build ones. The full list of Camel components can be found here.
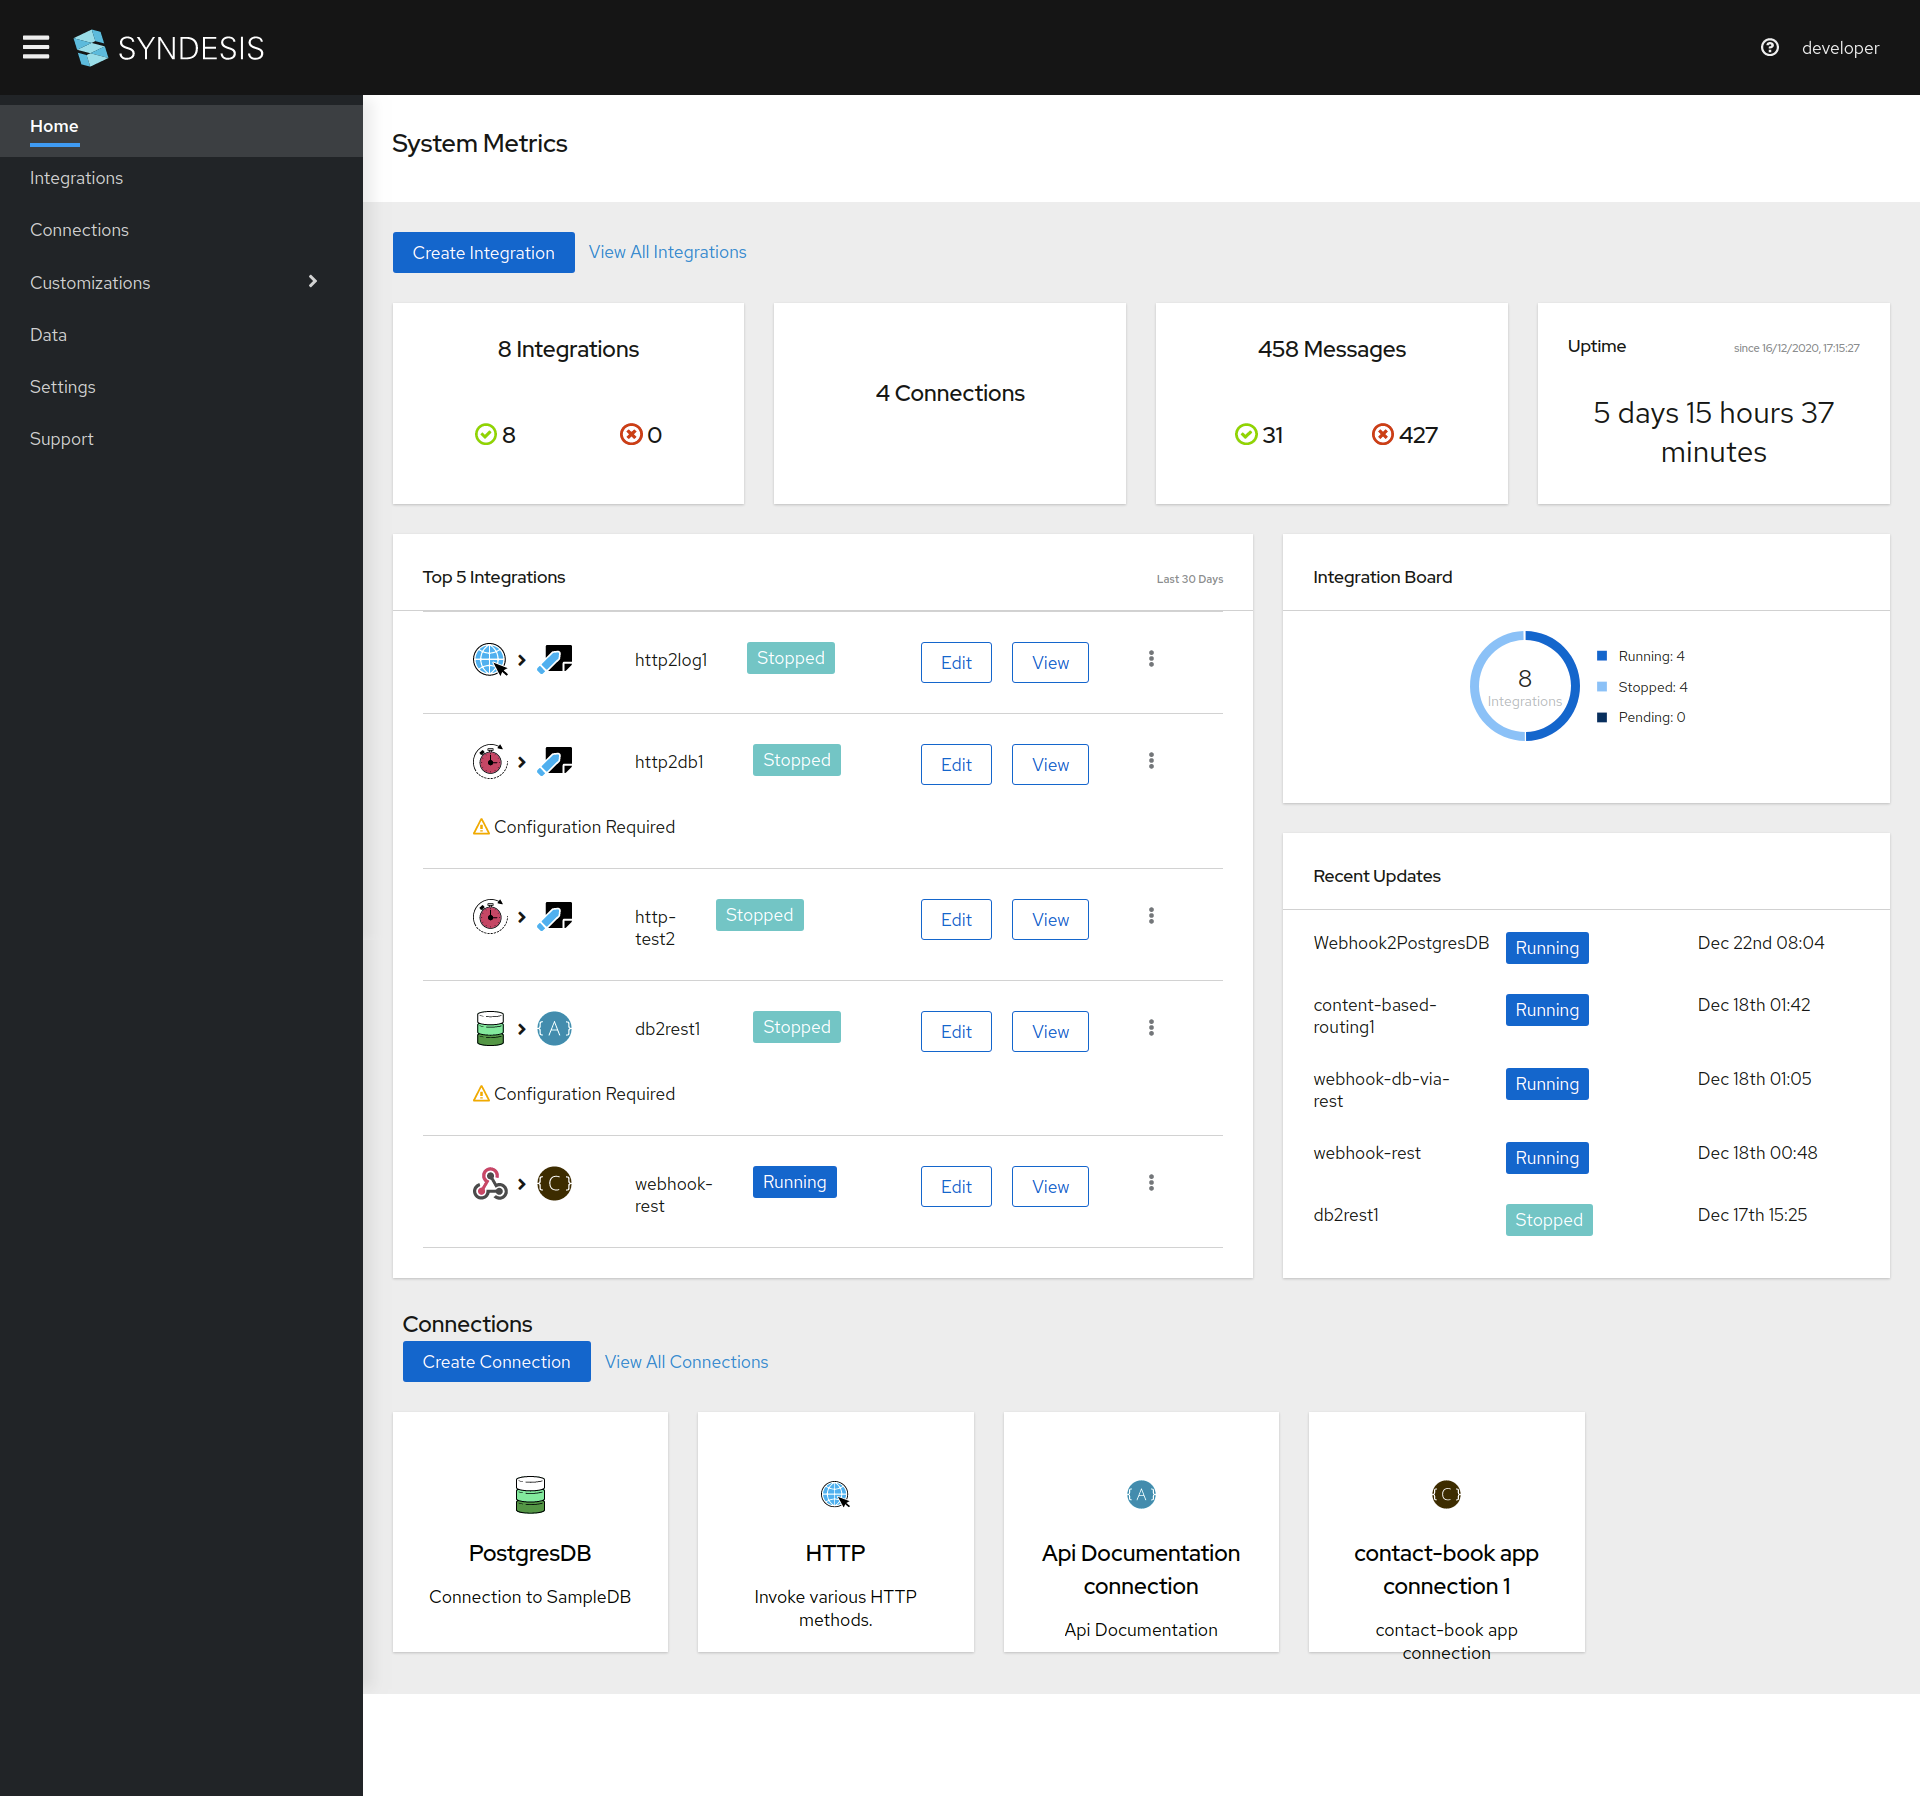
Apache Camel, even with its rich implementation of integration patterns and component library, is still a tool for technical people. One has to know the technicalities of the integration domain and programming to write integrations in Apache Camel. Domain experts cannot just come in and start writing/executing integrations by themselves. For this, they need a platform that allows writing and executing integrations as many times as they want without depending on technical experts/programmers. This is where Syndesis comes in. It builds on top of an integration platform (Apache Camel being the de-facto one) and provides a user-friendly UI to end users so that they can write and execute integrations straight away. Please refer to the section ‘Creating a Basic Integration’ further down in this blog to get an idea of how easily domain users can create integrations in Syndesis. Take a look at the following screenshot to get a general idea of Syndesis platform.
Let’s start with getting Syndesis installed, and see how easy it is to create integrations without extensive technical know-how.
How to install Syndesis?
In its latest release 1.10.0, Syndesis can be installed on OpenShift clusters. Syndesis installation on the Kubernetes cluster is still a ‘work in progress’ and may be available in its next release. Owing to this, you need an OpenShift cluster for installing Syndesis. In this blog, we will install Syndesis on Minishift, which is a single-node OpenShift cluster meant for development purposes. Minishift is to OpenShift what Minikube is to Kubernetes. Let’s see how to get Syndesis up and running on Minishift.
In order to install Syndesis on Minishift, you first need to have Minishift installed. Follow this link to install Minishift. Once you have Minishift installed, follow the below steps to install Syndesis.
-
Get the syndesis command-line utility to install Syndesis.
wget https://github.com/syndesisio/syndesis/releases/download/1.10.0/syndesis-cli.zip unzip syndesis-cli.zip sudo ln --symbolic $(pwd)/syndesis /usr/local/bin -
Install Syndesis
syndesis minishift --install --project syndesis --nodev --tag 1.10.0
In the above command, ‘minishift’ is the command of the syndesis CLI tool used to install Syndesis on a Minishift cluster. For other OpenShift clusters, use the ‘syndesis install’ command instead. Let’s briefly look at the arguments used in the command.
–install directs the command to install Syndesis.
–project syndesis directs the command to install Syndesis in a dedicated Kubernetes namespace called ‘syndesis’. If there is an existing installation by the same name, it will be deleted (the namespace will be deleted) before a new installation is carried out. If you only want to delete the existing installation named ‘syndesis’, simply omit the –install argument.
–nodev this option is somewhat unusual. Although there is no mention of it in the CLI documentation, I have observed that installation gets stuck forever if this option is missing.
–tag directs the command to download and install a given version of Syndesis. Absent this, the command downloads the unreleased latest version, which may or may not be stable.
Some other arguments related to Minishift are,
–reset resets the Minishift installation. More specifically, deletes the VM running Minishift and recreates it.
–full-reset deletes the ~/.minishift folder in addition to deleting the VM. ~/.minishift is the folder that holds the Minishift artifacts like the ISO image of the VM. Use this option with care since it forces downloading of the ISO image, which is ~375 MB.
–open use this option to open the Syndesis project in the browser or to obtain the URL of the Syndesis project.
Another way of installing syndesis is by building it from source code. You can download the source code and build the syndesis project locally. To do this, clone a particular branch and use the syndesis build command to build it.
git clone --single-branch --branch=1.10.0 https://github.com/syndesisio/syndesis.git
Creating a basic Syndesis integration
There are plenty of quick start examples by Syndesis, which are pretty much up to date and easy to follow. There is no point in duplicating them here. However, for those eager to find out how an integration looks like in Syndesis (and leave the detailed examples for later), given below are steps to create a simple integration.
Webhook2PostgresDB integration
This integration gets data from an HTTP POST request and inserts it into a database table. Consequently, this integration opens two connections; a ‘Webhook’ source connection to read data from and a ‘PstgresDB’ connection to write data to. ‘PostgresDB’ is a pre-configured connection to a database that is installed as part of Syndesis installation. If you list the pods in the syndesis namespace, you should see a pod named like syndesis-db-x-xxxx.
Follow along with the steps below to create and test the integration. We will get ‘firstname’ and ‘lastname’ in the incoming HTTP POST payload and insert them into the ‘contact’ table of PostgresDB connection.
Create integration
-
Go to the
integrationspage and click theCreate Integrationbutton.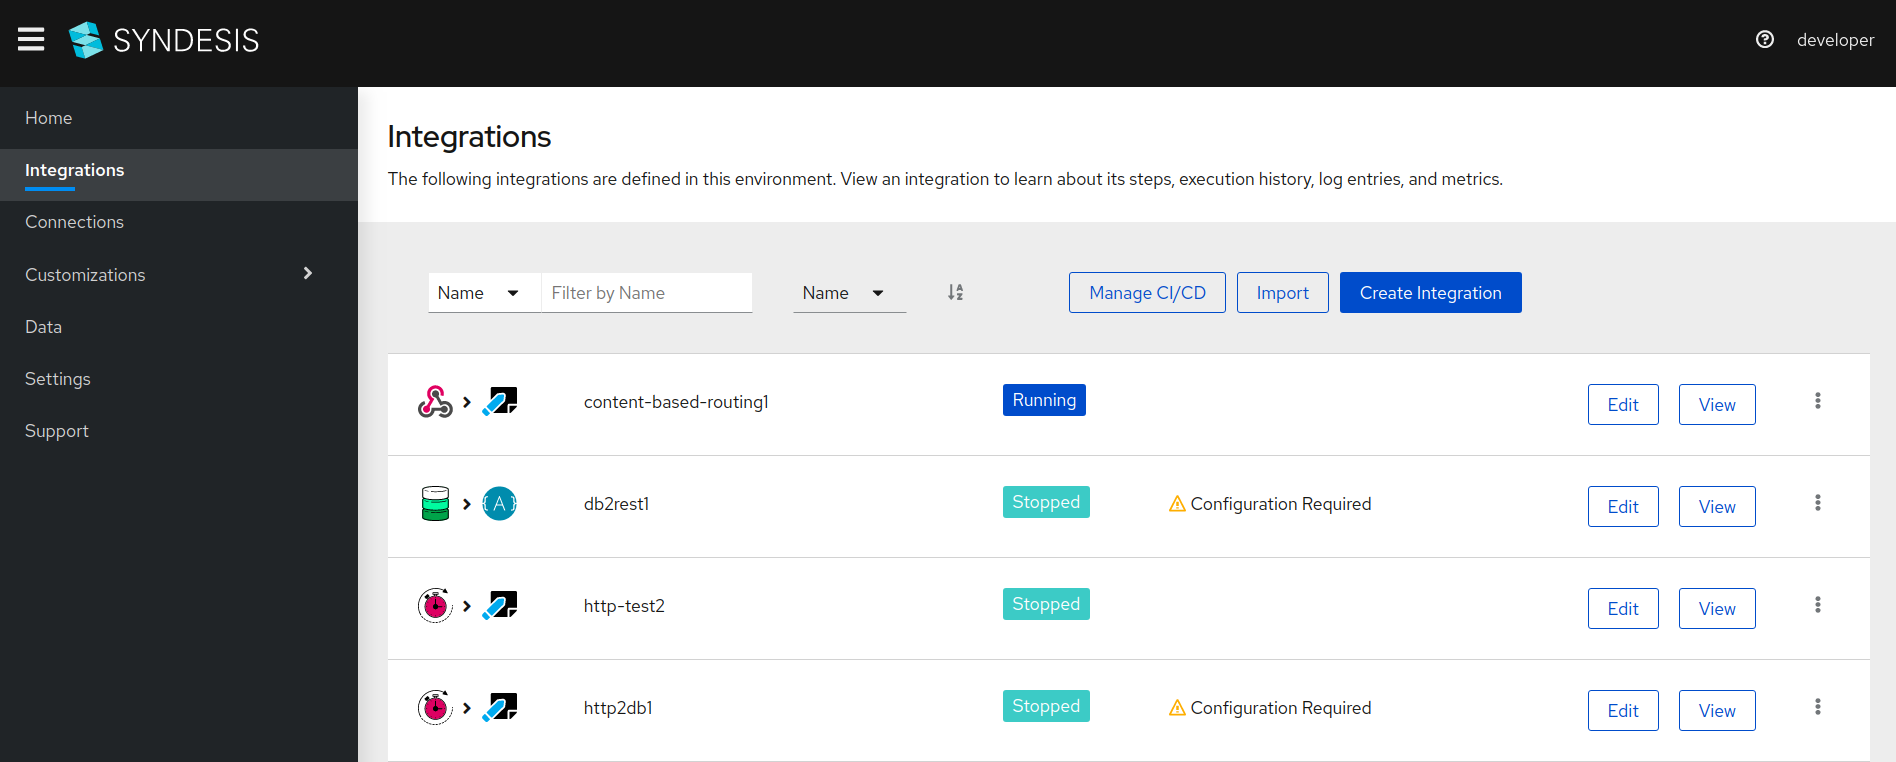
Create source connection
-
Select
Webhookon theChoose a connectionpage.
Steps hereafter are self-explanatory and do not need screenshots. So just follow along.
- Select
Incoming Webhookon the following screen. That is the only available option. - Accept default value for
Webhook tokenand clickNext. - On the
Specify Output Data Typescreen that follows,- Select
JSON instanceforSelect type. -
Add the following in the
Definitiontext box,{ "firstname": "placeholder", "lastname": "placeholder" }
- Select
- Add
request payload(or any suitable name) forData Type Namefield. - Click
Nextto complete Source connection creation.
Create sink connection
-
Select
PostgresDBon theChoose a connectionpage.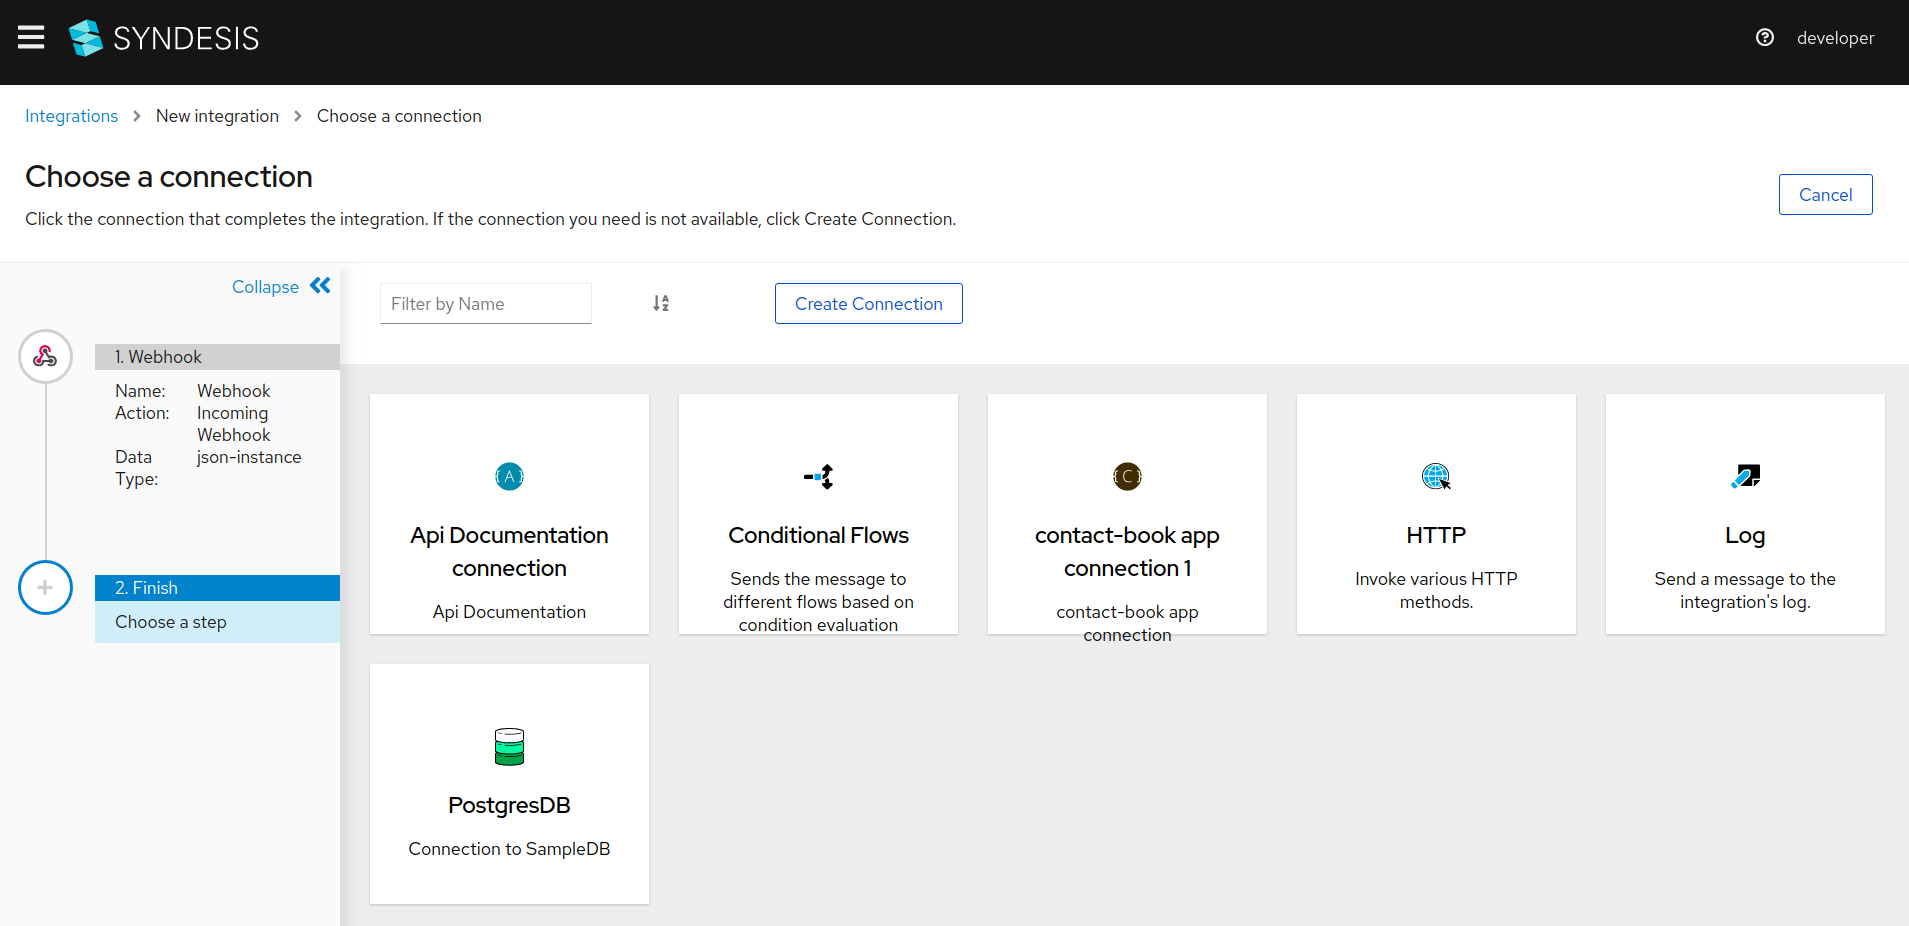
- Select
Invoke SQLon the following screen. -
Input the following SQL query for
SQL Statementand clickNext. Note the:#fisrtnameand:#lastnamesyntax in the query. These are the placeholders in the integration and will be mapped to the corresponding fields in the incoming HTTP payload. This completes the Sink Connection creation.insert into contact (first_name, last_name) values (:#firstname, :#lastname)
Data mapping
-
Click on
Add a data mappinglink as seen in the following screenshot. Alternatively, you can click theplusbutton between the two connections and select aDataMapperstep.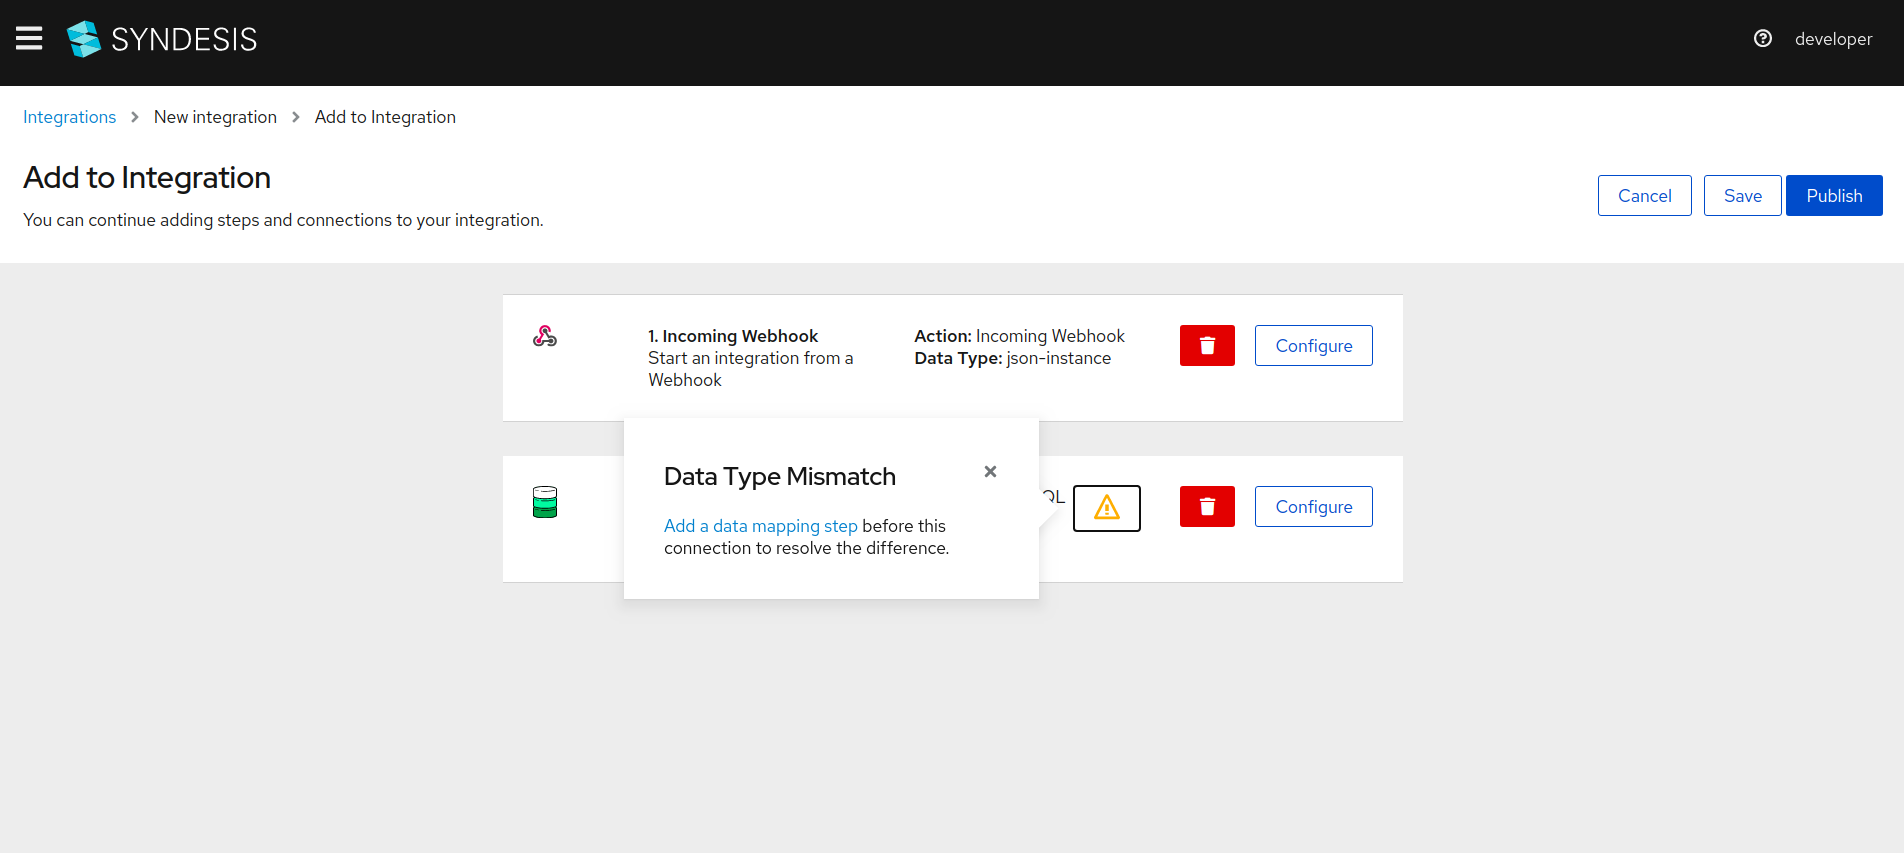
-
Map the placeholders in the SQL query to the fields of HTTP payload as shown in the following screenshot. Simply drag the fields on the left side and drop them on the corresponding fields on the right side.
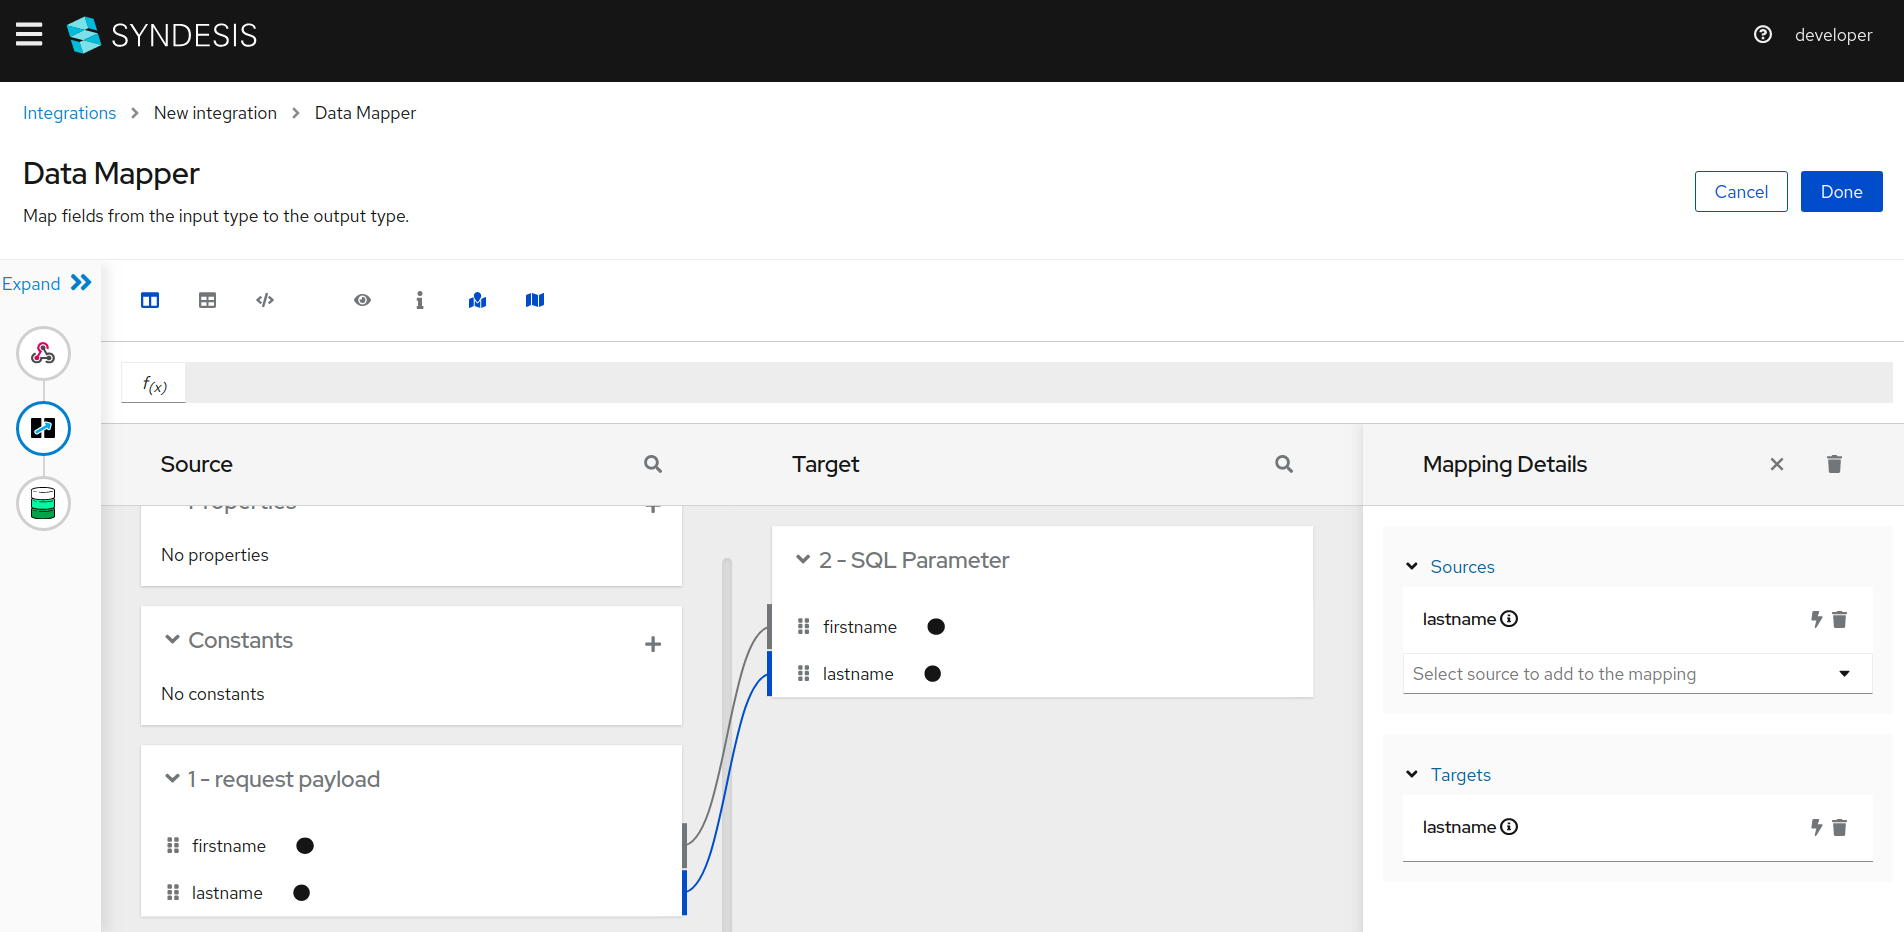
-
Click
Doneto finish the mapping and move on to publishing the integration.
Publish integration
-
Input name for the integration and click
Save and Publish.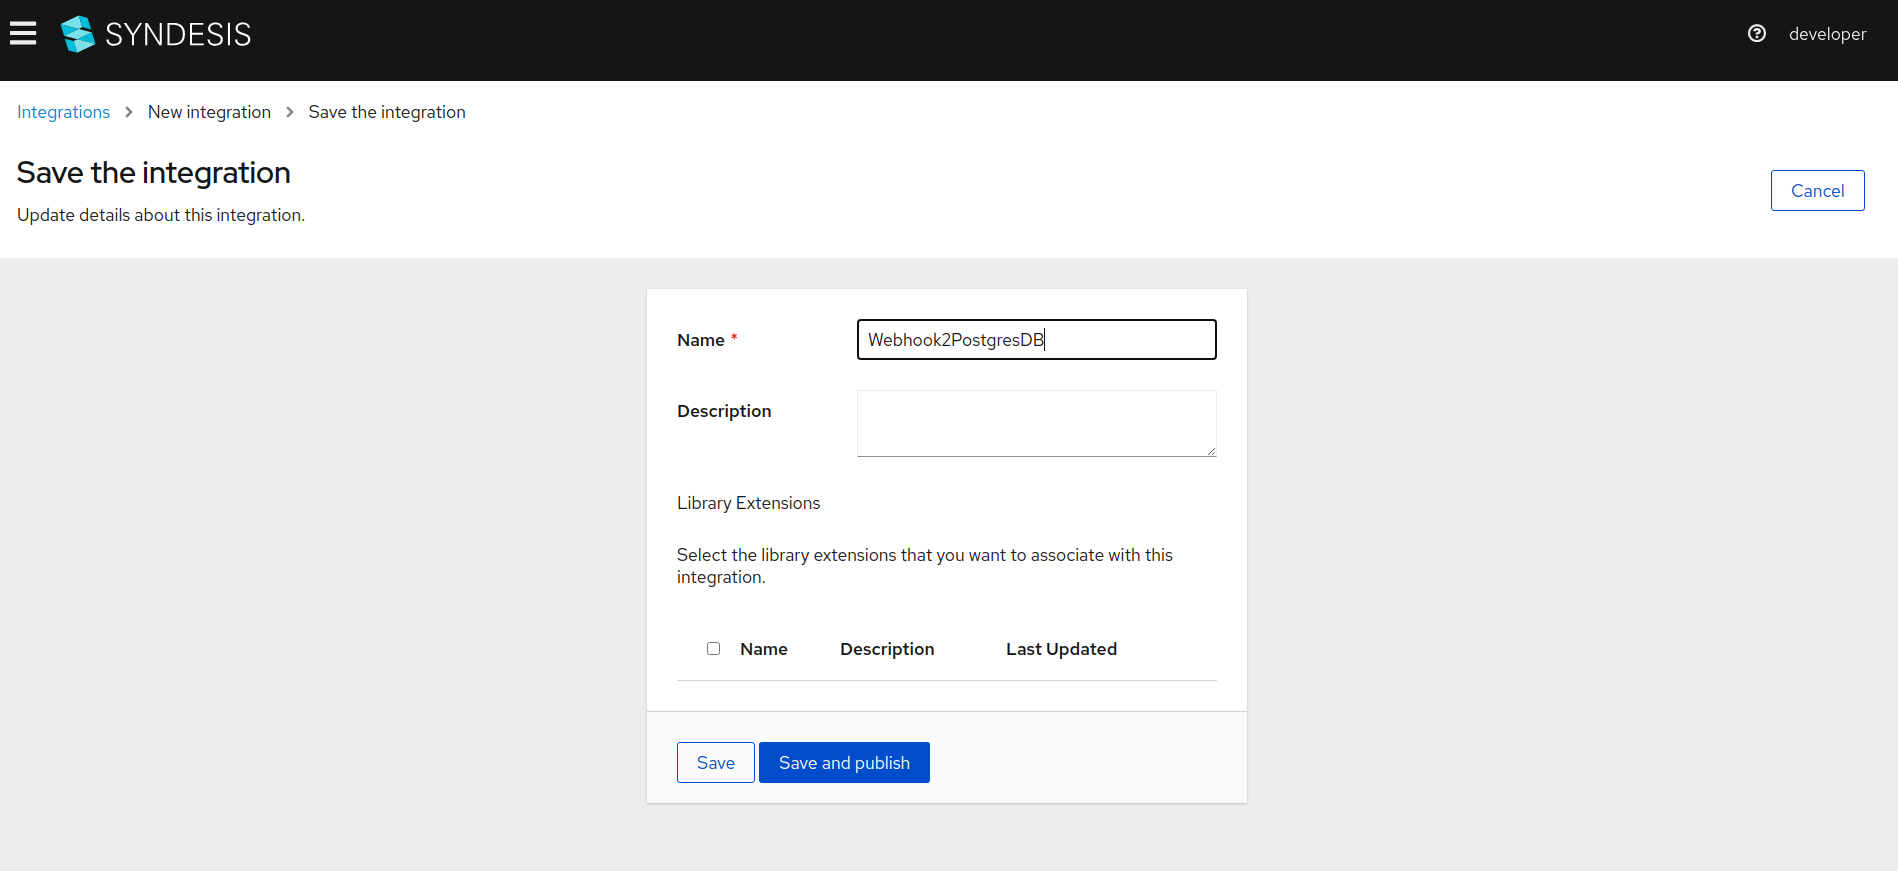
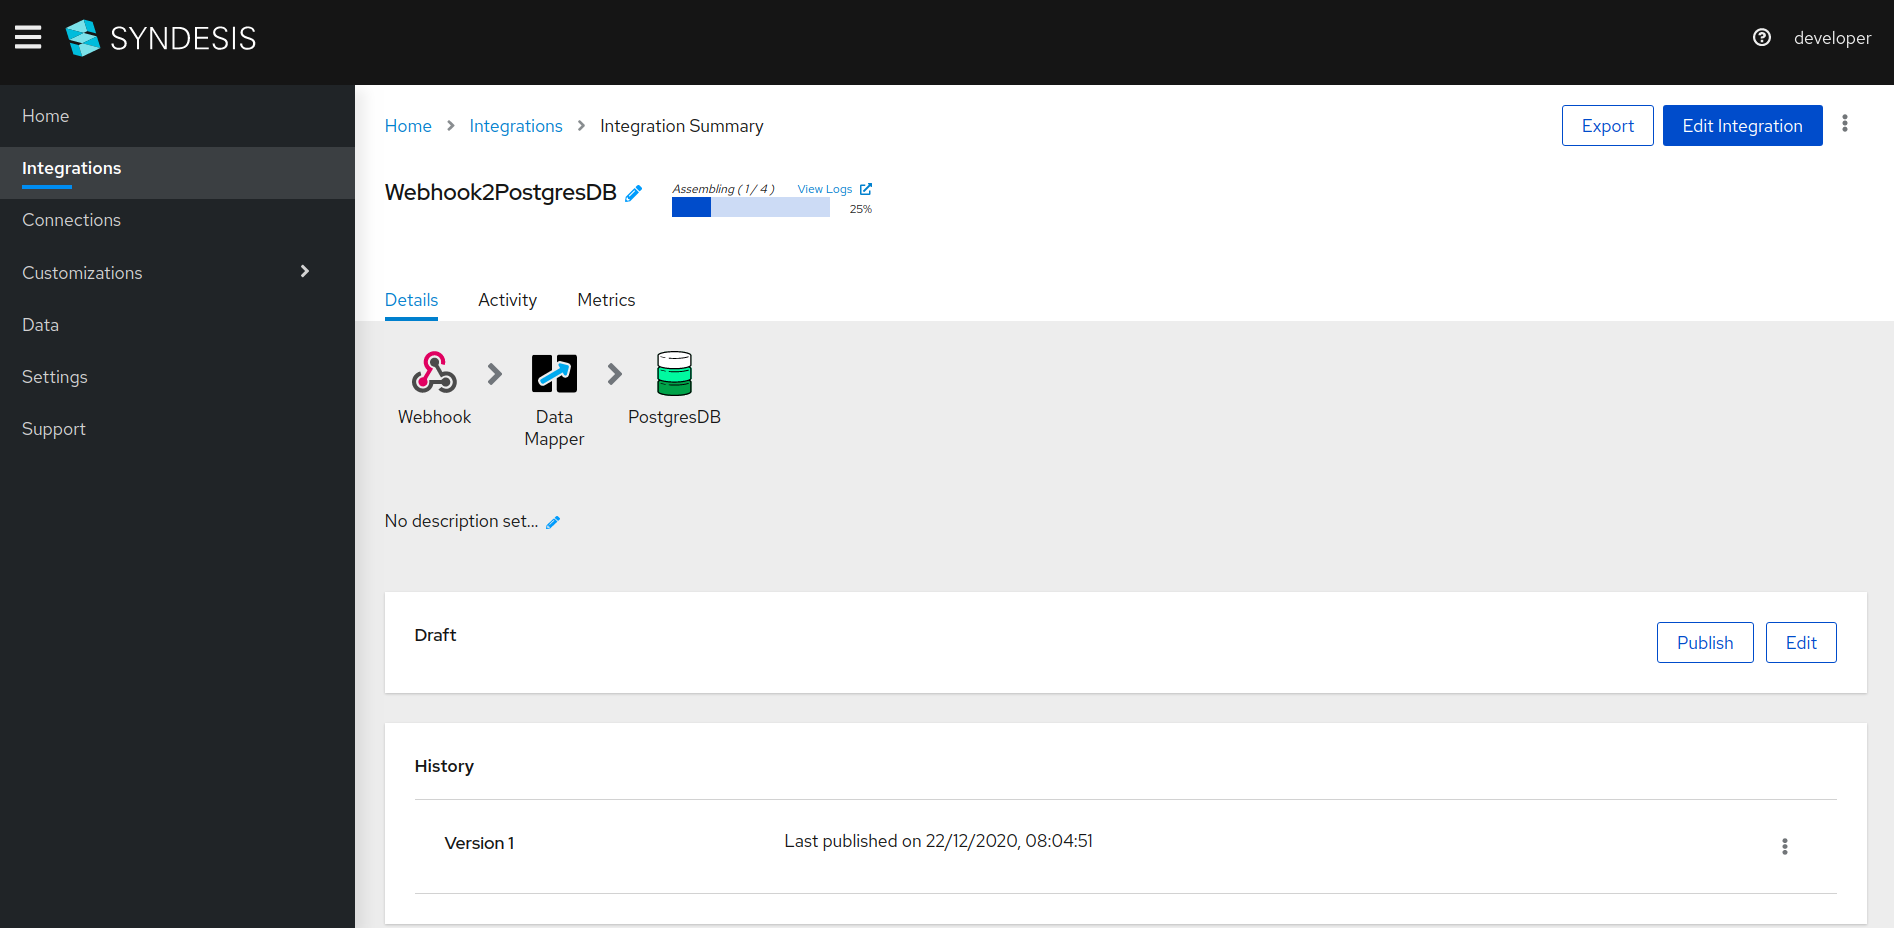
-
Wait for the integration to get published. You can watch the status on the blue status bar.
Test integration
-
Once the integration is successfully published, copy the
External URL.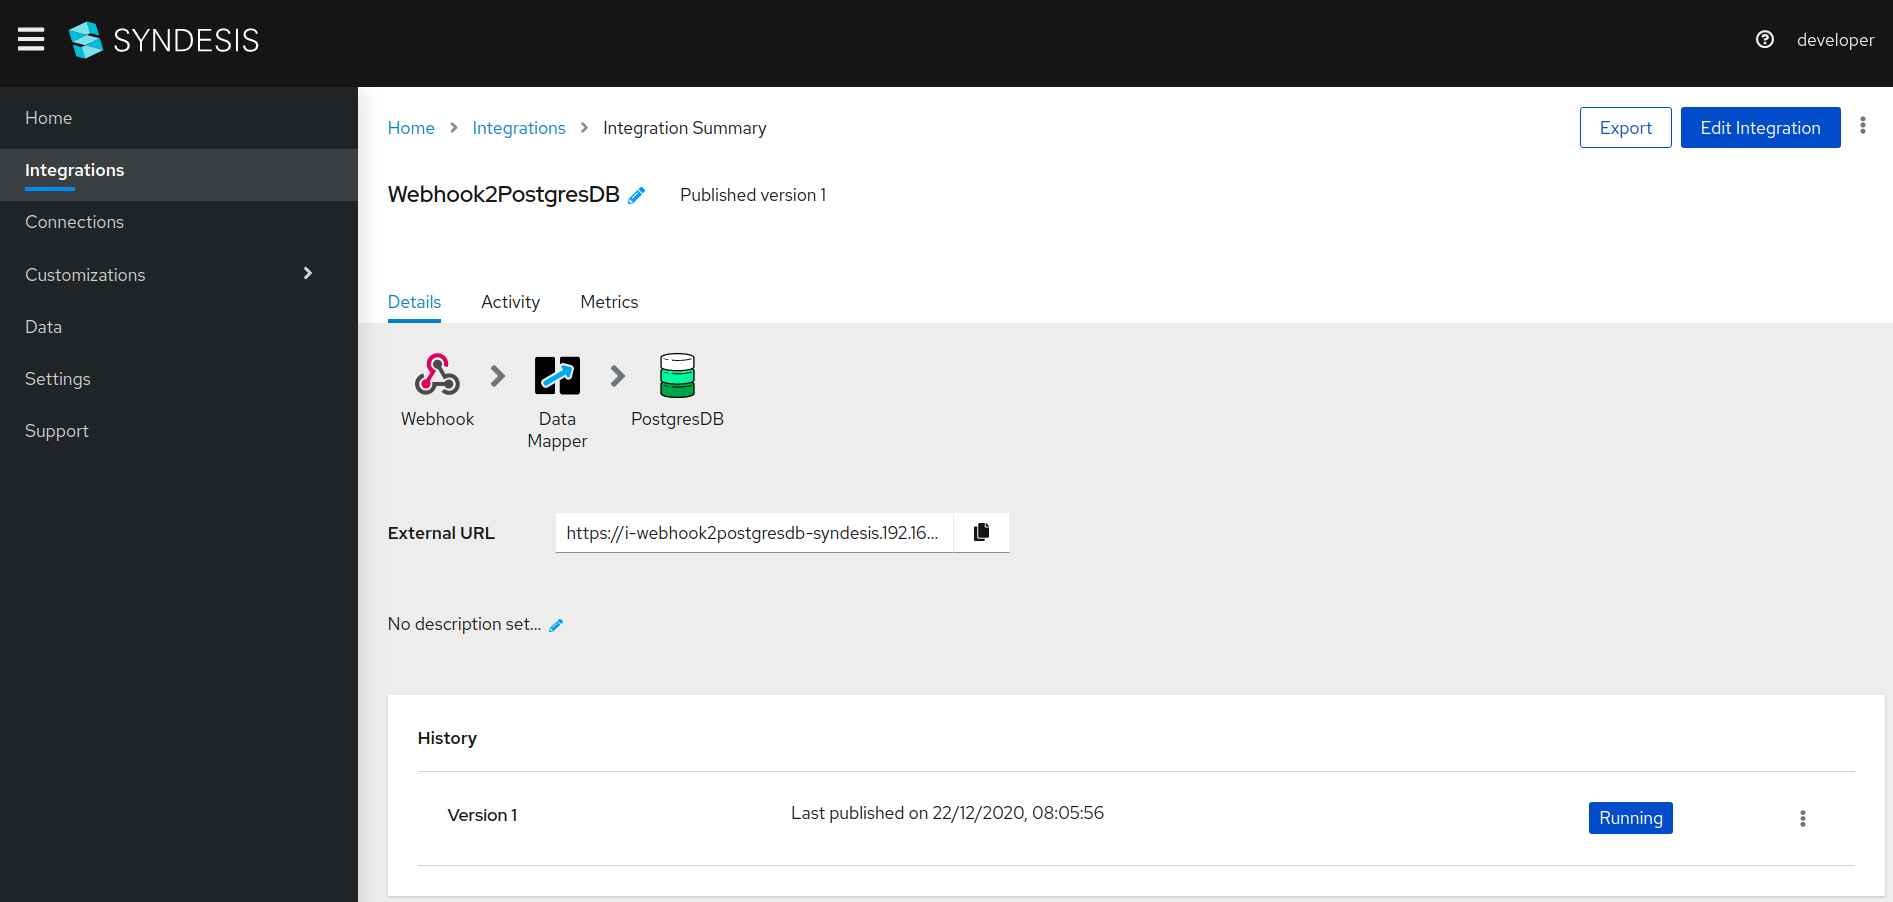
-
Issue following commands from the command shell. This will post an HTTP request and trigger the integration.
externalURL=Your copied URL goes in here curl -k --header "Content-Type: application/json" --request POST --data '{ "firstname": "some first name", "lastname": "some last name"}' $externalURL -
To confirm that the integration executed successfully, go to the
Activitytab. You should see a record similar to the one in the following screenshot.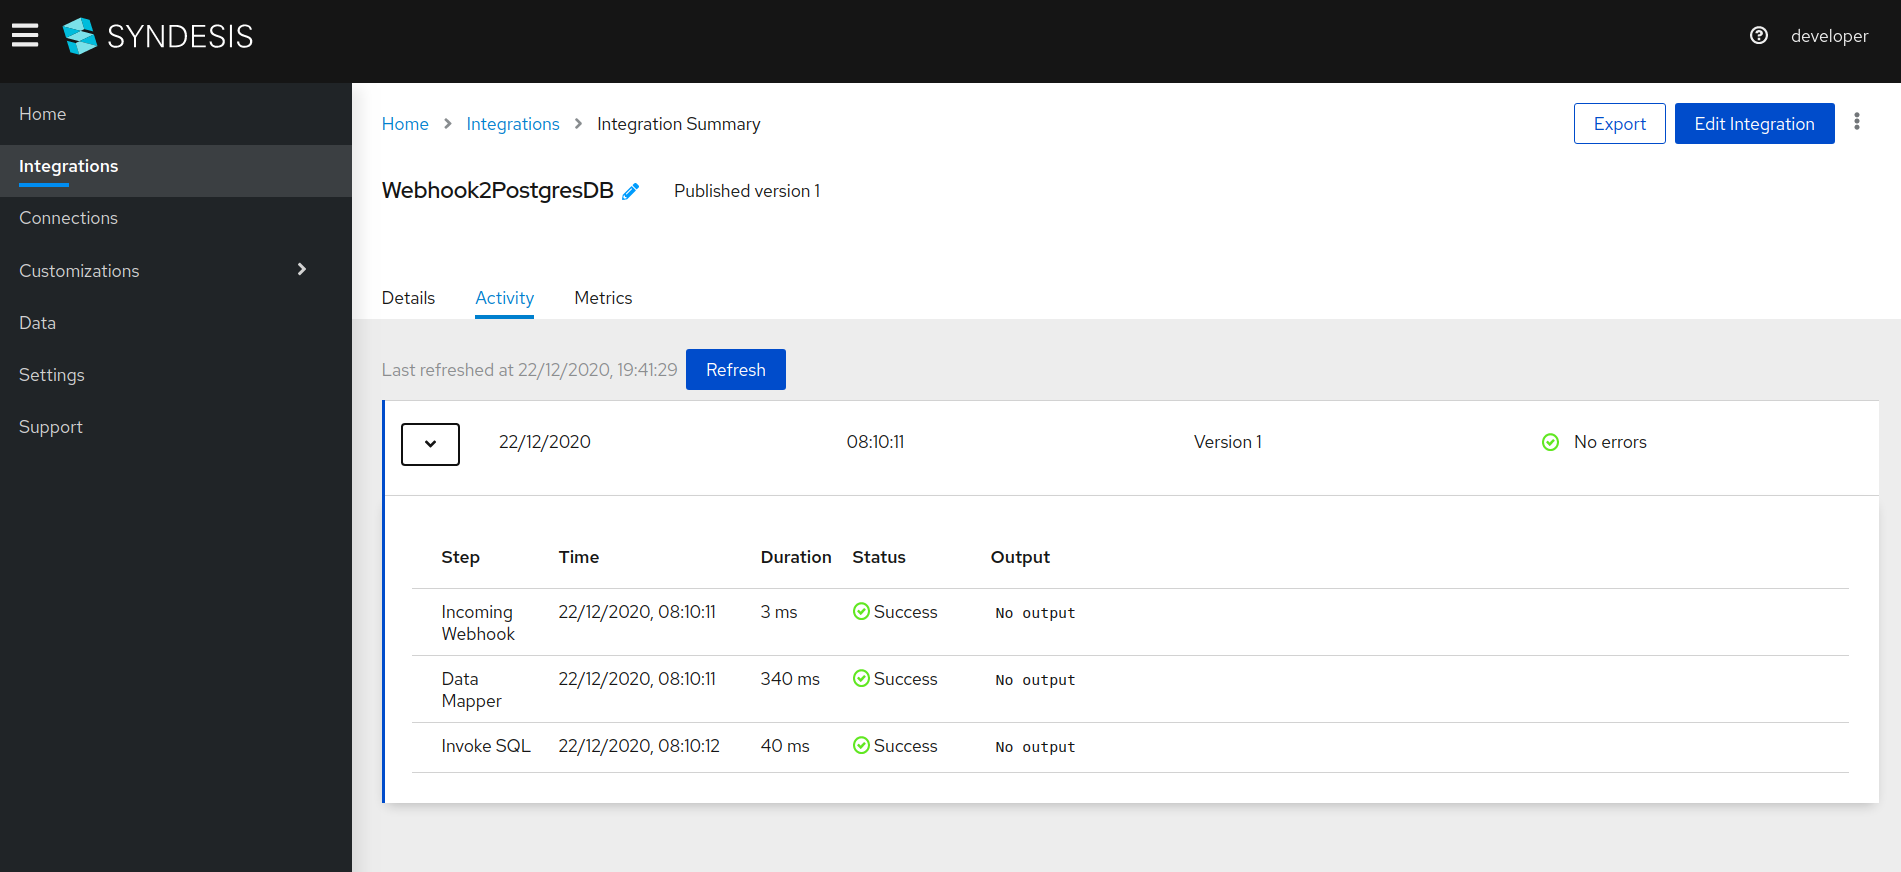
-
Do the following to see the record inserted in the PostgresDB.
- Exec into
syndesis-db-x-xxxxpod using the commandkubectl exec -it syndesis-db-x-xxxx -n syndesis -- bash. Name of the namespace used in this command should be what you used for--projectwhile installing syndesis. - Once inside the container, get into the PSQL shell using the command
psql -U sampledb. - Execute query
select * from contact;and you should see a new record with the first and the last name you used to invoke the integration.
- Exec into
That’s all there is to create a simple integration. Now let’s move on to see how to write custom integration code if required.
Extensions
An extension is Syndesis’ way of writing custom logic. The two cases in which you will be required to write custom logic are:
- Apply transformations to the data before it is written to the destination sync.
- Connect to systems for which Syndesis does not provide a connector out of the box.
Consequently, there are two types of extensions,
- Step extensions: For creating custom transformation logic.
- Connector extensions: For creating custom connections.
One more type of extension, called library extension, also exists. There are times when a Step extension depends on third party libraries or a Connector extension requires a specific driver. Library extensions are the way to provide such dependencies to the integrations at runtime. The most notable example of this type of extension is a JDBC driver.
Currently, the extensions are supported in the form of a JAR. That means extensions have to be written in Java, packaged as JAR, and then uploaded in Syndesis projects. Once an extension is uploaded, it is available for use in integrations. More information about writing a syndesis extension can be found here and creating an extension.
Syndesis and Red Hat Fuse
Fuse is a complete integration solution provided by Red Hat. Syndesis is one of the ten member technologies that make up Red Hat Fuse. Please find more information about Fuse and its member technologies here. Although Syndesis can be used independently, if you find yourself in need of other member technologies of Fuse, it is a good idea to explore it.
Conclusion
Syndesis is an awesome tool when it comes to empowering non-technical end users to create and execute integrations on the fly. It removes the need for collaboration between end users and integration developers, thereby saving a lot of time. Of course, there are times when writing custom code is inevitable and developers have to come in to write Syndesis extensions. However, such cases are very infrequent if compared to using plain Apache Camel without Syndesis.
That brings us to the end of the blog. More detailed information about Syndesis can be found on the Syndesis’ official documentation page.
Hope this blog helped you to get started with Syndesis and create your first integration. We’d love to hear about your experience; do start a conversation on Twitter.
Stay updated with latest in AI and Cloud Native tech
We hate 😖 spam as much as you do! You're in a safe company.
Only delivering solid AI & cloud native content.
Posts You Might Like