Kubernetes: Lifecycle of a Pod

Recently, I spoke about “Lifecycle of a Pod” at the Pune Kubernetes Meetup. This post is almost on the lines of the talk.
Pod is the smallest unit of work which can be scheduled in Kubernetes. A Pod encapsulates an application container(s), storage resources, unique network IP and options that govern how a container should run. Ideally, pods are not directly deployed on a cluster and instead higher level abstractions are used. Applications are generally deployed via higher level constructs such as Deployments, Replica Sets, Daemon Sets, Stateful sets or Jobs. Interaction with Pods is generally used to troubleshoot issues hence understanding of Pods is important.
States of a Pod
Through its lifecycle, a Pod can attain following states:
**Pending: **The pod is accepted by the Kubernetes system but its container(s) is/are not created yet.
**Running: **The pod is scheduled on a node and all its containers are created and at-least one container is in Running state.
Succeeded: All container(s) in the Pod have exited with status 0 and will not be restarted.
Failed: All container(s) of the Pod have exited and at least one container has returned a non-zero status.
CrashLoopBackoff: Container fails to start and is tried again and again
Birth of a Pod
Now let’s look at the events that lead to the creation of a Pod.
[caption id=”” align=”aligncenter” width=”1204”] *Image courtesy: Joe Beda’s Blog[/caption]
  * kubectl or any other API client submits Pod spec to the API server.
  * API server writes the Pod object to the etcd data store. Once the write is successful, an acknowledgment is sent back to API server and to the client.
  * API server now reflects the change in state of etcd.
  * All kubernetes components use watches to keep checking API server for relevant changes.
  * In this case the kube-scheduler (via its watcher) sees that a new Pod object is created on API server but is not bound to any node.
  * kube-scheduler assigns a node to the pod and updates the API server.
  * This change is then propagated to etcd data store. API server also reflects this node assignment on its Pod object.
  * Kubelet on every node also runs watchers who keep watching API server. Kubelet on destination node sees that a new Pod is assigned to it.
  * Kubelet starts the pod on its node by calling Docker and updates the container state back to API server.
  * API server persists the pod state into etcd.
  * Once etcd sends the acknowledgement of a successful write, the API server sends an acknowledgment back to kubelet indicating that the event is accepted.
Activities during pod’s life
Init Containers
Init containers are containers which are run before the main application container gets started. They have two important characteristics:
  * They always run to completion.
  * Each init container must complete before the next one is started.
Init containers can be useful when some initial actions need to be run before the main container in pod starts.
For Example: Copying config files and updating config values. Init containers use different Linux namespaces so they have a different filesystem view so they can be given access to secrets which may not be desirable for sharing within App container.
Lifecycle Hooks
kubelet can run code triggered by Container Lifecycle Hooks. This allows the user to run specific code during specific events of a containers lifecycle.
For Example: Running a graceful shutdown script before a container is terminated.
There are two hooks which are exposed:
PostStart : This hook gets executed upon container creation but there is no guarantee that it will run after the container ENTRYPOINT.
PreStop : This hook gets executed just before a container is terminated. This is a blocking call which means the hook execution must complete before call to delete container can be sent.
Both hooks mentioned above do not take any parameters. There are two types of handlers which can be implemented in the hook implementation:
Exec : runs a specific command inside the container and the resources consumed by the command are counted against the container.
HTTP : executes an HTTP request against a specific endpoint on the container.
Container Probes
Apart from lifecycle hooks, another important thing which happens during a pods lifetime is execution of container probes.
Container probes are diagnostics performed by kubelet on the container. There are two kinds of probes which kubelet can run on running containers:
livenessProbe : Indicates whether the container is running. If the liveness probe fails, kubelet kills the container and the container is subjected to its Restart Policy.
readinessProbe : Indicates whether the container is ready to service requests. If this probe fails, the endpoints controller removes the container IP from list of endpoints of all services that match the Pod.
There are three ways to implement a probe:
ExecAction : Executes a command inside the container. The diagnostic is considered successful if the command returns 0.
TCPSocketAction : Performs TCP socket check against container IP and specified port. The diagnostic is considered successful if the port is open.
HTTPGetAction : Runs HTTP GET action against container IP with specified port and path. The diagnostic is considered successful if the response has a status code between 200 and 400.
Termination of a Pod:
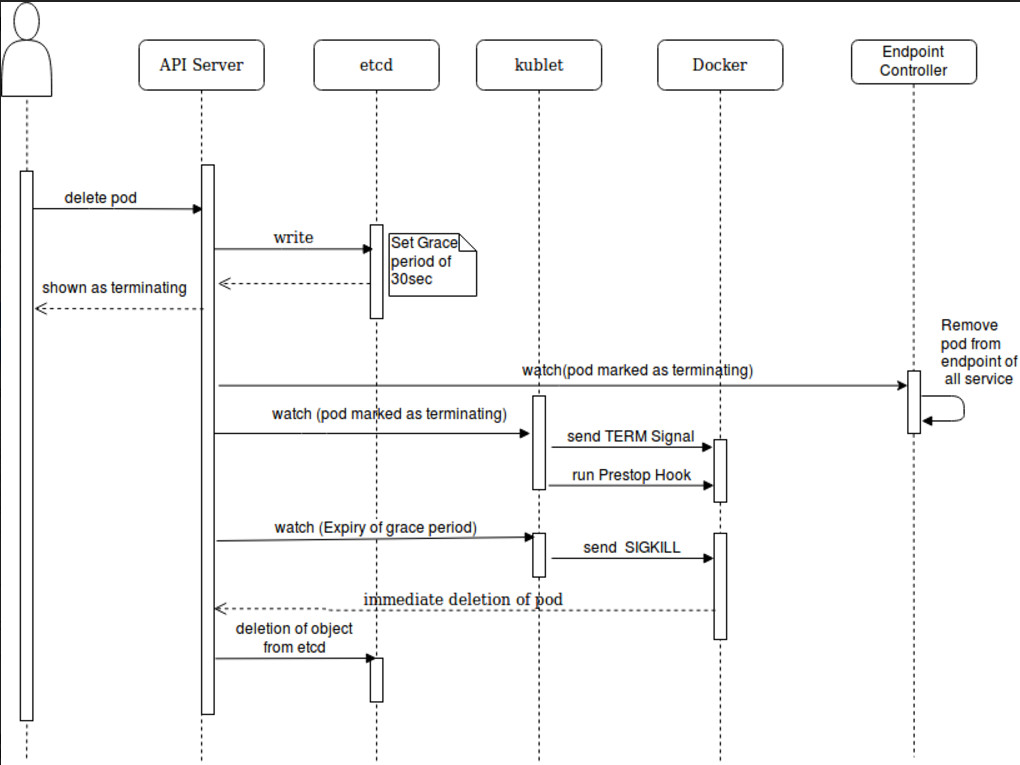
  1. User sends command to delete Pod
  2. The Pod object in the API server is updated with the time beyond which the Pod is considered “dead”  (default 30sec )along with the grace period.
  3. Below actions happen in parallel:

    * Pod shows up as “Terminating” when listed in client commands
    *  When the Kubelet sees that a Pod has been marked as terminating because the time in 2 has been set, it begins the pod shutdown process.
    * Endpoint controller watches the pod is about to be deleted and hence removes the pod from all the endpoints which were serviced by the pod.


  4. If the pod has defined a [preStop hook](https://kubernetes.io/docs/concepts/containers/container-lifecycle-hooks/#hook-details), it is invoked inside of the pod. If the `preStop` hook is still running after the grace period expires, step 2 is then invoked with a small (2 second) extended grace period.
  5. The processes in the Pod are sent the TERM signal.
  6. When the grace period expires, any processes still running in the Pod are killed with SIGKILL.
  7. The Kubelet will finish deleting the Pod on the API server by setting grace period 0 (immediate deletion). The Pod disappears from the API and is no longer visible from the client.
Conclusion
Idea of this post came from an excellent post by Kubernetes founder Joe Beda where he explained major components of Kubernetes architecture and the concept of **watch **which is crucial in understanding the working of APIServer and etcd functionality and then the birth of a Pod.
We can see there are multiple ways to control the events that happen within the duration of a Pod’s lifetime. Init container(s) can help remove a lot of complexity related to bootstrapping of containers and thus help keep logic within the main containers simple, similarly a post start lifecycle hook can help run any code(such as registering to a monitoring system or a service mesh) which needs to run once the container starts running. Liveness and readiness probes help remove bad pods before they start disrupting any customers. Graceful shutdowns can be run as a pre-stop lifecycle hook allowing for a lot more elegant exit. Knowing above control mechanisms can help in better designing a pod and the supporting use cases.
Looking for help with Kubernetes adoption or Day 2 operations? do check out how we’re helping startups & enterprises with our Kubernetes consulting services and capabilities.
Stay updated with latest in AI and Cloud Native tech
We hate 😖 spam as much as you do! You're in a safe company.
Only delivering solid AI & cloud native content.
Posts You Might Like