Multicluster GitOps with ArgoCD

What is multicluster GitOps?
As we adopt containers and Kubernetes, we end up running and maintaining multiple Kubernetes clusters. Some are used as production, some as QA while others are used as short-lived dev environments. There are many cases where we want to package and deploy applications to these clusters. The kind of applications we want to deploy may also vary a lot. On one hand, we have third-party off-the-shelf applications like Prometheus, Grafana, Elasticsearch, Kafka, etc. which have their own Helm charts. In many cases, these applications only need to be configured to our use case, pinned to a specific version and they can be deployed. While on the other hand, we have bespoke applications that are updated & deployed multiple times a week. Even multiple times a day in some cases.
In both cases, we have the problem of installing, updating and maintaining these applications on multiple clusters. With a handful of clusters, say three to ten, a CI pipeline (like Jenkins) could be set up to deploy to each of them using a template rendering tool of your choice (Kustomize, Helm, Ship , …). This approach works at a smaller scale. What if we have around a hundred clusters with at least a dozen apps each? In this blog post, we will leverage Gitops to tackle the problem of deploying an application and keeping it updated in one cluster as well as deploying multiple applications to multiple clusters.
GitOps to the rescue
GitOps is one of the solutions to this problem. Whatever templates or configs are defined in a git repository should match the resources running in the clusters. It also involves an agent that will fetch any new commits made to the git repository and apply them to the cluster. The simplest form of an agent can be a cronjob that runs every few minutes, clones the git repository, renders the templates and applies them to a target cluster.
There are several advantages of adopting GitOps. Listing a few:
- Single Source of Truth: You can figure out exactly what is running in the cluster by looking at the git repository
- Auditing, Peer Reviews: Using Pull Requests for any config or application changes allows other people to review it and point out any problems. Auditing and tracking changes also becomes easier. Every change is logged in git as a commit.
- Easy Rollback: Rolling back a change becomes quite easy and trivial. All you need to do is a git revert for the commit containing the change.
- Declarative & Observable: Deployments become declarative with GitOps, i.e. you specify what you want to run and the system handles the creation and deletion of resources. The system also becomes observable. The operations team can quickly detect any configuration drift that occurs and rectify it.
- Time to deploy: The time needed to push a change to a production cluster is much shorter once you adopt GitOps.
What is ArgoCD?
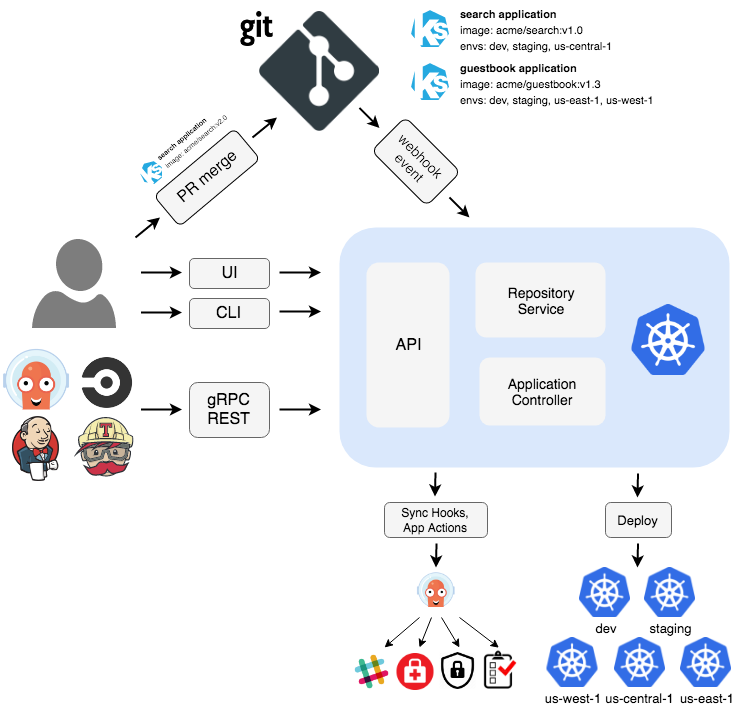
ArgoCD is a declarative GitOps continuous delivery tool for Kubernetes. It periodically renders resource templates from a git repository and compares them against the current state present in the cluster. Synchronisation can be done manually through the GUI/CLI or by setting up a post-commit webhook. It may also be done automatically (every 3 min). A sync will apply the templates to the cluster. It tries to make sure that the current state of the resources in the cluster matches the templates generated by the git repository at the latest commit.
ArgoCD demo
Let’s go ahead and create an ArgoCD application. To keep things simple, we’ll use a Helm chart that deploys nginx using a Deployment and a Service.
Requirements:
- Minikube
- Helm V2
- ArgoCD CLI
- A GCP project or a Kubernetes Cluster (for multi-cluster deployments)
Steps:
Setup the cluster. We’ll be using minikube to create our cluster.
# Start Minikube
minikube start --kubernetes-version="v1.15.7"

# Setup RBAC for helm/tiller
kubectl -n kube-system create serviceaccount tiller
kubectl create clusterrolebinding tiller \
  --clusterrole cluster-admin \
  --serviceaccount=kube-system:tiller

# Initialise helm and install tiller
helm init --service-account tiller
Run the following commands to install ArgoCD in the cluster using Helm
- We will be using this community maintained helm chart.
helm repo add argo https://argoproj.github.io/argo-helm
helm repo update
helm install --name argocd --namespace argocd argo/argo-cd --wait
Once the pods are up, you can port forward to the argocd-server service to connect using the CLI and GUI. The initial admin password is the name of the argocd-server pod. Use the following command to print and copy it. We’ll need that in the next step to login to ArgoCD.
kubectl get pod -n argocd -l app.kubernetes.io/name=argocd-server

NAME                             READY   STATUS    RESTARTS   AGE
argocd-server-5b56dcc4f9-xvgbs   1/1     Running   1          21h
After you know the admin password, you can port-forward and login using the “admin” user and the password from the previous step.
kubectl port-forward service/argocd-server -n argocd 8080:443

argocd login localhost:8080 --insecure
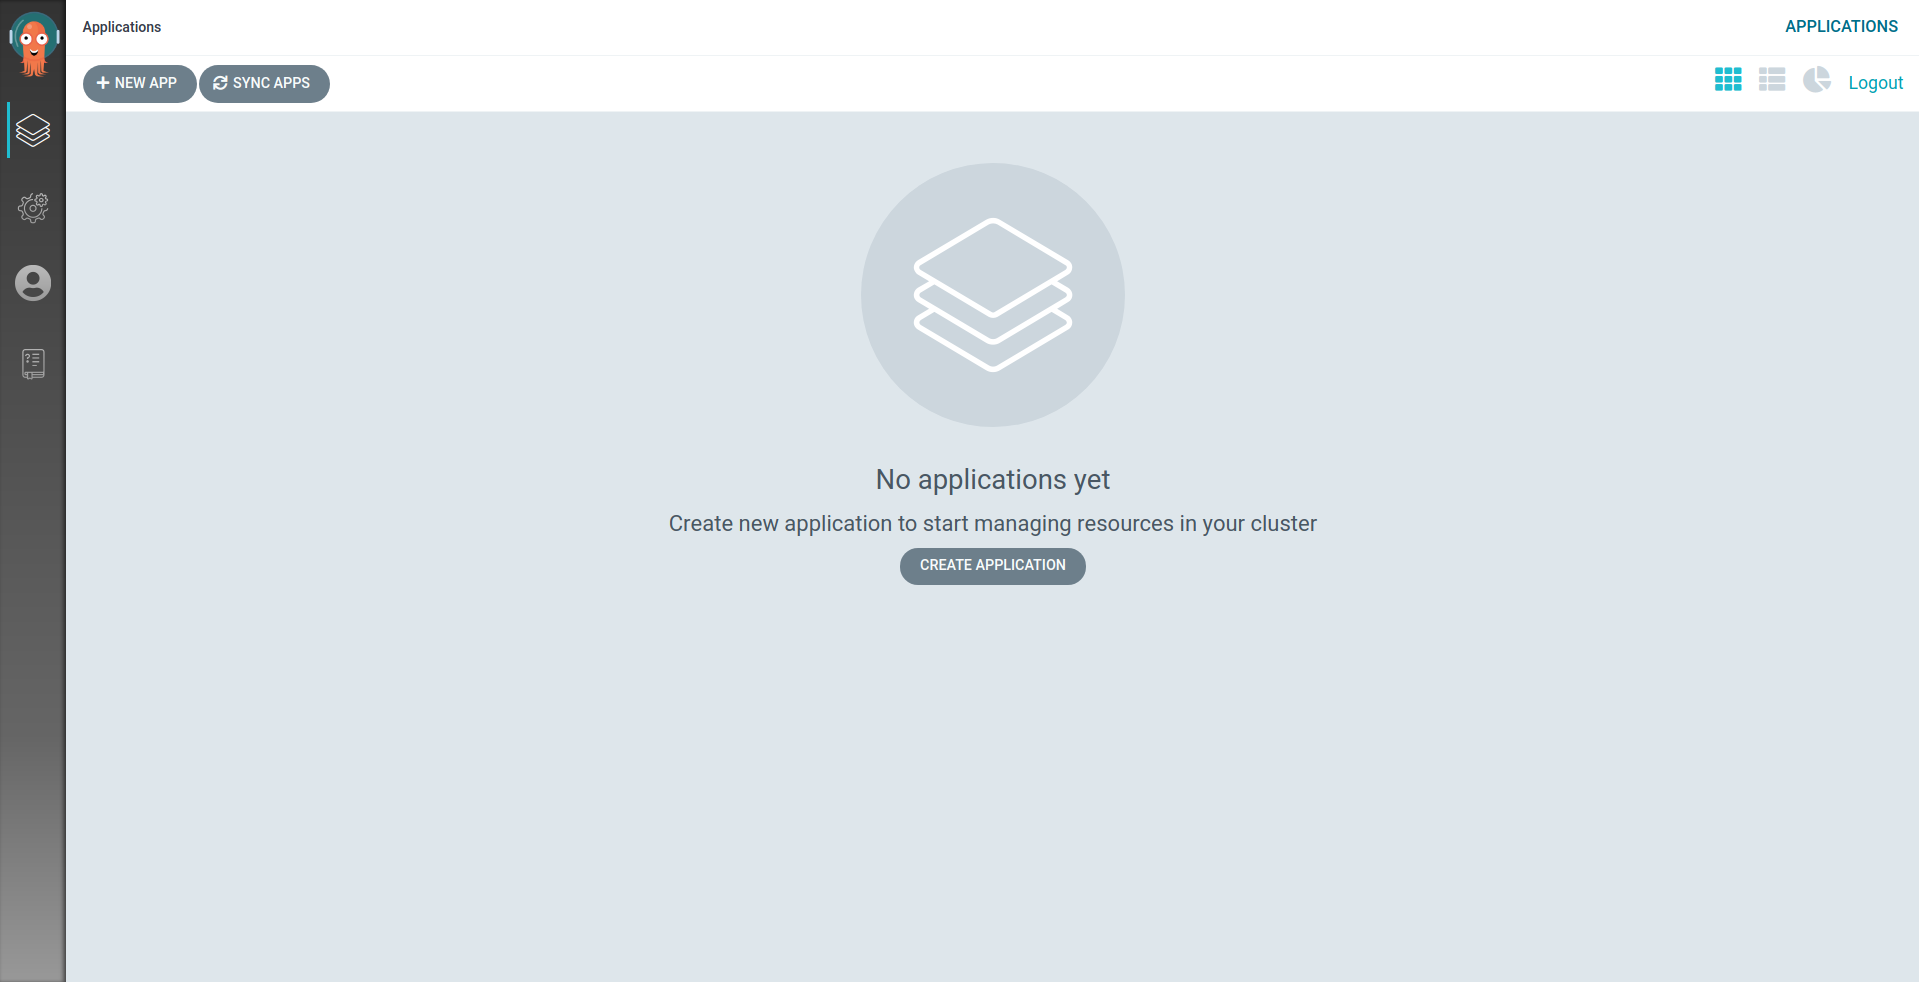
You can also access the GUI with the same credentials at localhost:8080 after accepting the self signed certificate. Let’s deploy a sample application using the GUI. Once you’ve logged in, you should see this page.
Nginx sample application
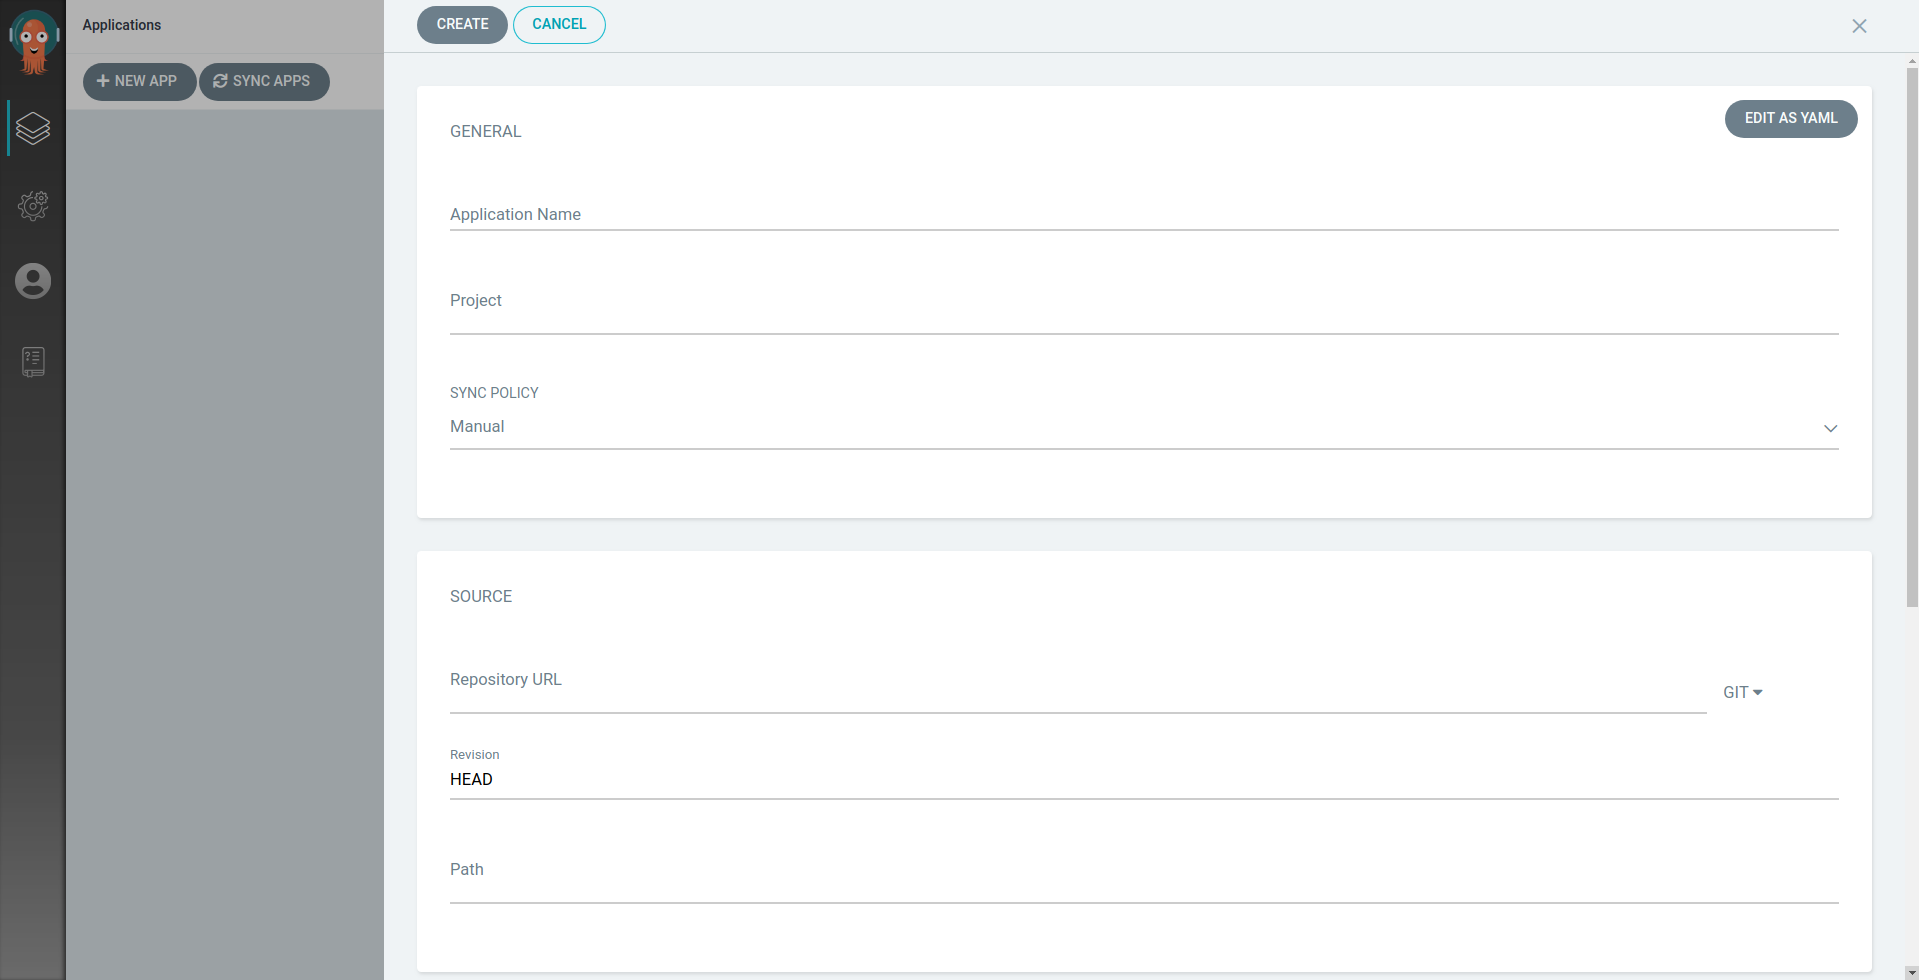
Click on “Create Application” and fill in these details. You can also click the “Edit as YAML” to look at the Application Custom Resource (CR) spec that will be generated by the GUI. This spec can also be edited directly to perform actions that the GUI does not support through the form.
General:
  Name: test
  Project: default
  SyncPolicy : Manual

Source:
  RepositoryURL: https://github.com/kanuahs/argocd-demo.git
  Revision: HEAD
  Path: nginx-chart

Destination:
  Server: 'https://kubernetes.default.svc'
  Namespace: default

Helm:
  ValueFiles: values.yaml
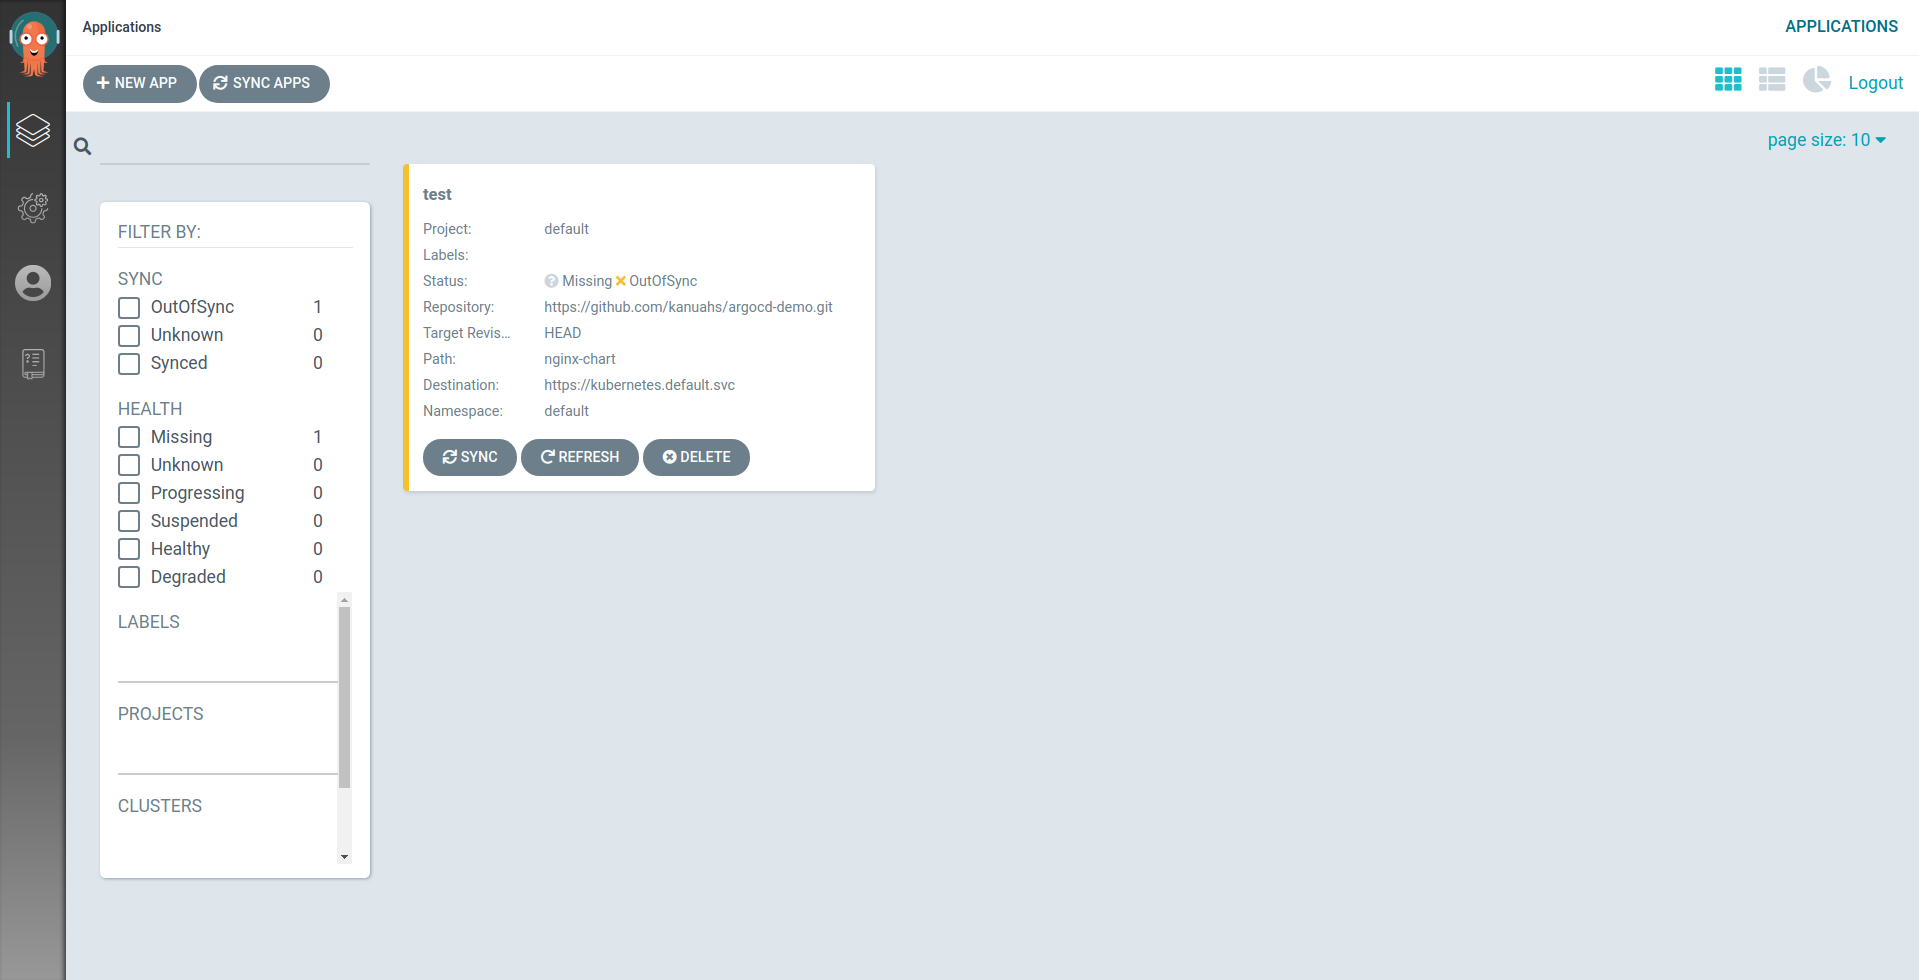
This page will be visible once the Application is created. The Application health will be “Missing” and status will be “out of sync” as automatic synchronisation is disabled. Opening the Application will let you see a diff for each resource present in the app. Click on sync to deploy the application to the cluster.
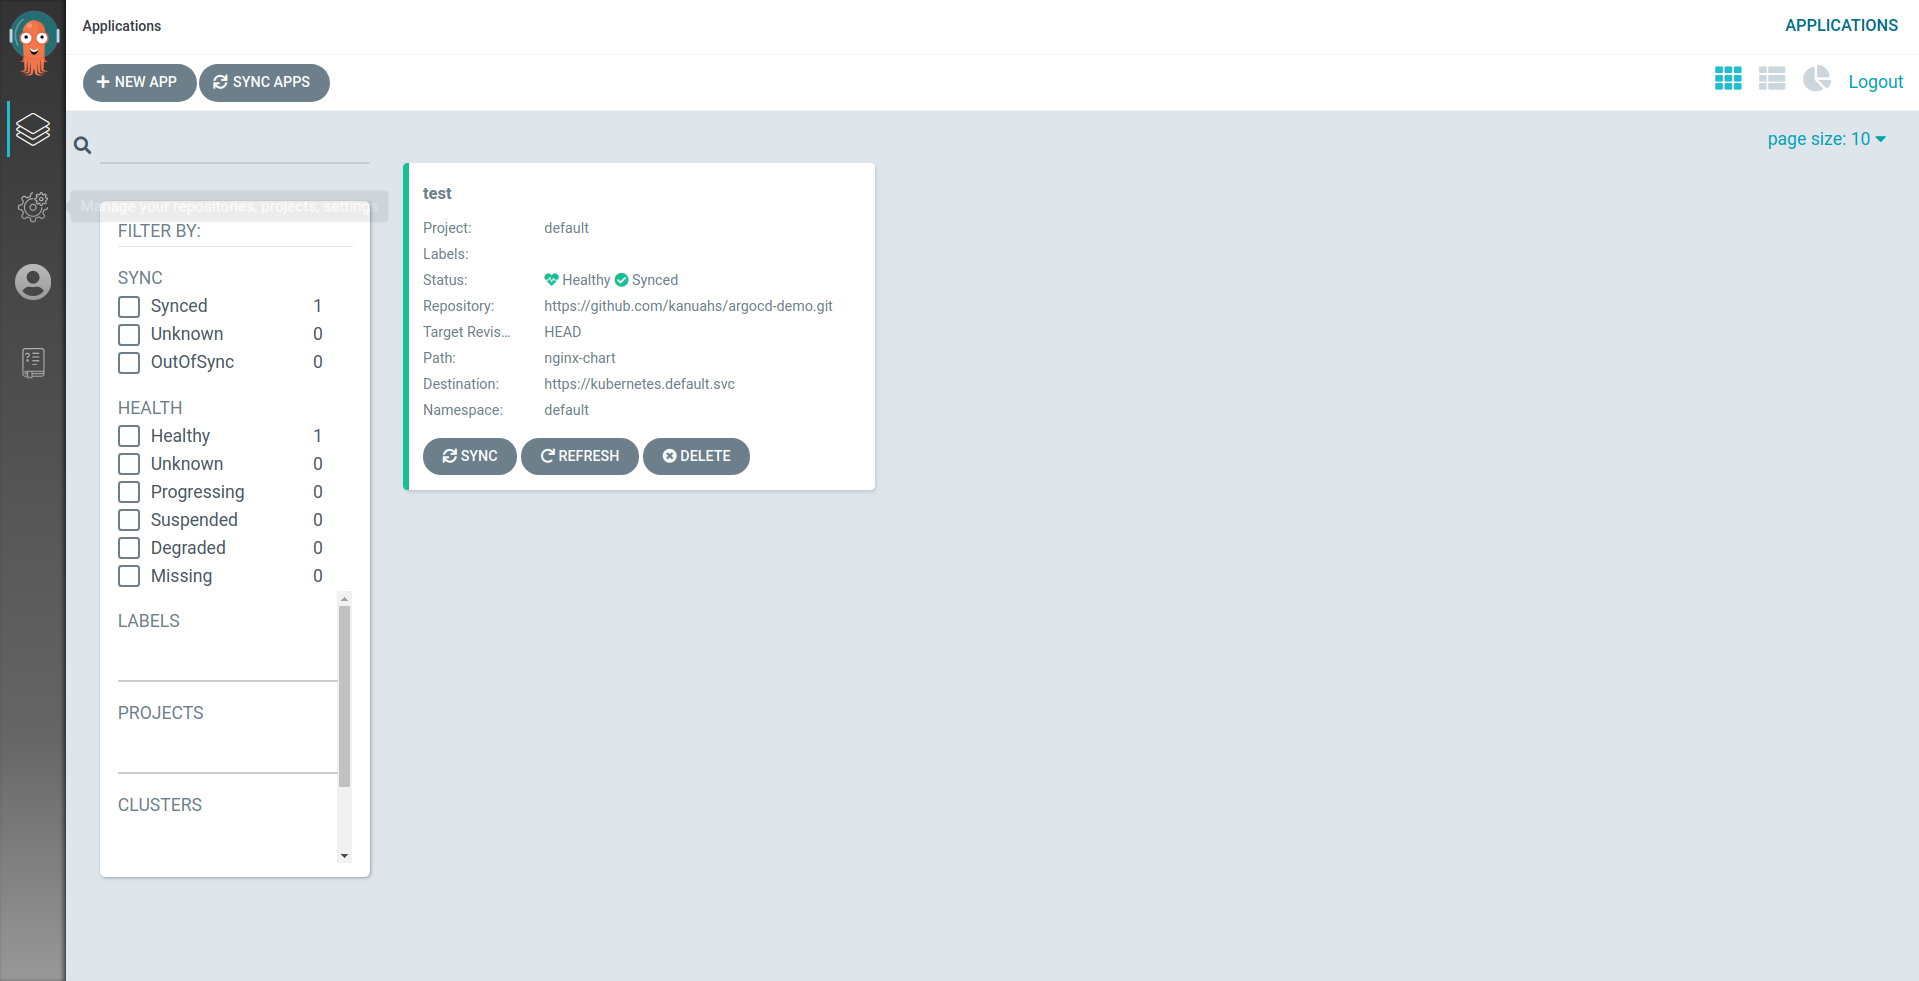
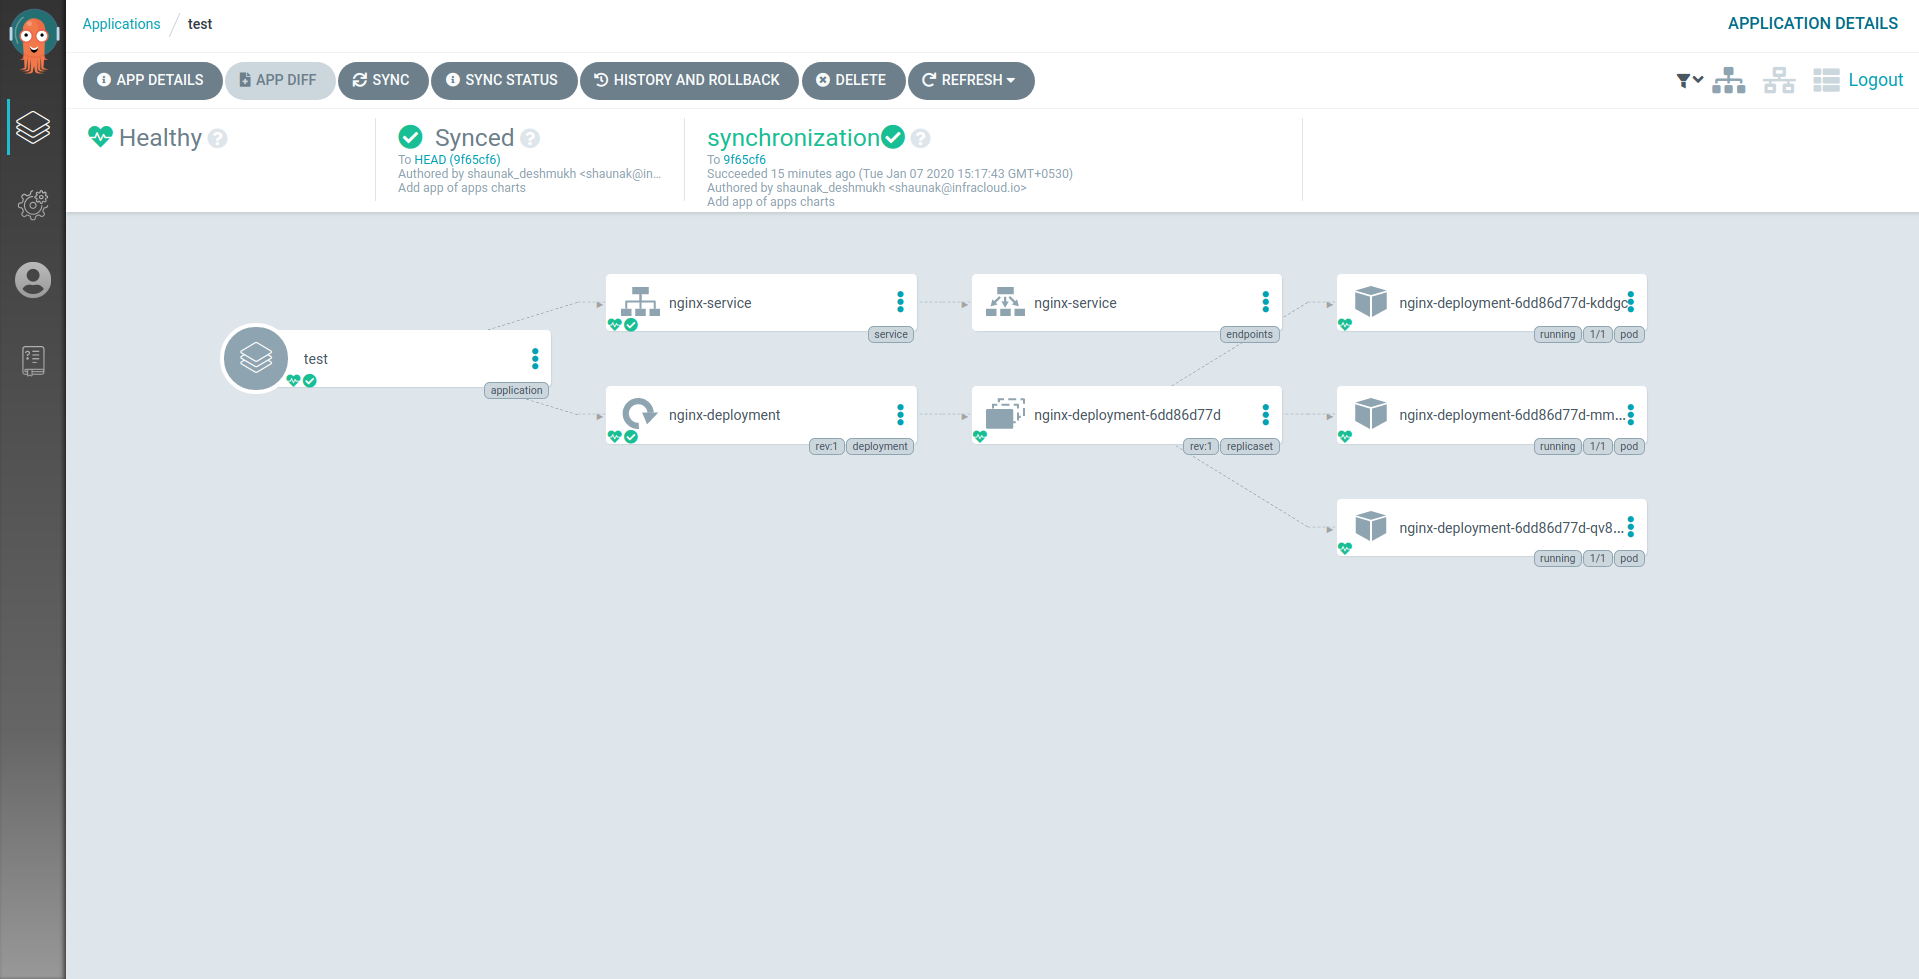
Once you see the Application as healthy and synced, you can check if nginx is working by going to the nodeport IP. You will see the default nginx landing page. Use the following command to open the URL in the default browser.
minikube service nginx-service --url
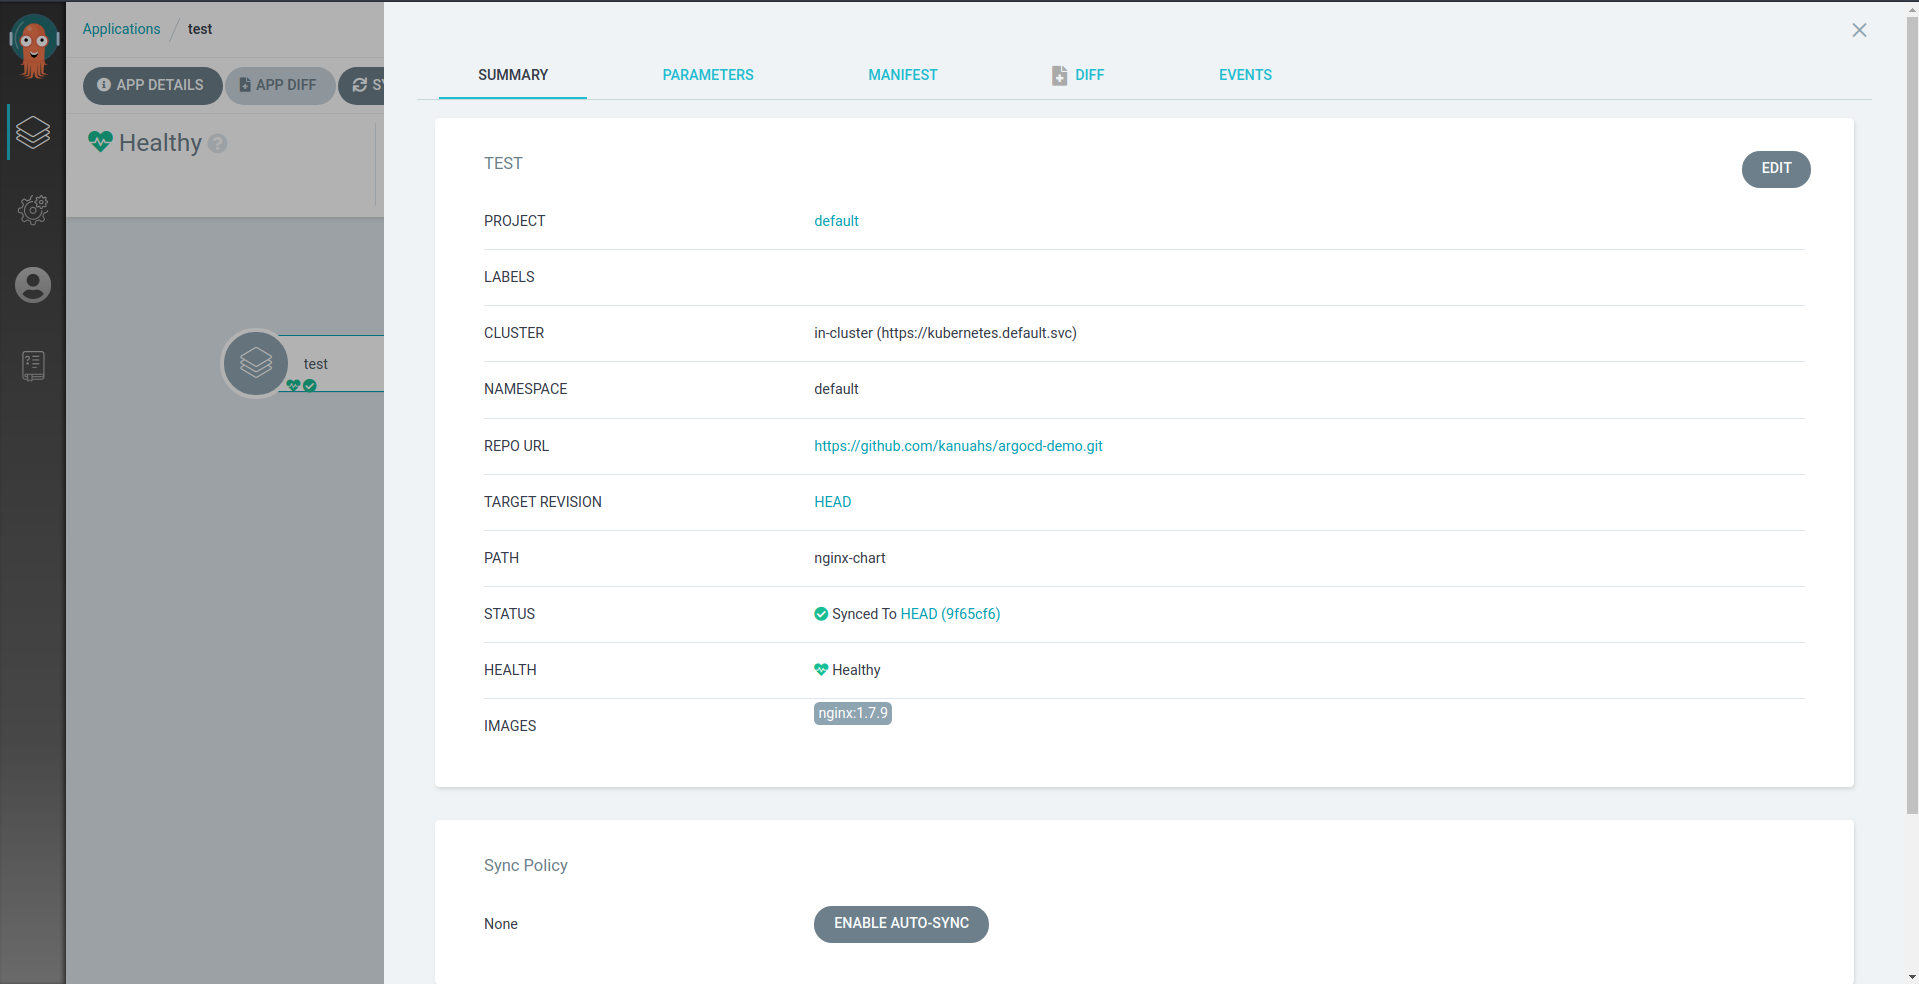
Let’s simulate a commit by switching to another branch. Click on “test” to open the Application and the “App Details” to check the values.
Click on edit and TargetRevision to “nginxV2”. This is a branch in the git repository that has a commit that changes the landing page for nginx.
Click on “Sync” after making the changes. You will see a new ReplicaSet being created. Go to the URL where nginx is exposed and you will see an additional line that says “This was deployed using ArgoCD”. You can open the URL with the following command.
minikube service nginx-service --url
Helm 1st class support
ArgoCD 1.3 and later version support directly fetching the chart from a Helm Chart repository and installing it into a cluster. Creating an Application from a Helm chart registry is similar to the steps listed above. However, let’s use the CLI to speed things up a bit.
Prometheus application
argocd app create monitoring \
  --repo https://kubernetes-charts.storage.googleapis.com \
  --helm-chart prometheus \
  --dest-server https://kubernetes.default.svc \
  --dest-namespace default \
  --revision 9.7.4

argocd app list           # To view all applications
argocd app get monitoring # To view details about the monitoring Application we just created.
We will use the above command to create an ArgoCD Application called “monitoring” by using the Prometheus chart. To perform a sync we can use the following command:
argocd app sync monitoring

kubectl get pods -l release=monitoring
Cleanup
Run the following commands to delete the apps.
argocd app delete test
argocd app delete monitoring
App of Apps pattern
So far, we have deployed a single application to a single cluster using ArgoCD. We’ll now use the ‘App of Apps’ pattern to deploy multiple apps to one cluster. However, before we jump into that, we’ll have to look at the Application CR that gets created when we use the GUI or CLI. In the nginx example, the following Application was generated from the form.
kind: Application
metadata:
  name: test
  namespace: argocd
spec:
  destination:
    namespace: default
    server: https://kubernetes.default.svc
  project: default
  source:
    helm:
      valueFiles:
      - values.yaml
    path: nginx-chart
    repoURL: https://github.com/kanuahs/argocd-demo.git
    targetRevision: HEAD
We can create these Application CRs directly using Helm or kubectl or another Application. We will create an Application that deploys the Prometheus chart and the nginx sample chart. Use the following command to create an App of Apps:
argocd app create app-of-apps \
  --repo https://github.com/kanuahs/argocd-demo.git \
  --path app-of-apps-chart \
  --dest-server https://kubernetes.default.svc \
  --dest-namespace default \
  --sync-policy automated \
  --self-heal \
  --auto-prune
We are also enabling auto sync. ArgoCD will check the state every 3 minutes and perform a sync if the Application is out of sync.
$ argocd app list

NAME                 CLUSTER                         NAMESPACE  PROJECT  STATUS  HEALTH   SYNCPOLICY  CONDITIONS  REPO                                              PATH               TARGET
app-of-apps          https://kubernetes.default.svc  default    default  Synced  Healthy  Auto-Prune  <none>      https://github.com/kanuahs/argocd-demo.git        app-of-apps-chart
minikube-monitoring  https://kubernetes.default.svc  default    default  Synced  Healthy  Auto-Prune  <none>      https://kubernetes-charts.storage.googleapis.com                     9.7.4
nginx                https://kubernetes.default.svc  default    default  Synced  Healthy  Auto-Prune  <none>      https://github.com/kanuahs/argocd-demo.git        nginx-chart        HEAD
Using App of Apps to deploy to multiple clusters
We’ll need to create another cluster for this demo. If you already have a Kubernetes cluster and a Kubeconfig, you can skip the cluster creation steps.
Cluster creation
We’ll be using Google Kubernetes Engine (GKE) as an external cluster. Run the following command to create a cluster
gcloud config set project [PROJECT_ID]

gcloud container clusters create gke-argocd \
  --zone us-central1-a \
  --machine-type n1-standard-4 \
  --num-nodes 1
Once the cluster is created and ready, run the following command to add it to your kubeconfig:
gcloud container clusters get-credentials gke-argocd --zone us-central1-a
How Add an external cluster to ArgoCD?
We’ll have to setup RBAC and access credentials for ArgoCD to connect to the cluster that we just created. The CLI makes this easy. Run the following command:
$ argocd cluster add

ERRO[0000] Choose a context name from:
CURRENT  NAME                                             CLUSTER                                          SERVER
*        gke_[PROJECT_NAME]_us-central1-a_gke-argocd      gke_[PROJECT_NAME]_us-central1-a_gke-argocd      https://[KUBERNETES-MASTER-IP]
         minikube                                         minikube                                         https://192.168.99.100:8443

$ argocd cluster add gke_[PROJECT_NAME]_us-central1-a_gke-argocd

INFO[0001] ServiceAccount "argocd-manager" created in namespace "kube-system"
INFO[0001] ClusterRole "argocd-manager-role" created
INFO[0001] ClusterRoleBinding "argocd-manager-role-binding" created, bound "argocd-manager" to "argocd-manager-role"
Cluster 'gke_[PROJECT_NAME]_us-central1-a_gke-argocd' added
This will let ArgoCD deploy apps to the GKE cluster that we just created. Fork this git repository and clone it to your development machine. We’ll have to make a few changes in the values.yaml file of the app-of-apps chart. The file is located at this path: “app-of-apps-chart/values.yaml”
# file: app-of-apps-chart/values.yaml

clusters:
- name: minikube
  destinationServer: https://kubernetes.default.svc
  apps:
    prometheus:
      enabled: true
      version: "9.7.4"

    sampleApp:
      enabled: true
      branch: HEAD

# - name: gke
#   destinationServer: #INSERT MASTERIP HERE
#   apps:
#     prometheus:
#       enabled: true
#       version: "9.7.4"
#     sampleApp:
#       enabled: true
#       branch: HEAD
Uncomment the GKE section in values.yaml and fill in the destinationServer field with the GKE cluster’s master IP address. You can use the following command to print it.
$ argocd cluster list

SERVER                          NAME                                             VERSION  STATUS      MESSAGE
https://[KUBERNETES_MASTER_IP]  gke_[PROJECT_NAME]_us-central1-a_gke-argocd      1.13+    Successful
https://kubernetes.default.svc                                                   1.14     Successful
Once you’ve updated the values.yaml file, commit and push it to your fork. Now, we have to redeploy the Application with your fork as the source. You can run the following command to do that after filling in your GitHub username:
argocd app patch app-of-apps --patch '{"spec": { "source": { "repoURL": "https://github.com/[GITHUB_USERNAME]/argocd-demo.git" } }}' --type merge
ArgoCD should pick up the changes and auto-sync. You can check the status of the Applications with kubectl or with the following command:
$ argocd app list

NAME                 CLUSTER                         NAMESPACE  PROJECT  STATUS  HEALTH   SYNCPOLICY  CONDITIONS  REPO                                                 PATH               TARGET
app-of-apps          https://kubernetes.default.svc  default    default  Synced  Healthy  Auto-Prune  <none>      https://github.com/[GITHUB_USERNAME]/argocd-demo.git app-of-apps-chart
minikube-monitoring  https://kubernetes.default.svc  default    default  Synced  Healthy  Auto-Prune  <none>      https://kubernetes-charts.storage.googleapis.com                        9.7.4
minikube-nginx       https://kubernetes.default.svc  default    default  Synced  Healthy  Auto-Prune  <none>      https://github.com/kanuahs/argocd-demo.git           nginx-chart        HEAD
gke-monitoring       https://[KUBERNETES_MASTER_IP]  default    default  Synced  Healthy  Auto-Prune  <none>      https://kubernetes-charts.storage.googleapis.com                        9.7.4
gke-nginx            https://[KUBERNETES_MASTER_IP]  default    default  Synced  Healthy  Auto-Prune  <none>      https://github.com/kanuahs/argocd-demo.git           nginx-chart        HEAD
Cleanup
This command will clean up all the Applications and delete the resources created by the Application.
argocd app delete app-of-apps
We hope you found the Multicluster GitOps with ArgoCD blog informative and engaging. For more reads like this one, subscribe to our blogs for up-to-date news, projects, and related content in real-time.
Looking for help with GitOps adoption using ArgoCD? do check our Argo CD consulting capabilities and expertise to know how we can help with your GitOps adoption journey. If you’re looking for managed on-demand ArgoCD support, check our support model.
References & other related content
- ArgoCD Official Documentation
- Kubecon 2019 – Tutorial: Everything You Need To Become a GitOps Ninja – Alex Collins & Alexander Matyushentsev
- Weaveworks Blog – Automate Kubernetes with GitOps
- CI/CD in Light Speed with K8s and Argo cd – Billy Yuen & Parin Shah, Intuit
- ArgoCD Official Documentation – App of Apps
- Explore our GitOps consulting and implmentation expertise
Stay updated with latest in AI and Cloud Native tech
We hate 😖 spam as much as you do! You're in a safe company.
Only delivering solid AI & cloud native content.
Posts You Might Like