Service Mesh Demo with Istio & SockShop

A modern cloud-native application is built up of many micro-service written in multiple languages where multiple services talk to each other forming a mesh. This network of micro-services has common concerns like service Discovery, traffic routing, canary deployments, metrics and monitoring, failure recovery, etc. Instead of embedding these concerns into applications and duplicating the same logic across potentially multiple languages, it makes sense to take care of this functionality at the network level. Service mesh such as Istio tries to solve this common problem centrally so that developers focus on developing their applications and rely on Istio for the above features. One of the main design goals of Istio is to have complete transparency so that minimum rework is required from the application side to integrate it with Istio. Istio can automatically inject itself between all network paths between services and mediate/control the traffic.
Install Istio on Kubernetes
Before we do deep dive into Istio, let’s set it up on Kubernetes cluster using Helm. While you can follow commands below, it is best to refer to the latest documentation on setting up Istio.
curl -L https://git.io/getLatestIstio | sh -
cd istio-<package-version>
export PATH=$PWD/bin:$PATH
kubectl apply -f install/kubernetes/helm/helm-service-account.yaml
helm init --service-account tiller
Enable Istio components like Kiali, ServiceGraph, Prometheus and Grafana in /install/kubernetes/helm/istio/values.yaml file
helm install install/kubernetes/helm/istio --name istio --namespace istio-system
After Istio is successfully installed, bellow pods will be in running state in the istio-system namespace:
kubectl get pods -nistio-system
NAME                                         READY STATUS RESTARTS AGE
pod/grafana-9cfc9d4c9-g2ld7                  1/1     Running            1          1d
pod/istio-citadel-86bc767f59-nd6s5           1/1     Running            1          1d
pod/istio-egressgateway-65bb9db7dd-vfmqr     1/1     Running            1          1d
pod/istio-ingressgateway-796f8d99c5-4n9pb    1/1     Running            1          1d
pod/istio-pilot-7db87986b4-ddjbq             2/2     Running            1          1d
pod/istio-policy-85979bf486-xrshh            2/2     Running            1          1d
pod/istio-sidecar-injector-c8c4c568b-bf784   1/1     Running            1          1d
pod/istio-telemetry-85fcc746bc-rslgn         2/2     Running            1          1d
pod/istio-tracing-ff94688bb-p7f4w            1/1     Running            1          1d
pod/kiali-7d7cf69cc7-d6dds                   1/1     Running            1          1d
pod/prometheus-f556886b8-q44wz               1/1     Running            1          1d
pod/servicegraph-847997bbf-d2gq9             1/1     Running            1          1d
Install sample Sock-Shop application
Now let’s deploy a polyglot micro-service sock-shop application in its own namespace ‘sock-shop’. For this, we will be using a customized version from sockshop-istio repository. Bellow are the changes made to original sock-shop Kubernetes deployment definitions to suit with Istio.
-
All Kubernetes service ports are named
http-<service-name>as per Istio application requirements -
Added
epmdport to rabbitmq service, this is required for the rabbitmq to function properly. -
Added
version: v1labels to all Kubernetes deployments. (Required for Istio destination rules to work properly later in the demo) -
git clone https://github.com/infracloudio/sockshop-istio.git
kubectl apply -f 1-sock-shop-install/1-sock-shop-complete-demo-istio.yaml -nsock-shop
istioctl create -f 1-sock-shop-install/2-sockshop-gateway.yaml -nsock-shop
istioctl create -f 1-sock-shop-install/3-virtual-services-all.yaml -nsock-shop
kubectl delete meshpolicies.authentication.istio.io default  # For catalogue service to be able to connect to catalogue-db. More info : https://github.com/istio/istio/issues/10062
After deployment is complete, you can see all the pods running:
kubectl get pods -nsock-shop
NAME                             READY   STATUS    RESTARTS   AGE
carts-66469c84c6-rtw9h           2/2     Running   1          1d
carts-db-6d7899f96f-8782k        2/2     Running   1          1d
catalogue-6446dbf7b4-jmvwz       2/2     Running   1          1d
catalogue-db-797549d944-97qwz    2/2     Running   1          1d
fortio-deploy-54ccc6bd8d-28b26   2/2     Running   1          1d
front-end-v1-964c49859-q8bsm     2/2     Running   1          1d
front-end-v2-7cd6b78dfb-s9vlh    2/2     Running   1          1d
orders-98c9fb97-b9ps6            2/2     Running   1          1d
orders-db-6857496975-4ppmx       2/2     Running   1          1d
payment-5b94cbbf9c-9vn25         2/2     Running   1          1d
queue-master-7d9d9b7f66-mb6ww    2/2     Running   1          1d
rabbitmq-694fbf6bc5-jlqwj        2/2     Running   1          1d
shipping-69dfddf9d4-h6k87        2/2     Running   1          1d
user-74bf6d9d9f-687xc            2/2     Running   1          1d
user-db-6c86bd698d-bg8zc         2/2     Running   1          1d
Let’s try to see if we are able to access the application by running below commands. Get the IP and port of istio-ingressgateway. Istio-ingressgateway acts as a single entry point into the service mesh.
export INGRESS_HOST=$(kubectl -n istio-system get service istio-ingressgateway -o jsonpath='{.status.loadBalancer.ingress[0].ip}')
export INGRESS_PORT=$(kubectl -n istio-system get service istio-ingressgateway -o jsonpath='{.spec.ports[?(@.name=="http2")].port}')
Note: If Kubernetes is deployed in a non-cloud environment then INGRESS_HOST is IP of any Kubernetes worker node, since service istio-ingressgateway is of type NodePort in that case. Hit $INGRESS_HOST:$INGRESS_PORT/index.html in browser. Default login username/password is user/password. See if you are able to place an order. This will ensure all the required micro-services are able to communicate with each other.
Service Mesh Visualization
Kiali is dashboard developed specifically to visualize all the services deployed in Istio service mesh. Let’s visit the Kiali dashboard and see how our service mesh looks like.
- Add a port-forwarding rule to access dashboard from your workstation.
kubectl port-forward -n istio-system $(kubectl get pod -n istio-system -l app=kiali -o jsonpath='{.items[0].metadata.name}') 20001:20001 & - See service graph by visiting
http://localhost:20001/console/graph/namespaces/sock-shop(Default login username/password isadmin/admin). The graph should look something like this:
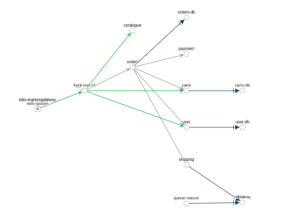
Kiali Graph
Istio Architecture
At a very high level, Istio consists of the Data Plane and the Control Plane. Data plane comprises of Envoy as a SideCar proxy and Mixer. Sidecar proxy intercepts and controls all the communication between services while Mixer is general purpose policy and telemetry hub. Control Plane configures these proxies to route traffic correctly based on the user-defined traffic management rules.
Data Plane
Side Cars
Istio requires each pod in the mesh to run an Istio compatible sidecar proxy. It can be injected automatically for all the pods in particular namespace by adding label ‘istio-injection=enabled‘ to a namespace or selectively to the specific pod by manual injection using istioctl. All incoming and outgoing traffic to/from k8s pod goes through this sidecar container. This is achieved by script like this which configures all the required iptable rules.
Let’s look at a pod in sock-shop application, we can see that an additional sidecar is running along with application container. There is also an Init container which is responsible to configure all iptable rules to redirect traffic to sidecar. We can see that istio-init container is redirecting traffic intended for catalog container to envoy proxy port 15001 by giving [-p 15001] argument, also it does not want to apply redirection for traffic intended for istio-proxy itself [-u 1337] by mentioning the UID of istio-proxy.
kubectl describe pod catalogue-6446dbf7b4-jmvwz -nsock-shop
Name:           catalogue-6446dbf7b4-jmvwz
Namespace:      sock-shop
            ....
Controlled By:  ReplicaSet/catalogue-6446dbf7b4
Init Containers:
  istio-init:
    Container ID:  docker://376d7e2fa4e3c016a2c53743d5c892d30dba85645dd518005bedc39c8cdbf677
    Image:         gcr.io/istio-release/proxy_init:release-1.0-latest-daily
    Image ID:      docker-pullable://gcr.io/istio-release/proxy_init@sha256:aa723cd8e9f14455fd0c5b34d38e12536c186b4248430545e992365b3ceb57fe
    Port:          <none>
    Host Port:     <none>
    Args:
      -p
      15001
      -u
      1337
      -m
      REDIRECT
      -i
      *
      -x

      -b
      80
      -d

    State:          Terminated
      Reason:       Completed
      Exit Code:    0
      Started:      Wed, 16 Jan 2019 15:27:38 +0530
      Finished:     Wed, 16 Jan 2019 15:27:38 +0530
    Ready:          True
    Restart Count:  1
    Environment:    <none>
    Mounts:
      /var/run/secrets/kubernetes.io/serviceaccount from default-token-ts7xn (ro)
Containers:
  catalogue:
    Container ID:   docker://2421a3031c2a37a6692c03a3f682e3d86aba3755ed89dca03f73c60e3a50944c
    Image:          weaveworksdemos/catalogue:0.3.5
    Image ID:       docker-pullable://weaveworksdemos/catalogue@sha256:0147a65b7116569439eefb1a6dbed455fe022464ef70e0c3cab75bc4a226b39b
    Port:           80/TCP
    Host Port:      0/TCP
    State:          Running
      Started:      Wed, 16 Jan 2019 15:27:43 +0530
    Last State:     Terminated
      Reason:       Completed
      Exit Code:    0
      Started:      Sun, 06 Jan 2019 13:28:25 +0530
      Finished:     Wed, 16 Jan 2019 14:34:48 +0530
    Ready:          True
    Restart Count:  1
    Environment:    <none>
    Mounts:
      /var/run/secrets/kubernetes.io/serviceaccount from default-token-ts7xn (ro)
  istio-proxy:
    Container ID:  docker://049dd65d07eacc88cbbf9d49cfd0f2d039ec705a78ebb075323e07fffabb7022
    Image:         gcr.io/istio-release/proxyv2:release-1.0-latest-daily
    Image ID:      docker-pullable://gcr.io/istio-release/proxyv2@sha256:38a986dcd813006b7fbdefe82ef5e308c00af4468143441dede193690040b276
    Port:          15090/TCP
    Host Port:     0/TCP
    Args:
      proxy
      sidecar
      --configPath
      /etc/istio/proxy
      --binaryPath
      /usr/local/bin/envoy
      --serviceCluster
      istio-proxy
      --drainDuration
      45s
      --parentShutdownDuration
      1m0s
      --discoveryAddress
      istio-pilot.istio-system:15007
      --discoveryRefreshDelay
      1s
      --zipkinAddress
      zipkin.istio-system:9411
      --connectTimeout
      10s
      --proxyAdminPort
      15000
      --controlPlaneAuthPolicy
      NONE
    State:          Running
Mixer
SideCars generates a wealth of information, called attributes about the traffic they mediate and send them to Mixer. Mixer processes these attributes and applies user-defined access control policies (RBAC) based on these attributes. Access control systems (like OPA, RBAC, etc), telemetry systems (like Prometheus, AWS CloudWatch, Google Service Control etc.), quota enforcement systems, billing systems can be seamlessly integrated with Istio service mesh. In Istio terms, these systems are call infrastructure back ends.
Mixer acts as an abstraction layer between these open-ended set of infrastructure backends and Istio services. Istio components can talk to these backends without worrying about specific interfaces these backends have. The mixer needs custom code to deal with each of these backends. For this, it implements an adapter model where each adapter is a go package statically liked to mixer binary and having details about interacting with specific backend.
Before making any request, sidecar calls mixer to perform pre-condition check and it reports telemetry data after the request is returned. Sidecar maintains a local cache so that a relatively large number of pre-condition checks can be performed from this local cache. It also maintains a local buffer to store telemetry data and sends at once to the mixer. But side cars need to be frugal in terms of cache sizes (1st level cache) since they reside beside each application. But mixers have the luxury to maintain bigger caches (2nd level cache).
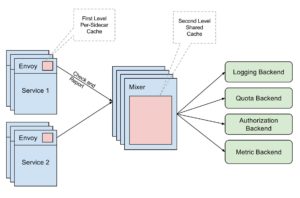
Mixer Architecture. Credits: istio.io
Control Plane
Control Plane maintains a canonical/logical representation of services in the service mesh. Platform-specific adapters in Istio are responsible for populating this model based on information from the underlying platform like Kubernetes. This control plan uses user-defined high-level traffic management rules to configure sidecar proxies.
Pilot
The pilot is the one which weaves the mesh. It builds the model of the mesh by gathering information from service discovery data like Kubernetes service registry. The user defines traffic routing rules using VirtualServices and DestinationRules. VirtualService is a set of traffic routing rules to apply when a particular host is addressed. VirtualService the definition will have a set of matching criteria and destination where to forward traffic when criteria are matched. Let’s look at bellow VirtualService.
apiVersion: networking.istio.io/v1alpha3
kind: VirtualService
metadata:
  name: catalogue
spec:
  hosts:
  - catalogue
  http:
  - route:
    - destination:
        host: catalogue
        subset: v1
Here all the traffic intended for the host catalogue should be directed to a subset v1. Let’s see how sebset v1 can be defined using DestinationRule.
apiVersion: networking.istio.io/v1alpha3
kind: DestinationRule
metadata:
  name: catalogue
spec:
  host: catalogue
  subsets:
  - name: v1
    labels:
      version: v1
      name: catalogue
Here, in this DestinationRule, we group together all the pods having the label name: catalogue and version: v1 under subset v1.
Use Cases
Let’s try out a few different traffic routing scenarios with our sample sock-shop application. User can define all traffic routing rules using VirtualServices and DestinationRules.
Blue/Green Deployment
In Blue/Green deployment, two identical sets of services are maintained in production. One set serves the actual live traffic and the other set is upgraded to a new version and a subset of users are routed to the new version. Once it is clear that the newer version of service is working as expected, traffic is switched to the newer version and older version is taken out of service. Let’s simulate this by deploying another version v2 of front-end service of sock-shop.
kubectl apply -f 2-inteligent-routing/2-front-end-deployment-v2-istio.yaml -nsock-shop
This will start another version v2 of front-end service but it will not serve any actual traffic. Once all the validation tests are done and ready to serve traffic, Istio VirtualService needs to be updated to redirect all traffic to v2 of front-end.
istioctl replace -f 2-inteligent-routing/2-front-end-deployment-v2-route.yaml -nsock-shop
If we look at the updated VirtualService, we see that all traffic (since there are no match criteria) coming to sockshop-gateway will be redirected to the version v2 of front-end service (to pods having the label version: v2 as defined in destination rule).
apiVersion: networking.istio.io/v1alpha3
kind: VirtualService
metadata:
  name: front-end
  namespace: sock-shop
spec:
  hosts:
  - "*"
  gateways:
  - sockshop-gateway
  http:
  - route:
    - destination:
        host: front-end
        subset: v2
---
apiVersion: networking.istio.io/v1alpha3
kind: DestinationRule
metadata:
  name: front-end
spec:
  host: front-end
  subsets:
  - name: v2
    labels:
      version: v2
Refresh the browser and see that updated front-end is getting served with a different logo on front-end page.
Canary Deployment
In old days, coal miners used to carry a canary bird along with them in mines so that they would get alerted if there are any toxic gases present, since the bird used to get affected first than men. Similarly, in the software industry, the practice of making a new feature available to relatively smaller sets of user and seeing how users react/accept it before rolling it out to all the users. Let’s simulate this with our front-end sock-shop example. Just replace existing VirtualService for front-end with
istioctl replace -f 2-inteligent-routing/2-canary.yaml
This will apply weighted routing rule to send 90% traffic to an old version of front-end (v1) and 10% traffic to a newer version of front-end (v2). See the rule in action by hitting browser multiple times, you might have to try this a few times before you see the change.
Circuit Breaker
In electrical circuits, circuit breakers are placed so that if there is a surplus of electricity flowing, these breakers will trip immediately avoiding any further flow of electricity and hence avoiding any further damage to other electric appliances. Similarly, in Istio service mesh, the circuit breaker pattern can be applied so one can actively reject any additional connections/traffic if there is a downstream failure. Let’s look at how to apply the circuit breaker pattern in Istio mesh. For this, we will use Fortio client developed by Istio community to generate traffic.
Initially, we will not put any restrictions on the number of connections our front-end can accept. Then we will put an artificial limit on the number of connections that the front-end service can handle using – this will be done purely with Istio configuration. This will ensure that requests that can not be handled by front-end service are rejected by Istio. Let’s start with deploying Fortio application inside cluster:
kubectl apply -f 3-circuit-breaker/3-fortio.yaml
Now let’s run Fortio to send 20 requests (-n 20) over 3 connections (-c 3). In the output, you should be able to see that 100% requests should pass.
kubectl exec -it $FORTIO_POD -nsock-shop -c fortio /usr/local/bin/fortio -- load -c 3 -qps 0 -n 20 -loglevel Warning http://front-end:80/index.html
Now, let’s restrict Istio to accept at most 2 connections at any given point of time by applying below circuit breaking rule. In TCP connection pool, we restrict to max 2 connections (maxConnections: 2). We will also allow only one request per connection (disable keepalive) by saying maxRequestsPerConnection: 1.
apiVersion: networking.istio.io/v1alpha3
kind: DestinationRule
metadata:
  name: front-end
  namespace: sock-shop
spec:
  host: front-end
  trafficPolicy:
    connectionPool:
      tcp:
        maxConnections: 2
      http:
        http1MaxPendingRequests: 1
        maxRequestsPerConnection: 1  # KeepAlive is disabled
Now if we run Fortio app with 3 connections and 20 requests. 70% will pass and 30% will fail as can be seen from the output.
kubectl exec -it $FORTIO_POD -nsock-shop -c fortio /usr/local/bin/fortio -- load -c 3 -qps 0 -n 20 -loglevel Warning http://front-end:80/index.html
Conclusion
Service meshes such as Istio provide powerful functionality without changing the code or duplicating the same logic across applications. They also provide visibility across the application stack and that feedback loop can be used for better uptime and improving applications. We have barely scratched the surface of what is possible with Istio with this demo app. Do try out the demo here and feel free to file bugs or send PRs.
Looking for help with your cloud native journey? do check our cloud native consulting capabilities and expertise to know how we can help with your transformation journey.
Stay updated with latest in AI and Cloud Native tech
We hate 😖 spam as much as you do! You're in a safe company.
Only delivering solid AI & cloud native content.
Posts You Might Like