Kubernetes Cost Reporting using Kubecost

Over the last few years, we have seen the mass adoption of Kubernetes as a container orchestration platform. With this also comes different ways to operate Kubernetes clusters. Some enterprises prefer one cluster one tenant (Hard multi-tenancy) and some prefer one cluster n tenant (Soft multi-tenancy) model. We have seen a lot of enterprises going with the latter model as it helps them cut down a lot of operational efforts. For the soft multi-tenancy model, it becomes very important to provide visibility of cost allocation tenant wise so that teams can be charged back accordingly.
Background Story
We are running a soft multi-tenant Amazon EKS cluster. Multi-tenancy is in place using Kubernetes namespaces. Now for Kubernetes cost reporting, AWS provides cost explorer which is very good if you want to get charges for nodes, EBS, network as a whole. But it is not possible to use it to get cost segregation for shared or pooled resources. We wanted to create reports based on tenants so that they can be tied to the budgets accordingly. There are many solutions in the market for Kubernetes cost reporting, but since we were looking for something open source, we ended up selecting Kubecost. In this blog post, I will elaborate on how we used Kubecost for our multi-tenant EKS cluster to get better visibility.
What is Kubecost?
Kubecost helps you monitor and manage cost and capacity in Kubernetes environments. - Kubecost docs
Kubecost is available as an open source as well as a commercial offering. As you must have guessed, commercial offering has few additional features like user authentication, saved reports, enterprise support, and a longer metric retention period. For this post, we’ll be using the OSS version of Kubecost.
How to install Kubecost?
Multiple ways to install Kubecost can be found here. We used Helm to install Kubecost in our cluster. These commands can be used to install Kubecost using Helm 3 with default configurations. You will need an unique token for installation which you can get here.
kubectl create namespace kubecost

helm repo add kubecost https://kubecost.github.io/cost-analyzer/

helm install kubecost kubecost/cost-analyzer --namespace kubecost --set kubecostToken="YWp1bmVqYUB0YXZpc2NhLmNvbQ==xm343yadf98"
There are a lot of configuration optionsavailable to configure Kubecost while installation. Following are the flags that we used for our use case to get better insights.
Network costing
networkCosts.enabled=true
This is a very important flag if you want to capture network cost and segregate based on namespaces or tenants in your cluster. In general, enabling this flag will provision a DaemonSet that will map traffic flowing through the node to the cost-model and use it in cost reporting. Network rates are adjusted using the cloud provider rates. Details on how network-allocation works. Gathered network data is classified into different categories like internet egress, cross-region egress, and cross-zone egress. You can override these network classifications and set something of your own.
Reusing Node Exporters and Metric Server
prometheus.kubeStateMetrics.enabled=false
prometheus.nodeExporter.enabled=false
prometheus.serviceAccounts.nodeExporter.create=false
Kubecost default installation comes with Prometheus, Grafana, and Metrics Server as well. There are ways to re-utilize your existing Prometheus and Grafana setup, the process is bit involved. It needs some modifications to the Prometheus scrape configuration, relabeling, recording rules etc. The recommended way of Kubecost installation is to reuse existing node-exporters and Metrics Server if available in your cluster and setup separate Prometheus and Grafana that come with Kubecost installation.
Metric retention period
prometheus.server.retention=15d
prometheus.server.persistentVolume.size=32Gi
By default, you have only 15 days of metric retention and 32Gb persistent volume available for Prometheus metric retention. You can calculate your storage requirement, based on the retention period using this formula:
needed_disk_space = retention_time_minutes * ingested_samples_per_minutes * bytes_per_sample
You can read more about this in the metric storage configuration section of the getting started documentation page.
What are key Kubecost features?
Cost allocation
If you are working on cost optimization for Kubernetes or want to get clear insights on how much a particular tenant or a service is costing, then ‘Kubecost Cost Allocation’ view is the space where you will spend most of the time. You can filter out costs for all Kubernetes objects like Deployments, StatefulSets, etc. If you are using soft multi-tenancy using namespaces then you can filter this view based on namespaces and get all tenants to cost distribution.

Cost allocation view provides detailed insights of Kubernetes major cost components like compute, network, storage, etc. For compute you will get the distribution of cost for memory, CPU, and GPU. Similarly, if you are using StatefulSets you can also get the cost for the persistent volumes which is calculated using cloud provider storage rates. If you have enabled network costing using the flag explained above, then you will also get network cost associated with your objects.
Savings recommendations
This is a very helpful feature of Kubecost as it provides some valuable recommendations that can incur good savings. These reports might not be very accurate every time but these are more or less generalized and will help you in identifying savings in some part of your cluster.
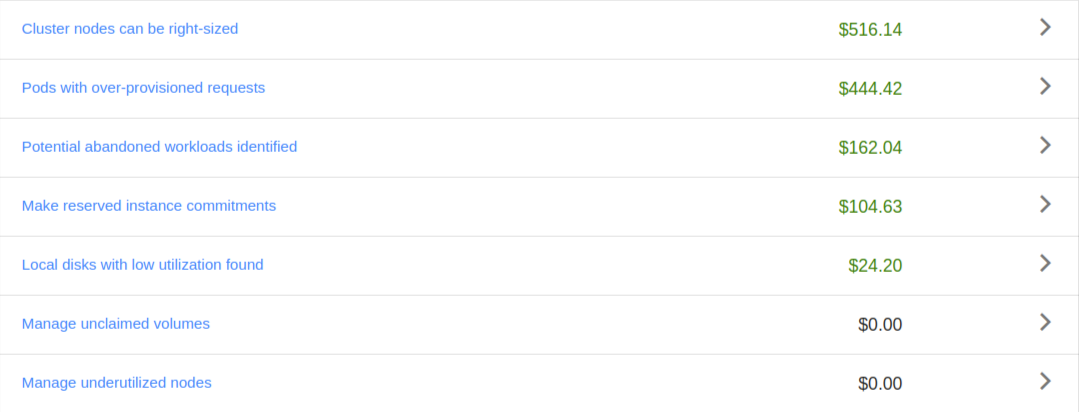
Savings recommendations actually cover the following areas majorly,
-
Nodes and Pods right-sizing
It generates recommendations for compute node sizes and reports of pods with over-provisioned requests. These recommendations can help you tune your nodes and pods requests, helping you better utilize cluster capacity.
-
Underutilized nodes report
This provides nodes reports that are currently underutilized and their workloads can be migrated or adjusted in other nodes. This is a very important report to look for. Cluster autoscaler downscales cluster but it has certain checks it uses to identify the nodes that can be downscaled. This report actually provides you details on why your node cannot be downscaled even if it is underutilized.
-
Underutilized storage
This provides details around persistent volumes that are unclaimed and any local storage attached to nodes and being currently underutilized.
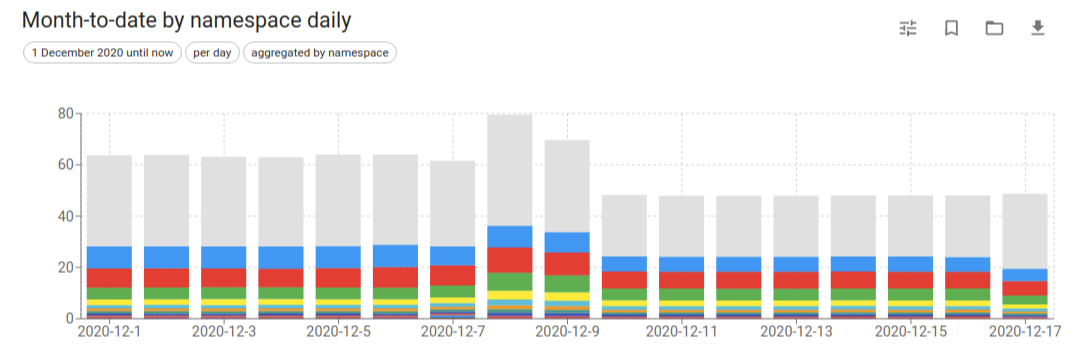
Cost reports
Kubecost reports contain detailed information about the cluster cost distribution. Just like the cost allocation view, you can generate these reports based on namespaces, Kubernetes objects, or labels. You can add filters and create reports specific to a particular tenant or a team. It provides export functionality as well which helps sharing this with the teams on regular intervals resulting in increased visibility. Make sure to set the correct retention period based on your report requirements using the flag mentioned in the installation part above.
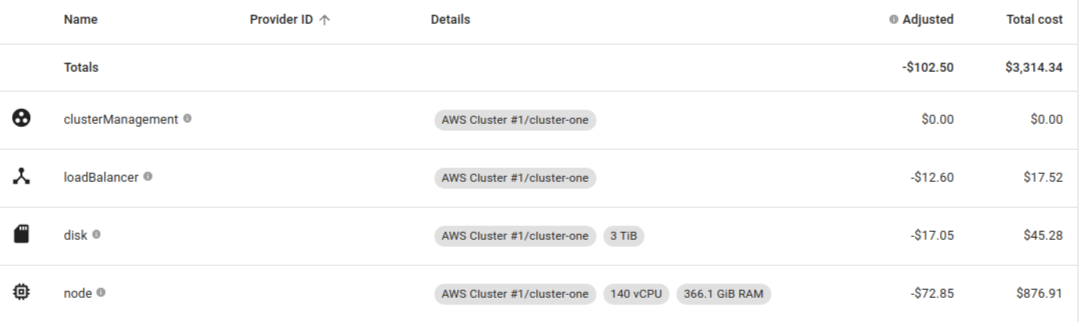
Charges based on Savings Plan, Reserved Instances
We are using AWS Savings Plan for Compute resources, so our cluster node’s actual rates were different than on-demand prices. With the default installation of Kubecost, you will see on-demand rates for the nodes because of which cluster costing will appear high. Kubecost has a very good feature of integrating with AWS Cost and Usage Reports which provides detailed costs for AWS resources and also covers details for price adjustments if you have purchased any savings plan or reserved instances. The integration process is not trivial and there are different ways to set it up based on how your AWS accounts are structured. If your billing account is the same as the account in which Kubecost is running then it is slightly easier to set this up. In our case, AWS accounts were structured using AWS Organization and Kubecost was running in one of the member accounts. As the billing account was a master account we created AWS CUR in the master account and further steps in the member account. The diagram below explains how that setup was achieved. More details on integration are available here.
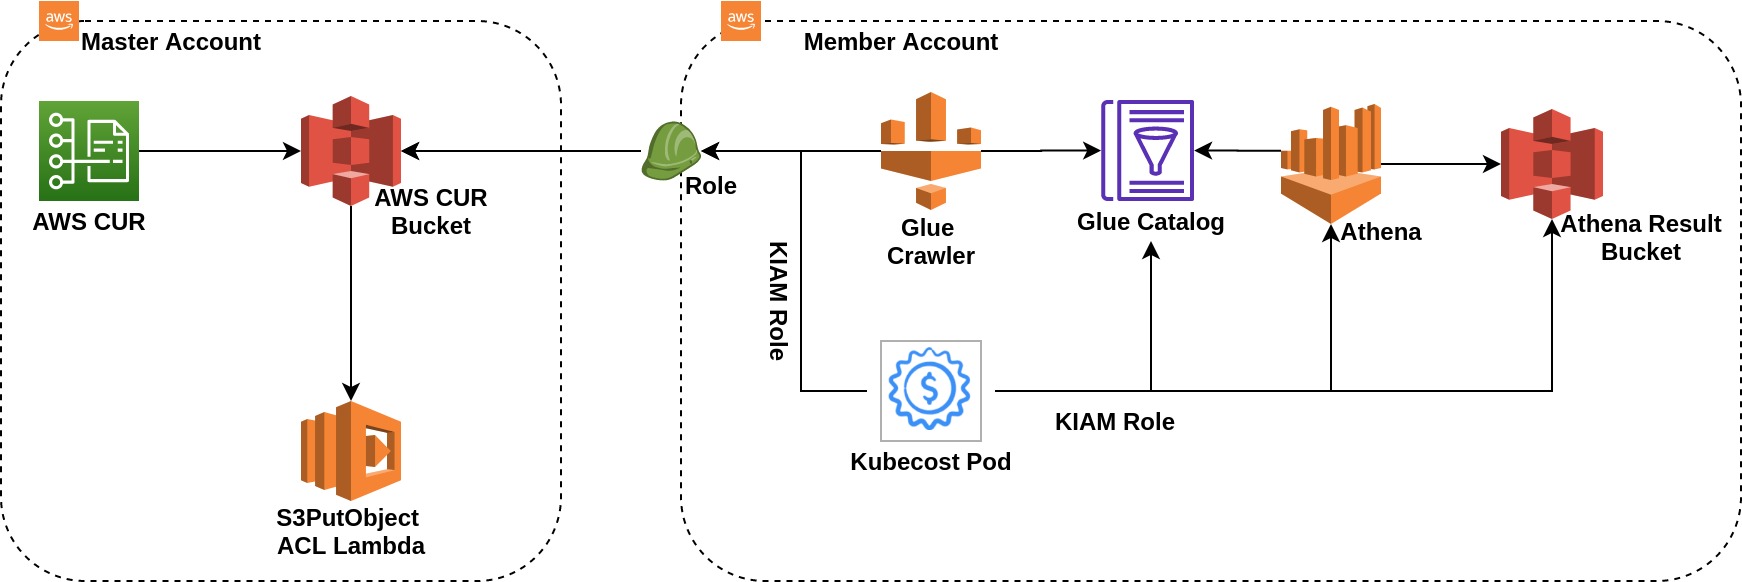
Out of cluster cost
It is an extension of Kubecost integration with cloud provider cost reports. From a setup point of view, this remains very much the same as the above diagram. The only addition is, you need to do some tag correlations. Many times we use a lot of cloud provider managed services with Kubernetes like RDS, MSK, etc. Out of cluster cost feature helps you to enhance your Kubernetes cost reports with these costing as well resulting in using Kubecost as a complete stack cost reporting solution. The way it correlates your tag is completely based on resource tagging. So for example you can use a namespace identifier and then tag your cloud resources accordingly. We didn’t use this feature as our cloud resources were shared by tenants.
What’s more
There are many other features in Kubecost that we are yet to use and I feel a single post cannot cover all. A few features worth looking into:
- Kubecost can send notifications on Slack and email. You can set a cost threshold for namespaces and get alerts when any namespace goes above the budget.
- If you are using spot instances, you can integrate spot feeds to get correct pricing details.
- Kubecost can be integrated with AWS and GCP. It also allows you to provide custom pricing in case you want to avoid integration with billing accounts.
Bonus
For added benefits, I’d highly recommend considering these 3 autoscaling projects for maximizing Kuberentes cost optimization.
Conclusion
Kubecost covered almost all our requirements but it comes with a slight operational overhead to set it up properly compared to many other paid solutions in the market. But I feel the value it provides is way more than efforts to configure it correctly. Kubecost support is also very prompt and the team is always up for help. If you are looking for any open source tool to get your Kubernetes cluster cost insights coupled with your cloud provider’s costing details then Kubecost is worth trying.
Hope this blog post was helpful to you. Do try it out and share your experience with us via Twitter or LinkedIn. Happy Coding :)
Looking for help with Kubernetes adoption or Day 2 operations? learn more about our capabilities and why startups & enterprises consider as one of the best Kubernetes consulting services companies.
Stay updated with latest in AI and Cloud Native tech
We hate 😖 spam as much as you do! You're in a safe company.
Only delivering solid AI & cloud native content.
Posts You Might Like